Features of a wooden ceiling
There are many options for arranging ceilings in wooden houses. However, only the use of wood remains beyond competition. Naturally, a ceiling made of solid wood will look elegant in a wooden house, but the imitation will also look respectable and expensive.
Wood is quite easy to process and has high-quality characteristics of sound and thermal insulation, and also adds coziness to any room. Very often, homeowners are guilty of the cost of a wooden ceiling, however, according to experts, it is not the finishing of the ceiling surface with this material that is expensive, but its treatment with reagents against fungus, moisture and other external factors.
Today there is a misconception that a wooden ceiling is only suitable for completely dry rooms, but thanks to the development of modern processing technologies and the correct installation of wood elements, it has become possible to use a wooden ceiling in the bathroom and kitchen.
When purchasing decorative panels or boards, you need to pay attention to what part of the wood was used to make them. If the board was sawn from the core, then it is more susceptible to cracking, but using the outer part of the tree will significantly increase the service life of the material.
Why is ceiling cladding so important?
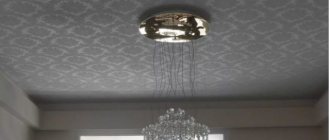
The design of the ceiling in the living room plays a much larger role in creating a favorable atmosphere than it seems at first glance. The cladding and base for lighting fixtures are just the tip of the iceberg.
- Firstly, when installing a ceiling in a hall, the design must correspond to the overall concept of the interior and complement it favorably.
- Secondly, with its help you can divide the room into separate zones, visually increase or, conversely, reduce the space.
Often, several functional areas are distinguished in the living room. The ceiling covering helps achieve a smooth transition between them.
Sheathing material for arranging the ceiling in a wooden house
Just as many years ago, pine ceilings are still very popular in wooden houses, although other types of wood have a right to exist. The arrangement of the ceiling in a wooden house can be made from various decorative elements, some types of which are given below:
- Plywood is a material made from several layers of wood that are superimposed on one another. It is easy to paint and process, and thanks to varnish and stain, you can emphasize the natural structure of the material.
- Decorative wooden slabs made from valuable species are presented in a wide range on the modern construction market. On sale you can find samples whose surface is completely impregnated with wax.
- Lining or edged boards are considered traditional finishing materials that have been tested over the years and do not cause difficulties during the installation process.
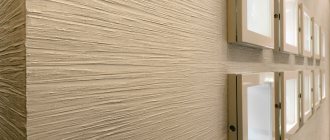
- Because of its elegant texture, wooden wallpaper has always been valued when finishing ceiling surfaces.
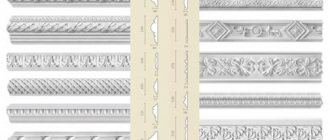
- The use of wood fillets when constructing a ceiling in a wooden house is also gaining increasing popularity.
- Another quite popular option for arranging a ceiling is considered to be imitation timber. This material is similar in appearance to wood paneling.
- False beams have also taken their rightful place among finishing materials for ceilings in wooden houses.
General information about sheathed ceilings
The technology for their installation is not the pinnacle of development by modern engineers. That is, these are not even tension structures, which are problematic to create with your own hands.
You don’t need any special tools or equipment or high professional knowledge. And you don’t even need skills in working with building materials - most of them are all cut with a knife or easily sawed, have a small specific gravity, are simply marked, and are attached through (or along the edges provided for this) with ordinary self-tapping screws, or with specially designed hardware.
There are many videos on the technology of installing different ceiling coverings on our website - after choosing the material, you can familiarize yourself with the procedure of work, “without leaving the checkout.” It will also tell you how the wiring and communications are laid inside - this is one of the common advantages of suspended or sheathed ceilings.
Another common advantage is that there is no need to thoroughly prepare the main surface for installation. There is a rough finish, the frame will hold up normally - all surface irregularities and defects will be hidden behind the cladding.
Features of arranging a wooden ceiling
Before directly installing a wooden false ceiling, you need to pay attention that after fixing all structural elements, the height of the room will decrease to 150 mm. Therefore, it is imperative to make sure that the construction of such a ceiling is suitable for the height of the wooden house. You also first need to take care of creating a detailed plan for laying electrical wiring and installation locations for lamps and other electrical appliances that are planned to be used in the room.
Beautiful options for wooden ceilings
Preliminary work on the arrangement of the ceiling
After preparing the necessary materials and tools, you can proceed to the step-by-step work of constructing a ceiling in a wooden house:
- At the first stage, a vapor barrier layer is created. For this, any available material is selected: polyethylene film, polymer membrane or foil insulation, which is spread between the ceiling beams with an overlap along the height of the ceiling beam. The insulating material is fixed using a construction stapler.
- After this, a material for insulation is selected, which is laid at the level of the beams. A waterproofing layer is installed on top of the thermal insulation, which is covered with slab panels across the ceiling beams. Thanks to such a shield, you can move around without fear in the future in case of roof repairs.
- Particular attention will need to be paid to insulating the ceiling around the chimney. For this purpose, a material that can withstand temperatures of at least 200°C is suitable. The layer of thermal insulation around the chimney in the area where it exits into the attic should be at least 250mm. It is also necessary to construct an asbestos gasket between the thermal insulation material and the beams.
Finishing ceilings in wooden houses
The technology for installing ceilings in a wooden house is similar to covering the surface with sheets of plasterboard, with one main difference that the finishing material is attached not to metal guides, but to a wooden sheathing. To properly build a ceiling in a wooden house with your own hands, you need to follow certain steps in the following sequence:
- To construct the sheathing, it is advisable to use slats 2 by 4 cm thick. A string is pulled level in the center and along the edges of the ceiling surface. The slats are secured under the tensioned rope so that it does not bend. The first plank is mounted close to the wall. The standard sheathing is installed perpendicular to the direction of fastening the boards.
- If you plan to cover it, for example, with clapboard, the planks are mounted at an angle of 45 degrees along the perimeter of the room. After constructing the frame from the slats, you can proceed to arranging the ceiling.
- In the under-ceiling space you need to lay electrical wiring, for which it is better to use high-quality copper wire with a good power reserve so that it does not heat up in the future. It is also necessary to mark locations for lighting fixtures.
- The wooden suspended ceiling system is fixed to the board. When using such decorative panels in finishing, it is necessary to leave gaps of 2-3 millimeters from the walls around the perimeter of the room. This is necessary so that the material does not deform when expanding or contracting during changes in the microclimate in the room.
- If lining will be used to finish the ceiling, then it is attached to the slats using self-tapping screws. To hide the head of the self-tapping screw, the latter is fixed into the groove of the lining.
- Also, to hide the fastening points, so as not to spoil the appearance with nail heads, you can place the facing material on an adhesive base. You can also use decorative analogs of nails instead of standard fasteners, which will not only secure the material well, but also give it originality.
- After installing the decorative elements of the facing material, they must be treated with varnish or paint. If the natural look of the cladding does not suit the homeowner, then you can use various stains and impregnations that will emphasize the wooden base of the material. At the same time, it will not take much time for the surface to dry.
- When choosing a wood varnish, you should not purchase a material with a glossy effect, since a shiny ceiling will tire the inhabitants of the home. After applying the starting layer, it is processed with the finest sandpaper, which will get rid of air bubbles and lint that sticks during the varnish application process. After the first layer has dried, another 2-3 layers of varnish are applied.
As you can see, in order to make a ceiling in a wooden house with your own hands, the homeowner must first decide on the material from which the finishing lining of the ceiling surface will be made. Perhaps preference will be given to lining or the choice will be made of wooden wallpaper or other environmentally friendly material. In any case, such ceilings will always have a respectable appearance.
The best types of cladding: what are they?
We are forced to disappoint those who are waiting for a universal “recipe” for a ceiling for any situation. When choosing material for cladding, many factors need to be taken into account. That’s why in one living room the suspended ceiling design looks great, but in another it “presses” and seems too heavy.
It is important to consider the functional tasks that you would like to solve using the ceiling surface. The large square area of the room forces you to pay special attention to the location of lighting fixtures. You also need to think about how best to hide communications.
Since every modern style has literally grown on the trends of minimalism, preparing the surface for arrangement requires thorough work. The ceiling should not have any flaws or irregularities, and in old multi-storey buildings this tendency occurs all the time.
Based on current trends for 2020, the list of the best ceiling options is as follows:
Tension fabric
In terms of hygienic and practical properties, the suspended ceiling in the living room is superior to all other options. Such a feature as plasticity allows you to create truly impeccable options. I would also like to note the wide variety of textures and colors. The surface can be not only matte and glossy, but also mirror-like and velvety.
Fabric-based options can be stretched to a decent level, but the choice of color shades is no longer so large. But the white ceiling covering can be painted with water-based paint. In the photos below you can see the most interesting design options for the living room using stretched fabrics.
Beams and wood panels
It is difficult to imagine contemporary and eco styles without the use of wooden ceiling coverings. This material itself is environmentally friendly and very attractive in appearance. You can make adjustments to absolutely any ceiling surface.
The presence of free space between the main plane and the coating will allow you to hide communications and wiring and serve as a sound and heat insulation layer. You can see the most interesting design options in the photo.
Plasterboard ceilings
A serious alternative to stretch fabrics. However, it can act as an additional option - you will get a combined type.
Plasterboard ceilings have proven themselves well when you need to hide a flaw or install additional lighting equipment. The texture features make it possible to cover gypsum boards with almost any material: plaster, wallpaper, painting.
Creating multi-level structures is one of the key advantages of drywall. Using it, it is easy to highlight one or another zone and install illumination lighting. When the surface is completely leveled and communications are hidden, you can proceed to cladding the plasterboard.
It could be:
- Coloring. Perhaps the most popular method.
- Wallpaper. This type of coating is not used so often, but can also be interesting.
Finishing the ceiling
The installation of the ceiling in a private house, when the attic is not planned to be used, is completed with finishing. Which option is best to use depends on the height of the premises. When finishing the ceiling in a country house with a ceiling height of 2.7 meters or more, you can do the lathing on a board made of boards, and if it is located above the beams, then directly on them.
If the ceilings are low, the boards are laid, as previously mentioned, on top of the floor beams, and the finished ceiling is placed between them from below. In this situation, you don’t have to do the sheathing, since different materials can be successfully attached to the tree and it won’t need to be placed horizontally. The beams perfectly make minor irregularities invisible (about
Ceiling installation when the attic is residential
It should not be forgotten that:
- to fasten each board you will need at least 2 nails;
- the fasteners are driven “into the spacer” so that the angle relative to the vertical of the edge of the board is 45 degrees. Due to the fact that the nail sews the boards together, it does not allow the seam to come apart when the wood dries.
Step two - insulating the floor
. For this:
- a vapor barrier layer is laid in the gap between the beams on the rough ceiling. To create it, glassine is used, but polyethylene, the most common film, is also suitable. It is necessary because the soundproofing material should not get into the cracks between the boards and not absorb moisture;
- To ensure sound insulation, 100 mm thick mineral wool is used. In practice, a mixture of sawdust and lime or dry sand is also often used as a material. The size of the soundproofing layer should be about ¾ of the height of the beam;
- In this case, waterproofing the ceiling in a private house is not required, but when using mineral wool, its layer will prevent small fibers of the insulating material from getting into the air.
Step three - creating the flooring
.
This stage involves:
- laying joists and flooring. It is advisable to use boards 30-40 millimeters thick. They also use OSB or plywood, laying it in one thick layer or two, but with the seams overlapping with a thinner sheet;
- then they reinforce the exit point to the attic with timber, the thickness of which should be similar to this parameter for the beams. In the case when the attic is temporarily not used, the exit to it is covered with a shield in order to reduce heat loss.
Ceiling installation when the attic is cold
When the building is one-story, and only the roof is on top, the installation of the ceiling in a private house is carried out as follows.
Step one - filing the ceiling
. For this you need a shield made of boards. The material for it is ordinary edged or tongue-and-groove boards with a thickness of 25 millimeters or more. They are fastened “in space” using long nails, leaving minimal gaps. The tongue and groove boards are hemmed with a groove from the wall from which the installation starts.
When deciding what to make a ceiling from in a private house, you can opt for lining it in another way - plywood or OSB, at least 15 millimeters thick (read: " "). But it should be taken into account that in terms of one “square” this option is much more expensive and the possibility of the structure sagging under its own weight and the weight of the insulation increases.
As an alternative, in private houses of old construction, the board panel can be placed not below the beams, but laid on top of them. Thus, the height of the rooms will not be reduced, and the living space will not be reduced. If necessary, you can make a crate. You should not worry about the appearance of the rough ceiling, since finishing the ceiling in a private house will cover the surface, and the beams, painted in the desired color, will decorate the interior of the room.
Step two - vapor barrier of the ceiling
. First of all, you should take care of the vapor barrier. On the one hand, this layer should prevent the heat-insulating material from becoming damp, and on the other hand, due to radiation, it should reduce heat loss. This can be achieved using aluminum foil. Also used as a vapor barrier is foil insulation based on foamed polyethylene - this relatively recent product creates an obstacle to heat loss due to both radiation and convection. When a chimney is laid in the ceiling, there must be a distance of at least 30 centimeters between the chimney and combustible material.
The most popular among them are: