Home / Agriculture
Back
Published: 04/16/2020
Reading time: 17 min
0
11
- 1 Selection of materials and tools
- 2 Types of wood paints
- 3 Restoration process: step-by-step instructions
- 4 How to make a choice
- 5 How to paint wooden furniture correctly?
- 6 How to reupholster a chair 6.1 Chair painting ideas
How to paint a chair
By changing the color of the chair and repainting it, you can completely change its style. Here we will turn an ordinary old wooden stool (and there is probably one in almost every home) into a stylish element of the apartment interior.
What paint to paint a wooden chair
Any wood paint from enamel to alkyd or acrylic.
- Acrylic paint - can wear off over time and leave streaks when cleaned with a damp cloth. BUT it is odorless.
- Enamel and alkyd paints have a strong odor, so it is better to paint in a ventilated area. But they are waterproof and won't wash off!
How to paint a chair: Large surfaces, such as seats - with a roller . But the legs of the stool with a small brush!
Step-by-step painting technology:
- Old wooden stool
- Sandpaper
- Paint (dark for the seat and white for the legs)
- Brush
Step 1: Sanding the chair
First you need to sand the wood with sandpaper to remove the old paint and level the surface.
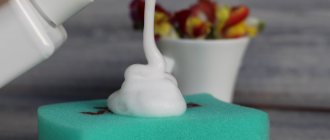
Step 2: How to properly paint a stool with paint and varnish
We will apply the paint in 2 stages.
- Let's start by painting the seat . After sanding, you can see the color of the wood from which the stool is made. If it is dark enough on its own, you can apply wood varnish, leaving the natural color. If the wood is light, apply dark wood paint, but such that the structure of the wood is visible.
- Leave to dry.
- After the paint on the seat has completely dried, you can begin painting the legs.
- Apply white paint with a brush and leave until completely dry.
- If the paint is too absorbed, then apply a second layer!
Here's what happened:
Step 3: A Few Additions
Since the paint is farmhouse style, you can also add an antique effect to the wood . To do this, you need to make small abrasions using sandpaper.
TIP: To keep your stool looking like this longer, apply a protective wood wax coating over the paint.
Types of paints for wood
Builders have a joke that wood can be painted with almost any paint. And, it’s true, but a small list of funds is not suitable for this. Therefore, paint for wooden furniture is divided according to the type of coating and its properties.
Varnishes, impregnations, stains
These are substances that are either colorless or with coloring pigments. They allow:
- emphasize the structure of the wood without painting it;
- the product “breathes”, absorbing/releasing moisture into the room;
- protect the product from negative environmental influences such as burnout
You need to varnish either new furniture or furniture that has been well preserved. Such products fit perfectly into a classic interior or eco-style. It is also important that in the future, for a new change, you will not need to remove the varnish; it can be updated from above.
Dispersion paints
Painting wooden furniture with water-soluble compounds is now very popular. The water in them is a solvent, and the binder is a polymer resin. Such popularity is not surprising, because most often it is odorless paint, which makes it indispensable for children's furniture.
It is also important that it dries quickly, is waterproof and vapor-tight. When working with it, you should not be afraid of the release of harmful substances. A wide selection of colors will allow you to choose your unique color. The coating can be either matte or glossy.
It is a pleasure to paint a product with her. This group also includes acrylic paints, which are characterized by increased durability and all the other advantages of water-based paints.
Organic solvent-based enamel and paint
This paint for wood furniture is less popular now, but literally 5-10 years ago it had no equal. And the reason for its unpopularity is toxicity, fire hazard, unpleasant odor and long drying time. Its undoubted advantage is its low price, especially in comparison with acrylic paints.
After drying, a layer is formed on it that protects the product from high humidity. Because of this, it is often used for rooms and furniture that may frequently come into contact with water.
Important! The protective barrier against water does not allow the product to “breathe”. To use such paint, the wood must be completely dry, otherwise peeling and paint shedding cannot be avoided.
Updating kitchen chairs
Here we will update a set of four kitchen chairs by painting the legs and backs white and the seat dark brown.
The scheme of work is similar to that described in the master class on updating a wooden stool.
- First you need to remove the old paint using sandpaper,
- then alternately paint the seat dark and the rest of the chair white,
- and at the very end apply a protective coating.
The difference is that here this process will take longer due to the larger number of elements to be painted.
Follow these step-by-step instructions for upgrading your farmhouse style stool and you'll end up with this awesome chair:
Don't be afraid to experiment with paint colors and upholstery fabrics, or adding a vintage effect. Make the chairs suitable exactly for your taste and interior!
Chair Painting Ideas
Painting your chairs a different color is the most versatile way to make them look modern and stylish. Below in the photo we have given several ideas for decorating chairs.
Decor for a large company
If you are setting a table for a large company for the New Year, you can attach a Santa Claus hat to each chair on a clothespin - when sitting down at the table, guests put them on and become part of the holiday. And if there is a gift in store for each guest, then you can put it in a New Year’s sock, and in turn attach the sock to the back - what a homemade decoration! You can do the same with sweets and tie, for example, a sweet New Year's stick to the back. Guests will love it if paper ribbons or cookies with their names hang on the back along with the decor. You can see inspiring photos and decor of chairs for a large company below.
For originals.
New Year is another way to stand out. Among the original design options, we like the decor with fluffy wings, elements of winter clothing with appropriate paraphernalia (children's mittens with a spruce branch inside look very cute), as well as special covers for chair legs in the form of elf legs, little helpers of the overseas Santa Claus. If you have the right talents, you can sew them yourself. Some even hang winter skates on the back of their chair! Another technique that we have long come to love is cones. It’s easy to find them either in markets, or in the countryside or in the forest, so why not decorate the back of the seats? This is where you'll need ribbons again, and don't forget your sense of style!
Thanks to many years of traditions in our country, we usually celebrate the New Year at the table with our loved ones. First, saying goodbye to the old year, and only then welcoming the new year, in total we spend a lot of time at the table, and therefore serving, decorating the table and chairs with the help of scrap materials and homemade decor easily create a festive mood for us. We hope that our tips for decorating chairs will be useful to you and that all the wishes that you make while sitting on them will definitely come true!
After some time, any furniture loses its original appearance. Almost all types of furniture tend to wear out quickly. Wardrobes, tables, chests of drawers, etc. wear out less often.
However, the fastest-wearing type of furniture is undoubtedly chairs, since we use them much more than other furniture. The body of the chair itself does not wear out as quickly, and not as significantly, as does the upholstery of the seat and back.
So, many will certainly decide to get rid of old and shabby furniture, but this is absolutely not worth doing since you can restore any old thing yourself.
In order to make high-quality decor for a wooden chair, you need to have the necessary material and tools, as well as certain skills in furniture repair, and have a lot of imagination.
Reupholster an old chair
A quick way to update a chair is, of course, to reupholster the stool and give one of the sweaters a new use . The only cost will be the purchase of paint.
- Chair
- Paint (wood enamel or regular acrylic)
- Brush
- Construction stapler
- Sweater
- Construction adhesive
Step 1: Making a new skin
- You need to unfasten the seat from the wooden structure of the chair, and then cover it with a knitted sweater and secure it around the perimeter with a construction stapler.
- Of course, you can also use fabric for covering, but here we are considering the simplest and cheapest option from scrap materials.
TIP: Of course, you don’t need to take the whole sweater; cut off such a part for covering so that it is enough to wrap the seat and secure it.
Step 2: Paint the wooden part of the chair
In this case, we paint it white with special paint for wood. Before this, the wood can be sanded with sandpaper to remove the old paint and ensure better adherence of the new one. Leave until completely dry.
All that remains is to connect the two parts of the chair. This can be done using construction adhesive or thin nails driven in from the back.
Chair seat reupholstery ideas
When restoring a chair seat, it is not necessary to use fabric; other cheap materials at hand can be used: old belts or cloth tape.
Master class as in the PHOTO: How to make a fur cover for a standard IKEA stool - follow the link!
Decorating with jute rope
Decor made from natural jute will create an atmosphere of comfort and warmth in the apartment. In addition, it can become a beautiful accent to highlight the style of the interior. To decorate chairs with jute you need to prepare:
You need to wrap the stool with jute as tightly as possible, gluing the rope where it cannot be secured.
- a piece of fabric of a suitable color;
- rope made of jute or sisal with a thickness of at least 3.5 mm;
- stapler;
- glue;
- ruler and pencil;
- scissors;
- hammer;
- wallpaper studs.
First, you need to remove the old upholstery from the seat. Then the entire structure is wrapped with rope. The working technique is as follows: the edge of the rope is secured to the inside of the leg, back or other part of the structure using a bracket or nail. After this, the entire structure is tightly wrapped with rope. The other end of the rope is fixed in the same way.
Related article: How to glue ceiling plinth and plastic corner to wallpaper
In those places where the rope cannot be secured or nailed, it must be glued to the base using wood glue, hiding the ends. To make the decoration look more harmonious, you can remove the middle from the back of the chair, leaving only the base of the structure, and weave it with a rope, covering the central empty part of the back. Weaving should be done in the form of a mesh with large or small cells.
Instead of the old upholstery, the seat is covered with new fabric. To do this, a piece is cut out of the material, the dimensions of which are 5 cm larger on each side of the seat. The edges of the fabric are tucked under the seat and secured with a construction stapler. You can drive decorative wallpaper nails along the outer side of the seat to secure the fabric drapery.
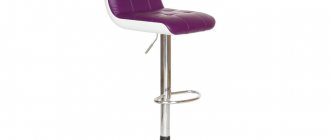
Decorate an office chair
A standard black office chair can be given a fun and colorful look. After such a change, your workplace will definitely become more comfortable and inspiring new productive ideas.
- Office metal chair with soft seat
- Spray paint
- Construction stapler
- Upholstery fabric
- Screwdriver
- Scissors
Step 1: Attach the sheathing
In order to make a new upholstery, you must first remove the soft part of the seat from the chair. Here you should proceed based on the method of attaching the seat to a particular chair: it can be glued or attached with screws. Remove carefully so as not to damage anything.
After this, stretch the fabric so that it fits tightly around the seat. The fabric should extend a few centimeters from the back of the seat; the excess should be cut off. We will secure the trim with a construction stapler on the back side of the seat.
Step 2: Paint the chair
Place the chair on an unnecessary sheet or old newspapers so as not to stain the floor when painting; if possible, take it outside. Choose special paint for metal. After painting, leave the chair to dry completely.
Step 3: Attach the seat to the chair
Return the seat to its original position based on how it was attached. That is, you will need either a screwdriver or glue.
Now compare the end result with what was originally. Looks like a completely different chair:
Over time, wooden chairs have ceased to be a common element of the interior. Nowadays they are often used as decoration, a design highlight. These pieces of furniture create a special atmosphere in the room, attract attention, and indicate the owner’s sense of taste and style. However, what if they don’t look presentable at all? Even if old wooden chairs have lost their original appearance, they do not need to be thrown away. You can breathe a second life into them. What will it take? Read how to paint a chair yourself and take advice from professionals.
We tie bows
One of the most common methods for decoration, which is used not only for the New Year, but also for other holidays, is bows tied to the back of a chair. Tied bows create a light decor with a touch of solemnity. The fabric can be almost any, the main thing is that it holds its shape well. Satin and organza in several layers look very elegant; and if your holiday atmosphere is more relaxed, then linen or thick cotton will do. A bow is convenient and appropriate to tie on a chair of any height and style. A large bow will look good on chairs with a high back, but on small chairs with an open back it is better to tie a smaller bow. A small bow can be created by tying a small rectangular piece of thick fabric with twine in the center and pinning it to a wider strip of fabric that is attached to the back of a chair. This composition will look very neat. By the way, there are a lot of ways to tie a bow that are easy to repeat with your own hands. Admire the options we offer in the photo.
Tip: To prevent the bows from slipping, secure the fabric to the chair with double-sided tape.
What tools and materials to choose
Furniture restoration is an undertaking that requires patience and adherence to technology.
- Choice of paint. How to paint wooden chairs after preliminary preparation? The choice is extensive. All wood paints are suitable. Aerosol paints are great for metal furniture elements. With them it is easy to achieve a perfectly smooth, even surface without streaks. Aerosol paints in spray cans are very popular among novice decorators. An acrylic composition is often used for application to wood. After painting, the surface of the chair dries quickly, leaving no odor in the room. The disadvantage of this material is the fragility of the coating. Alkyd paints and enamels are more resistant. One drawback is that during the process of restoring old furniture with these finishing materials and drying it, you need to ventilate the room. Water-based paints and varnishes are not suitable for finishing furniture, as they quickly wear out and are washed off during wet cleaning.
- Color selection. What paint to paint a wooden chair? There are many ideas for home, office or other establishments. First of all, designers advise sticking to the existing style in the interior, since the updated furniture should be harmoniously combined with it, be a decoration, a stylish “find”. Retro chairs painted white look noble and luxurious. Lightness and cheerfulness How to paint a chair to preserve the wood texture you like? You can choose transparent paint. They also use a varnish that matches the color, which “preserves” the condition of the piece of furniture and prevents abrasion of the decorative coating.
- Tools and materials. Painting of chairs begins after preliminary preparation, during which the following will be useful: - putty and a spatula (you need to repair cracks, chips, deep damage); - sandpaper to remove the old paint layer; — wood primer (for good adhesion); — detergent, lint-free cloth; - hammer, screwdriver, nails, screws; — scotch tape (construction tape); - rags, newspapers, etc.
Restoration process: step-by-step instructions
Stages of work. To update old chairs and stools, you need to follow these steps: - wash the furniture, dry it, degrease it with a solvent (for example, White Spirit); — carefully disassemble the item (if possible) into parts using a screwdriver or screwdriver; — remove the previous paintwork by scraping; - clean the wooden surface, fill the recesses, cracks, and prime; - wipe with a cloth after drying, you can cover it with stain; — paint (varnish) the elements; - sand after drying; - if necessary, re-coat the paint; - wait for it to dry completely, assemble the furniture. Before staining, you need to check the condition of the stool. If it has been idle for a long time or has been heavily used, it may need repairs. For example, tighten screws, glue elements, replace fasteners.
- Preparation. Preparatory work consists of cleaning the area of the upcoming finishing from dust, dirt, as well as providing access to the smallest details of the restored piece of furniture. In order to paint chairs efficiently at home, the scraping (scraping) method is used to remove the worn-out coating. Only a metal tool is suitable for this. You can make it yourself, for example, from a hacksaw blade or a circular saw blade. When scraping, it is important to ensure that no old varnish remains on the wood. To make it easier to remove the layer, you can use paint removers and solvents (acetone). It is best to work while wearing safety glasses and a respirator.
Important ! Make sure that the solvent (removal) does not get on other parts. These chemically active materials contain substances that have a detrimental effect on plastic.
After scraping off the old layer, some unevenness and roughness will still remain on the chair. They need to be removed using regular fine- and medium-grit sandpaper. This is a difficult task, but it can be simplified. An oscillating sander is useful for this. You cannot immediately paint a stool or chair if it shows deep scratches or dents. They need to be sealed with a putty of a suitable color. Then the treated areas should be cleaned with fine-grained sandpaper. The use of gloves, masks and goggles is recommended.
Attention! If the cracks are too large, there is no need to putty them. The furniture needs to be repaired. Otherwise, the putty will fall out of the crevice during use, and again you will have to think about how to paint the wooden chair.
After this, it is recommended to walk with a damp cloth over the surfaces that will be painted. During the preparatory work, dust may have accumulated on them. Next, the treated area should be primed in 2 layers for better adhesion to the paintwork. Experienced restorers advise applying a strengthening wax balm to the primer mixture at this stage of work. If the restoration object is subsequently varnished, it must be covered with stain (tinted). To highlight the structure of the wood, it is good to use wenge or mocha colors. You need to apply the selected composition with a brush or sponge, carefully distributing it over the surface. After drying, you can already think about how to paint the old chairs.
- Coloring. The process of applying paint and varnish is also carried out after the preparatory work. To do this you need: - choose a suitable place for painting; - lay unnecessary fabric or old newspapers on the floor; - curtain nearby furniture and walls with film; - cover decorative elements on the chair (if any) with masking tape. Then you need to: - stir the paint, prepare a brush (roller); — apply a thin layer of paint and varnish material to everything, including hard-to-reach surfaces; - leave the chair until completely dry; — sand the first layer using fine-grained sandpaper, wipe the parts with a damp cloth; - paint the chair white or another color, let it dry completely; — to give a glossy shine, you can apply a double layer of colorless varnish. This measure will extend the service life of the product. After this, the room is cleaned and the updated piece of furniture is installed (if it was disassembled).
DIY designer furniture: beautiful and inexpensive
Do you have furniture at home that is already out of fashion or has lost its attractive appearance? Don't rush to throw it away. It is quite possible that it will become a designer accessory that will decorate the room. Use our tips, and painting chairs at home in your own house or apartment will not be difficult at all.
Adding an article to a new collection
Metal furniture that is used outdoors quickly loses its attractive appearance. The paint is peeling off and traces of rust are appearing. However, even old fittings can be restored to their former glory.
The era of metal in the interior began in the 50-60s. last century and continues to this day. Unfortunately, over time, old furniture does not become more attractive and requires restoration. Is it possible to quickly restore garden furniture that has lost its luster to its former attractiveness? Quite, say landscape designers and want to share their advice with you.
How to paint wooden furniture correctly?
Do you have furniture at home that is already out of fashion or has lost its attractive appearance? Don't rush to throw it away. It is quite possible that it will become a designer accessory that will decorate the room. Use our tips, and painting chairs at home in your own house or apartment will not be difficult at all.
Don't want to spend money on new chairs? Then you can simply redecorate and remake the old stools. Breathe new life into your family and favorite things with the help of restoration!
We invite you to familiarize yourself with 5 master classes on how to update old wooden chairs with your own hands. We will show you how to paint chairs, update the seats and upholstery of chairs, and make a simple cover. How to beautifully decorate a kitchen and office chair yourself
We decided what paint would be best to paint the furniture; all that was left was to do everything correctly. The process begins with preparation, which is rightfully considered the most important stage in repainting furniture. How evenly the paint and varnish will apply will depend on how correctly and competently it is performed.
The step-by-step preparation technology is as follows:
- All removable fittings from handles to overhead decorative elements are removed.
- The old coating is carefully removed. To do this, you can use a special solvent, mechanical impact with grinding materials or a hair dryer.
- The entire surface is sanded. First with medium-grit sandpaper, then with fine-grain sandpaper.
- Wood putty removes all imperfections and imperfections.
- Next, the surface is thoroughly cleaned of dust and debris. It is important not only to wipe the product with a damp cloth, but also to wipe it dry.
- Then you should coat the surface with a primer. It will not only reduce the consumption of the main substance, but will also serve as an antiseptic. If you plan to get an aging effect at the end, then do not use a primer, as it will prevent special substances from achieving such a result.
The painting process itself usually does not cause any particular difficulties, even for beginners. However, following the rules below will make it much easier:
- The distribution of paint over the surface should be carried out strictly along the grain of the wood.
- Subsequent layers are applied only after the previous one has completely dried.
- The third layer is often unnecessary. A high-quality result is obtained by painting in two layers.
- Carry out painting in a dry and well-ventilated area.
- Products should not dry in direct sunlight. This process should be natural.
- The brush must be of high quality and special; for example, special brushes are produced for varnishes that do not leave streaks. Only smooth and large surfaces can be painted with a roller.
We invite you to read The Trust of Lambs
Thus, repainting a table or cabinet yourself is a completely doable task. The main thing is not to rush, rushing can ruin everything. It’s better to spend a little more time, but get an excellent result and real satisfaction from the work done.
Paint for wooden stairs in the house
Renovation of metal furniture
Rough metal products are reappearing in our suburban areas. Everything is used - old coat hooks, chandeliers, chairs hastily welded from metal pipes, etc. As a rule, such things are installed without preliminary processing. All they usually do is hastily rinse used utensils with soap and water.
However, old metal furniture first of all needs high-quality polishing. Typically, a metal brush attachment and a drill are used for this. It takes a long time to polish the furniture until it is completely clean. After this, it is coated with an anti-corrosion primer and several layers of paint. The result is a completely new product that can become a worthy decoration of the garden interior.
If rust is widespread, a simple electric drill is not enough - you will need a sandblaster. You can rent it or go to your nearest auto repair shop. After sandblasting, you can paint a chair or table as you wish. The step-by-step instructions for upgrading a metal chair will look like this.
Step 1: Scrape off surface rust with a wire brush
Use a wire sponge or brush to remove large pieces of rust. Wash the chair thoroughly and remove any loose parts from the surface.
Step 2: Use sand and sandpaper
As a replacement for a sandblasting device, you can use sand and sandpaper such as P80 and P100 (the higher the index, the finer the grain). Fine-grit sandpaper helps with the finer work of removing fine rust.
Step 3: Fill the sand by hand
To reach hard-to-reach places such as rounded legs and chair arms, sand must be poured in there by hand and these areas must be thoroughly cleaned. When most of the rust is gone, sandpaper with an index of 150 or higher should be used. Continue sanding until you feel the chair is completely smooth to the touch. Traces of rust may remain for some time.
Step 4: Apply Acetone
Once the surface is smooth and even, wipe it with any solvent, such as acetone, to prepare the chair for subsequent priming and painting.
Step 5: Prime the chair
Use high quality anti-rust spray to protect your furniture. For light objects, prepare a white primer, and for dark ones, use a duller one. Apply the primer in a smooth motion so that it does not spread or go on too thick. Cover the back and bottom of the chair since it will be outdoors and exposed to the elements for a long time. Ideally, you need to apply two or three light coats of primer so that the surface has time to dry before applying each new one. After the coating has completely dried, wipe off any dust and remaining primer using a rag.
Step 6: Apply Spray Paint
To give your chair a bright and attractive color, use a high-quality outdoor rust-preventing spray paint. Move the spray can from top to bottom at a distance of 5-10 cm from the surface to prevent overuse of paint and application of too thick a layer. Apply the paint evenly in two or three layers and let it dry.
Current decor of wedding chairs: fashion trends
Fashion for wedding attributes is more loyal than for clothes or hairstyles. Here, a lot depends on the general idea of the holiday: do you want to spend it in the atmosphere of a classic ceremony or a youth party, a traditional wedding or a playful stylized wedding. Each option will have its own design style.
We will look at general trends that can become the basis for creativity in each individual case.
Cases
An easy way to set the color scheme of a room. Fabric covers will not only hide the unsightly appearance of furniture or its banal appearance, but will also brighten up the room. You can rent them or make them yourself.
The style of the cover depends on the idea being implemented; it can be a strict monochromatic product without unnecessary details, or decorated with embroidery, ribbons, braid, pom-poms, etc., as in the photo.
A universal option is a light, plain cover, decorated with a bright ribbon tied in a bow at the back of the back.
Bows
They are used together with covers and as a separate unit. The shape, color and size of the bows depend solely on your imagination. To ensure that the product is in harmony with the overall design, you can use the same color for the bows on the chairs for guests and the tablecloth on the podium.
Fresh flowers and garlands
Plants refresh the atmosphere, make it more romantic, and the lights of the garlands add a touch of magic.
When decorating chairs in this way, you should remember that guests should not experience discomfort from the decorations on the chairs. Branches of climbing plants can be passed through the elements of the back, and roses and other stem species can be attached using ribbons or plastic clamps.
In order for living plants to remain fresh for a long time, they must be placed in a special container with a damp sponge before installation. It is better to choose plants that are not too delicate - roses with dense buds, gerberas, and asters are ideal.
For decoration, take one flower or bouquet.
Ribbons
Using ribbons, you can turn a row of ordinary dull chairs into a holiday attribute in a matter of seconds. Lace, satin, denim - any fabric that fits into the holiday concept will do.
The length, width, color and method of tying the ribbons are selected empirically.
pads
This type of decor is less common than the previous ones, although the cushions on the chairs look stylish and neat. For the convenience of the sitter, they should be fixed to the chair, for example, with tapes; they can cover the back, the seating area, or both areas of the chair.
Signs, letters
A great way to designate seats for guests and add some flair to the furniture - nameplates or initials on chairs; they will prevent invited guests from losing their place.
You can decorate them with the inscriptions “guest”, “mom”, “dad”, or hang signs with the silhouettes of women and men, alternating them with each other. This option is appropriate if there is no strict seating arrangement for guests.
Signs can be made of paper, plastic, wood, metal.
Handmade wreaths of herbs and flowers
A great way to decorate for a spring or summer wedding. Fits well into the “country” style and is suitable for a “berry” or “forest” celebration.
In addition to its aesthetic appearance, this decor also has a delicate aroma. In autumn, wreaths can be woven from yellow maple leaves, physalis flowers, and wheat spikelets.
Paper decorations
Paper makes amazing decorations: pompoms, lanterns, garlands, origami, flowers, butterflies, fans.
You can create unique compositions for a wedding celebration with your own hands from budget material. A simple and effective paper flower is made in just a few minutes. To do this, you will need round openwork napkins (sold in stores as disposable coasters for cups) and glue.
Take 2-3 napkins, fold them in such a way as if you want to cut out a snowflake, unfold them and fasten them with the centers, placing one on top of the other, using glue. Spread the paper beautifully and you will have a bud on your palm.
Now they can be strung on a fishing line and assembled into a garland or attached to fabric with pins.
Air balloons
Not the best way to decorate chairs. Delicate balls often burst from careless movements and can frighten someone present, especially children.
Therefore, it is better to leave them for decorating the table, podium, or ceiling.
As a last resort, you can lightly fill the balloons with gas and tie them to long ribbons.
This way there will be less chance of accidentally bursting it and creating an awkward situation.
Embroidery
For a wedding in a national style, it is important to use covers decorated with embroidery.
True, this option will not be cheap if we talk about real hand embroidery.
As a more affordable analogue, covers with a print in the form of a cross pattern are suitable.
Beads
Decorating chairs for a wedding with beads is appropriate for both a classic celebration and a themed one, in the style of “retro,” “vintage,” or “Gothic.”
Threads with beads strung are woven around the backs of chairs, and the ends of the rope are secured with tape or simply tied. To prevent the decoration from tearing, it is better to use fishing line, thin wire or ribbon rather than thread, if the holes for stringing are wide enough.
Pine cones, shells and other wedding style elements
Interesting decor can be made from cones. They are first torn with spray paint, bleached, and sprinkled with glitter.
Although it is possible to leave them in their original appearance. Needles, acorns, vines and other gifts of the forest in skillful hands become a real work of art.
Chair decorations should not have sharp edges or corners or cling to clothes, otherwise there is a risk that one of the guests will get hurt or tear the festive outfit, and the mood will be ruined.
For a sea-themed wedding, you can take decorations made of shells, pearls, pebbles, figurines of starfish and skates.