You can purchase such a product either ready-made in a store or make it yourself.
Sand painting has many benefits. In addition to developing fine motor skills, people get a lot of positive emotions from such an activity.
Materials
Before you start building a sand painting light table, you need to make a preliminary drawing. This drawing indicates the dimensions of the future product. The materials and necessary tools are selected.
Particular attention should be paid to the choice of manufacturing materials. For the countertop, you need to choose milky (white) acrylic , 5 mm thick. The light will be evenly scattered on it. The advantages of acrylic include:
- resistance to mechanical damage;
- safety in operation;
- durability.
Help : this material does not crack or break even under significant loads. Therefore, you don’t have to worry about your child getting hurt.
Kinds
Illuminated tables can be of very different types and purposes.
- Dressing tables with lighting around the mirror.
The light bulbs are located around the mirror frame. Lamps must be white only. Multi-colored lamps are not permitted. - With lighting, but without a mirror.
Lighting is a design element and does not have any technical role. As a rule, it is presented in the form of an LED strip. In different versions, the tape can be located in different places. It gives a contrasting, perhaps even “futuristic” shade, and suits many interiors.
Structurally, tables are:
- A table with no internal storage.
Not highly recommended, but if there is no need, you can consider this option. There are, of course, tables in the form of a triangle, a circle and other shapes. - Table with cabinet.
This modification allows you to store cosmetics and many different care tools. The number of cabinets does not vary much: one or two. Has a hanging compartment and a stand with drawers. The pull-out drawer is definitely handy when working with makeup or hair. According to people's experience, it is found to be very convenient for storing cosmetics, body care products and other such products.
- Table with drawers.
Almost the most popular table model. Looks good, takes up little space. Subtypes: hanging, side and corner tables. Do not forget that there are very original solutions that are not available in all stores.
Dimensions
There are no specific standards for what size a children's sand painting table should be. Here it is worth starting from personal wishes and the characteristics of the room . If the size of the children's room allows, you can make a fairly spacious and large table. It can be installed in the corner of the playing area. If the room is small, then it is worth saving free space and making a mini table for sand painting.
In any case, the child will be interested in creating his favorite cartoon characters, dogs, cats, both on a large table and on a small one.
Tools
Tools for making a table you will need :
jigsaw;- drill;
- screwdriver;
- self-tapping screws;
- ruler;
- assembly knife and new blades for it;
- building level.
From the materials you need to prepare:
- a plywood box with high sides (you can buy it in a store or make it yourself);
- acrylic glass;
- whatman;
- Double-sided tape;
- special glue;
- 4 bars for legs;
- lamp or LED lamp.
Help : with a competent approach to making a drawing table, it will take you several days. You can assemble the product in a day, but for it to completely dry and stick together properly, you will need to wait a couple more days.
Tabletop assembly procedure
First, a frame (sidewall) of the future structure is assembled from 4 boards using self-tapping screws, then this frame is glued on top of the mirror, on its front side. In this case, the size of the frame must correspond to the dimensions of the mirror.
At the next stage, you assemble the frame with LEDs yourself. The outer diameter of the frame can be equal to or greater than the outer diameter of the frame, but the inner diameter should be 1-2 cm less than the inner diameter of the frame on each side. When the frame is ready, an LED strip is attached to its bottom side along the inner edge. The frame is then attached to the sides with screws. Holes are drilled in the frame through which the wires are routed out.
When all this work is completed, all that remains is to attach the translucent mirror to the frame. It is screwed with special screws. It is advisable to choose screws that can be removed without much difficulty (in case the LEDs need to be replaced). Craftsmen recommend attaching small strips to the edges of the frame, which in height form a single plane with the glass. At the final stage of work, it will be possible to attach an upper frame to these planks, ensuring reliable fixation of the tabletop.
Not every craftsman can equip a table with such a mirror, because this material is quite rare. Many furniture makers use plexiglass and self-adhesive mirror film, which is applied to the bottom surface of the glass (the one that will be facing the mirror).
Mirror-coated glass is also popular, but it needs to be chosen correctly. You can determine whether mirror-coated glass is suitable for making a coffee table with an infinity effect in the following way: you should place a piece of mirror and a piece of glass in parallel, and place any light source between them and visually evaluate the effect.
Another affordable option, which is often preferred by novice craftsmen, is the use of ordinary window glass. But in this case it will not be possible to achieve a sufficient depth of the endless tunnel. In addition, the observer will be able to see everything inside the table.
One of the most important characteristics that you need to pay attention to when assembling a mirror table is the depth of the tunnel. It is determined by two factors:
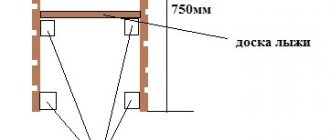
- the distance between the mirrors (the actual distance should be multiplied by 16 to get the approximate apparent depth of the tunnel; in most cases, the actual distance from the bottom mirror to the top is 75-80 mm);
- throughput of translucent material.
To ensure long-term operation of the backlight and save energy, it is recommended to use a power supply with a 50% power reserve.
There is an easier way to make your own table with an infinity effect. In this case, instead of an LED strip, a regular New Year's garland is used. First, a square or rectangular frame is made from bars, then the number of light bulbs on the garland is counted.
After this, marks are placed on the frame in the places where the light bulbs will be located. It is recommended to place them at a distance of about 2 cm from each other. At the next stage of work, holes for light bulbs are drilled in the frame of the future table.
Then light bulbs are inserted into these holes and secured there. Then you need to glue the frame onto the mirror with your own hands, and glue glass with a mirror film on top of the frame.
When the backlit tabletop is ready, all that remains is to make the base and legs of the table. The legs should be thick enough (about 10 cm in diameter) so that a hole can be drilled inside one of them for the wires. Exiting the wires through the leg is a solution that allows you to make the product as aesthetically pleasing as possible. You can route the wires directly from the tabletop, but this will make the table less beautiful and convenient to use.
When the legs are made, you need to form a through hole in one of them with a diameter of about 5 cm. In the upper part of the leg, you should make two grooves through which the wires will pass, and also cut out a corner hole necessary for fixing the tabletop.
The height of the hole should be equal to the height of the table top. The depth of the hole must be calculated individually in each case; it must ensure reliable fixation of the tabletop. Similar corner holes are made on all four legs.
In addition to the legs, you need to prepare the base in which the tabletop will be placed. The width of the base should be such that the base protrudes 8-10 cm on each side of the tabletop placed inside it. Free space around the tabletop is needed to accommodate wires and related equipment.
A hole is formed in each corner of the tabletop into which a leg is inserted. Then an outer frame is attached to the base using self-tapping screws, the height of which is equal to the height of the tabletop. Then the legs are screwed on, and the tabletop is placed into the finished structure. The spaces between the table top and the outer frame house wires that are routed out through the table leg.
When the assembly of the base and tabletop is completed, all that remains is to close the space with the wires and additionally fix the tabletop inside the base. A special frame is made for this.
The width of each side of the frame is calculated as follows: the width of the trench with wires + the thickness of the outer frame + a few centimeters to ensure the frame fixes the tabletop. This frame is assembled from four blanks and fastened with self-tapping screws. It is then bolted to the outer frame as well as to the LED tabletop frame.
The holes for the bolts must be drilled in advance to avoid delamination of the wood. The design is ready!
There are many creative ideas used by furniture makers when making their own masterpieces. A bright, original and memorable product that will perfectly decorate a modern interior and create a unique atmosphere is a coffee table with an infinity effect. Making it is not very easy, but it is quite possible if you have some skills in working with wood and glass.
You can place a table with lighting both in an office space or in a country house, as well as at home. LED lamps used in the assembly of such furniture are absolutely safe for human health, as well as for the environment. Such lamps are durable and economical, so using a table with an infinity effect will not lead to increased energy consumption.
The illusion of an endless tunnel is created by using two mirror surfaces and LEDs located between them. The colors of the lamps used can be any, but experts say that red diodes can make the tunnel deeper, since red color is less prone to scattering than other colors.
To control the backlight, you can use the on/off button or a special remote control.
How to do it?
Before we start making the table, we carefully check the drawing again, measure the length and width of the drawer, and check the dimensions of the acrylic.
Box
The workflow itself consists of the following stages:
The manufacture of the table begins with the assembly of a plywood box . If possible, it is better to purchase it ready-made at a hardware store. The box should have high sides. The depth of the finished product should be about 7 cm.- Using a jigsaw, cut a hole in the bottom through which the light will pass. It is recommended to make preliminary markings by attaching a sheet of acrylic. It should be taken into account that a 3-5 cm frame is left around the perimeter of the product for gluing the glass.
- Cut out a piece of whatman paper to the required size. Its dimensions must correspond to the dimensions of the glass.
- Glue whatman paper to the glass using double-sided tape. Whatman paper is used to ensure that the light is evenly scattered over the surface and so that the backlight is not visible.
- We put the glass in the prepared box and glue it to the frame with double-sided tape.
- Now we screw the legs to the assembled structure . For stability of the product, additional fastenings can be made between the legs.
Backlight
Most people use a night light or LED lamp as lighting.
Attention : the greater the distance from the lamp to the glass, the more scattered the light will be.
But it’s best to backlight using an LED strip:
We take 5 meters of self-adhesive LED strip, which is powered by 12 volts. You need to purchase a power supply for it. The ribbon comes in different colors, but it is better to give preference to white.- A hole for the plug is drilled at the bottom of the table .
- At the opposite end of the plug, several clamps are tightened so that the wire does not fall into the hole made.
- Lay out the tape on the table . We check how conveniently the material is laid out and how well it fits.
- Next, glue the selected installation pattern. It is better to do this from the end where the connection cable is located.
- Despite the fact that the self-adhesive LED strip sticks quite firmly to surfaces, it is better to strengthen it with double-sided tape in several places. Especially on bends and corners.
- We connect the tape to the power source.
- Let's check how the backlight works.
DIY 3D table
Let's consider making a more complex one,
but the safest and most
beautiful
LED table.
Materials
In order to make a table, you will need the following materials:
- Mirror
(diameter 60 cm); - Mirror translucent self-adhesive film;
- Expanded polystyrene
(for the body); - Glass
or plexiglass (thickness 4 mm, 65 x 65 cm); - Metal strip
in roll (for window); - Wires;
- Instant superglue;
- Double sided tape;
- Power supply
5/5.5V 200/300mA with USB output; - LED
strip (not less than 1.5 - 2 meters); - Arduino Uno;
- Programmer
for Arduino (for projects); - USB
for powering the microcontroller.
Note!
The mirror can be of absolutely any shape: square, circle, oval, D-shaped bar counter, etc.
Tools
Tools
needed to create an LED table:
- router
(you definitely need an attachment for making round parts); - regular or
- soldering iron
(you definitely need solder for a soldering iron); - Dremel;
- scissors
; - knife
(for cutting metal and plexiglass); - pencil, pen, thin marker;
- square
(ruler).
Stages of work
Step 1.
From a piece of plexiglass we cut
a circle
along the diameter of our mirror.
the edges and
remove the shavings.
Note!
When cutting a circle from plexiglass, you should move the milling machine quickly so that the edge does not melt.
Step 2.
Carefully glue the self-adhesive
film onto the plexiglass.
We glue the plexiglass to the table with tape.
We remove the film that is applied to the plexiglass
and the film from the mirror film.
Spray the plexiglass with water,
or even better,
with a soap
solution.
We place the mirror film on the glass and expel all the formed bubbles. Step 3.
Cut
off the protruding edges of the mirror film with scissors.
We leave the entire structure to dry (at least 12 hours
).
Step 4.
Carefully attach
the metal
strip to the dried mirror plexiglass using transparent
superglue. Step 5.
We glue the LED strip to
the inside
of the metal strip.
Step 6.
We drill holes for
the wires in the metal strip. Step 7.
Grind the resulting
holes.
Step 8
write
the connection code yourself, or you can use a ready-made one.
diagram
:
Step 9.
You need to cut 10 - 15 small
rectangles from plexiglass.
Using clear instant adhesive, attach them to
the front
of the mirror.
They will serve as supports for structure
.
The size of
the rectangles should be such that the strip along with the plexiglass overlaps our mirror.
Step 10
We install
of the rectangles .
The glue must dry completely .
It is advisable to put something heavy on top to
better
bond the surfaces.
Step 11
the second (outer)
film
from the plexiglass.
This design can be used as a mirror.
We install the structure on a table with a tabletop of the same or smaller
diameter.
- You should not start
making a glowing table if you are not sure that
will correctly
connect the LED strip to the battery or network.
Incorrect or careless connection
may result in short
circuit
and fire.
We remove
the films that protect
the glass from external influences last - this way it
will preserve
its appearance.- Before cutting
the plexiglass,
we attach a piece of wooden
double-sided .
It will serve as a support for the router. - The glue must be waterproof.
- glue
the LED strip with good, strong double-sided
tape.
If the tape comes off when the table is completely ready,
you will have to
open the entire structure to
fix
this problem. - the minicontroller
in a box and attach it to
the bottom
of the tabletop.
To power
the tape, you can use electrical networks or build a small
battery.
When powered by a battery, the table will become even
safer
and will not depend on the power grid.
It can also be installed in a country
house where there is no power supply.
LED strips are safe and durable.
To illuminate the table, you can use
a single-color
or
multi-colored
LED strip (they differ only in price).
The luminous
table will delight the owners and their guests with its unusual
design.
How to install lamps to illuminate your desktop in the kitchen, see the following video:
See inaccuracies, incomplete or incorrect information? Do you know how to make an article better?
Would you like to suggest photos on the topic for publication?
Please help us make the site better!
Leave a message and your contacts in the comments - we will contact you and together we will make the publication better!
There are many creative ideas used by furniture makers when making their own masterpieces. A bright, original and memorable product that will perfectly decorate a modern interior and create a unique atmosphere is a coffee table with an infinity effect. Making it is not very easy, but it is quite possible if you have some skills in working with wood and glass.
You can place a table with lighting both in an office space or in a country house, as well as at home. LED lamps used in the assembly of such furniture are absolutely safe for human health, as well as for the environment. Such lamps are durable and economical, so using a table with an infinity effect will not lead to increased energy consumption.
The illusion of an endless tunnel is created by using two mirror surfaces and LEDs located between them. The colors of the lamps used can be any, but experts say that red diodes can make the tunnel deeper, since red color is less prone to scattering than other colors.
To control the backlight, you can use the on/off button or a special remote control.
Finishing
After manufacturing and assembling the drawing table, it needs to be given an attractive appearance. Before painting the product, it should be sanded . Once you are sure that there are no nicks, chips or other defects on the table, you can begin painting.
Attention : finishing will not only improve the aesthetic qualities of the drawing table, but will also extend its service life.
The table can be painted any color . The legs of the product can be made colorful and multi-colored. In other words, use your imagination and create exclusive and unique sand painting tables with your own hands.
Tip : a coffee table, a children's table, or even a glass table can also become a bright decoration for your home.
Materials and tools
You can make an exclusive piece of furniture with your own hands. To do this, prepare the necessary materials, tools and follow the step-by-step instructions.
To make a table you will need:
Instead of a translucent mirror for the top cover, you can take regular glass and cover it with tinting film yourself.
Idea: to reduce work, you can purchase the simplest table in any furniture store and use it as a ready-made base.
Why choose LEDs:
- They give a rich, beautiful, deep shade.
- Longer service life without burnout (the number of on/off switches does not affect the service life).
- No heating.
- High efficiency.
- Various colors.
- Reasonable price.
- Light bulb safety.