Decoupage of New Year's Christmas tree balls is a unique design technique that allows you to introduce new motifs into an outdated design. With the arrival of the New Year holidays, it becomes more and more difficult to surprise with a colorful Christmas tree every year, since only the same type of products are often on sale.
A homemade toy is the optimal solution, the implementation of which does not require a higher education in the art industry. To learn how to draw decoupage in stylization you need to have desire, good imagination, courage and appropriate materials.
What balls are used for decoupage?
A master class in the decoupage technique for decorating New Year's balls is performed using special kits.
It presents 4-10 empty models, which make it possible to completely create a design from scratch, focusing only on your imagination and preferences. Decoupage is also done on old items that have been left in the house from previous years. This is a good opportunity to make the design of New Year's balls more modern without spending money on buying blanks.
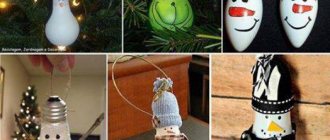
DIY Christmas balls: decoration in decoupage style, beads and more
On the night from December 31 to January 1, we not only welcome the new year, but also say goodbye to the old one. Therefore, New Year's decorations and toys in a nostalgic style are always in great demand. DIY Christmas balls in decoupage style are a great way to bring the spirit and romance of the past into your home. Read more about the decoupage technique in the article. The secret is to thin out old cards or other paper well before gluing it to the surface. Photo for inspiration:
Do you have a lot of old Christmas tree decorations? See how you can update them and decorate Christmas balls with your own hands:
At the end of our article, we offer you some more ideas for crafts - this time using transparent balls. Delight your family members by preparing a DIY New Year's ball with a photo inside for each one.
Also read:
In addition to photographs, you can decorate transparent Christmas balls with your own hands using pine needles, finely chopped paper, scraps of old garlands, etc.
New Year is an amazing holiday when even adults behave like children, firmly believing in miracles and being delighted with shiny trinkets, sparkling lanterns and bright gift paper. Of course, you don’t have to be original and, as usual, decorate the Christmas tree with traditional glass and plastic balls, but it’s much nicer and more interesting to create New Year’s decorations with your own hands, and get a lot of pleasure and positivity from this process. New Year's creativity is limitless! The best part is that you can make all this beauty from available materials, and you don’t have to be a handmade guru to do this.
Beautiful New Year's ball: decoupage
In 2020, the most fashionable shade is ultraviolet, which has a pronounced character and is highly compatible with other colors.
When using the decoupage technique to decorate Christmas balls, pay special attention to the correct combination. Otherwise, it will not be possible to bring the idea to its logical conclusion.
Before starting the design stage, New Year's balls for the Christmas tree for decoupage must be prepared:
- Remove the wire fastening from it and secure the product to the rod - this will ensure comfortable application of the design to the surface.
- Using fine sandpaper, clean the surface from glitter and other decorative elements. You can wash off the paint layer using a regular nail polish remover - just moisten the sponge generously and wipe the shell.
- At the end of the stage of removing decorative elements, the ball is thoroughly washed under running water.
- After complete drying, the ball is cleaned again with sandpaper.
When purchasing a set of blanks for decoupage, you do not need to go through the preparatory stage. All products are ready from the factory for drawing, pattern and color.
DIY New Year's ball with a photo inside
Good day, dear craftswomen. The most fabulous and beloved holiday is approaching with quiet steps - New Year!! And when the question arose: “What to give to friends and family for the New Year?” The answer was found somehow by itself, because... I am the unofficial custodian of photos from all significant and not so significant events in our lives. Christmas balls with photos inside. This is what I want to talk about.
The most difficult thing for me was to find absolutely transparent Christmas balls without a pattern. I bought “filled” balls in the shape of hearts and felt stars, which I later removed without much difficulty. I also needed for work: the main thing is a photo. confetti (mine is in the form of stars), artificial snow, double-sided tape and fishing line.
I was lucky, the balls' labels indicated the diameter of the ball. Reducing it by 3 mm, I made a template according to which I cut out the photo.
I connected the photos together using double-sided tape, and placed a fishing line (loop) between the photos. This loop will make your work much easier in the future. Then I twisted the photo into a tube of the required diameter in order to insert the photo into the Christmas tree ball. BUT! It must be said that when twisting, you need to avoid pronounced deflections so that the photo does not look wrinkled.
As soon as the photo is twisted, we immediately push it into the ball so that the photo does not “stick” and quickly straightens out inside the toy. This is where a loop made of fishing line came in handy for me))) Holding the photo by this loop with one hand, I straightened the photo with the other hand using the “handle” of a brush.
Then I added confetti and fake snow inside on both sides. Once everything is ready, cut off the loop from the fishing line.
In general, that’s all!)) Then who knows what. You can make a garland of balloons or simply decorate a toy with ribbons.
These are the Christmas tree balls I got. I hope your friends like it)
This is only the first batch)) There is still more toy to be made.
And finally, I would like to wish everyone a Happy New Year! I wish you good health, dear craftswomen, and your family. And also creative success in the coming year. )))
What a miracle. Thank you very much for the great, useful idea. The most expensive, unusual and very beautiful gift. Thanks again!!
Thanks for the kind words!
What wonderful balls you made! A very good gift!
Thank you!)) I really hope that your friends will like the idea
Very interesting idea! I would like to implement it, please tell me where you bought the balls and how you managed to get the contents out?
I'm glad that you liked the idea!)) I purchased the Christmas tree balls from Magnit Cosmetics, JSC Thunder (in common parlance - Magnit). But it turned out to be much easier to get the contents, put in a photo))) Felt figures (heart, Christmas tree and star) were glued to the edge.
Thank you very much for the answer! Upcoming holidays!
What a wonderful gift option!
Chekurova Tatyana guest
Very interesting idea! Thank you!
Fresh idea! and I think your MK is quite worthy of being the best of the week. New, simple, fast, original! non-trivial - that's the main thing! to favorites.
Technique of applying an image to a product
A New Year's ball using decoupage technique is created according to the following procedure:
- Before applying the image, the surface must be primed with a solution of PVA glue with 30 milliliters of acrylic paint. The mixture is applied with a sponge in a solid, even layer, then reapplied after complete drying.
- After the final primer layer has completely dried, you can begin decoupage. Decorating decoupage decorations with fragments is done using napkins with beautiful designs or patterns. When selecting a design, make sure that the dimensional parameters of the image are directly proportional to the ball.
- Cuts are made on the cut-out designs, which will allow the image to fit correctly into the shape of a ball, avoiding folds.
- For gluing, PVA glue is used, diluted with water in an arbitrary proportion, but it should not be too thick or liquid - find a middle ground.
- There are two ways to glue an image to the surface of the ball: apply the picture to the product and smear it with adhesive on top, or generously coat the ball with glue, then glue the picture.
- After gluing, blot the surface with a sponge, leveling the image to the shape of a ball and eliminating excess adhesive accumulation.
- After the decorated ball has completely dried, it is necessary to apply a finishing layer of acrylic paint. This will help ensure a smooth transition of the pattern to the tone of the free surface. Visualization of toys for the New Year using the decoupage technique is ready for use as a colorful decoration for the Christmas tree or for decorating rooms, doorways and window openings.
To improve the picture, you can use additional decorating materials: sparkles, glass beads, contouring using paint of a different shade than the general background. During the drying process, rough marks may form - they can be easily removed with sandpaper.
DIY decorative balls.
Decorative balls are one of the most popular interior accessories. This is due to several reasons:
• firstly, a current trend in interior design is the placement of balls of various colors, sizes and textures on huge stands and decorative plates;
• secondly, the opportunity to create such masterpieces of design art yourself, using available materials;
• thirdly, decorative balloons are often used to decorate rooms intended for celebrations.
So this direction has every chance of becoming a small family business. After all, it often happens that entrepreneurial activity begins with a simple passion or hobby. This idea will always be relevant, since decorative balls are fashionable, beautiful, inexpensive and easy to make.
We make our fantasies come true with our own hands
The modern Internet is simply overflowing with all kinds of master classes and tips on creating decorative balls with your own hands. For this, the simplest available materials are used.
Method 1. Simple
To create decorative balls from threads: you need a balloon, threads, a needle and PVA glue. Just a few movements and a thread soaked in glue is wrapped around a ball of the required size and gives a very beautiful spider web effect. After drying, the ball needs to burst. The resulting ball will take the shape of a former balloon and will become a wonderful interior decoration.
Method 2. Colorful dreams
You can create decorative balls from twine by carefully gluing it onto a foam base. To enhance the effect, it is better to paint the thread in colors that match the overall style of the interior.
Method 3. Collective image
There is an option to create decorative balls from paper, fabric, wire, sisal. You can take a base and stick moss, peas, shells, beads, seed beads, pieces of mirrors, mosaics, colored glass and other available materials onto it.
New Year presents
Preparations for the New Year will begin very soon and learning how to create decorative balls with your own hands will not be superfluous. You can decorate the Christmas tree yourself with original balls, hang a mirror ball in the style of the 80s on the ceiling, or decorate the room with voluminous paper balls. Now, at the peak of the popularity of handicrafts, such gifts will appeal to many people.
What does the Ancient East whisper?
Even the ancient teachings of Feng Shui are very positive about the use of balls in the interior. The main recommendation of the Chinese sages: place a crystal ball on the window opposite the door to retain positive energy and repel negative energy.
Where to display your work of art?
We talked about how and what to make decorative balls from, now let’s discuss where to place these creations. A very interesting option is to create a composition on a chandelier or interior door, placing balls under the ceiling or on curtains. It is considered a classic to display balls in vases and dishes on shelves and coffee tables.
Thus, we see that creating decorative balls is a very exciting creative process in which the whole family can be involved. The range of materials used is huge. The author's flight of imagination is not limited by anything. Interior items created with your own hands are always relevant and store positive energy, and also give warmth and comfort. Therefore, create your own large and small masterpieces, create together with your children, decorate your life!
Similar tips:
- How to make a paper cracker with your own hands?
- How to create a stylish winter garden at home?
- How to get rid of unpleasant odors in the room
- How much urine is needed for analysis?
- Neutrophils are reduced
- How to cook delicious talash from potatoes.
Master class - DIY New Year's balls
Do you like New Year's balls decorated using this technique?
Not really
Another way to decorate New Year's balls in decoupage style involves using semolina. This technique is simple, so it can be safely suitable for beginners. For decoupage you will need the following materials:
- old Christmas tree balls or special sets with blanks;
- themed napkins with three layers;
- PVA glue;
- acrylic paints;
- brushes;
- sponge;
- glossy texture varnish;
- contours;
- semolina.
Decoupage of New Year's toys should begin after preparing the ball, otherwise the result will not live up to expectations.
Cleaning is carried out by analogy, as described in the previous paragraph: the surface is sanded with sandpaper until decorative elements are completely removed, then primed twice with an emulsion of PVA glue diluted with 30 milliliters of acrylic paint.
After complete drying, the ball is cleaned again with sandpaper. The end result should be a smooth and clean toy.
DIY Christmas ball decor
You can always update your existing Christmas tree balls and end up with a completely new toy. There are few ways to decorate balloons; they can be decorated from the inside or outside, but you can use any materials for this. In the instructions given, three master classes on how to decorate Christmas tree balls with your own hands are presented.
Master class No. 1: decorating a Christmas ball with crumbs from CDs
You can decorate even the smallest Christmas ball with a regular CD or DVD. To do this, you will need to grind it very much. The effect is interesting: the surface of the ball becomes textured and shimmers in different shades.
Materials
To decorate your Christmas ball with CDs you will need:
- the disks themselves;
- Christmas ball;
- metal scissors or kitchen scissors;
- sieve;
- old blender;
- Plastic container;
- protective glasses.
Step 1
. Take scissors and a disc and cut it into small pieces.
Step 2
. Place the CD pieces in a blender and cover the blender with a lid. This is mandatory for security reasons. Please note that after this work the blender will not be suitable for further use, so take only equipment that you no longer need.
Step 3
. Pour the contents of the bowl into a sieve and sift the disk pieces over a plastic container. How large the glitter will be depends on the sieve grid.
Step 4
. Lubricate the surface of the ball with a thin layer of glue and, holding the ball by the fastener, roll it in glitter.
After the glue has dried, shake off the excess material. The ball is ready!
Master class No. 2: decorating a Christmas ball using decoupage technique
Without knowing how to draw, you can still decorate the New Year's ball yourself with the most whimsical prints and fantasy pictures. To do this, you will have to master the decoupage technique.
Materials
To decorate a Christmas ball using decoupage technique you will need:
- regular Christmas tree ball;
- decoupage glue;
- printed multi-layer paper napkins;
- brush.
Step 1
. Remove the fastener from the ball so that it does not interfere during work.
Step 2
. Apply a thin layer of decoupage glue to the surface of the ball.
Step 3
. Divide the selected napkin into layers, leaving only the printed layer. Carefully tear the paper into pieces or cut them out with scissors.
Step 4
. Start gluing pieces of paper onto the surface of the ball. Apply decoupage glue over the paper with a brush. Smooth the paper carefully to avoid creases. Leave the ball until the glue dries completely.
Step 5
. Send the fastener back and replace the metal hook with a loop of ribbon or twine.
Ready!
Master class No. 3: DIY Christmas ball with snowflake
A beautiful Christmas ball with light sparkles inside and a snowflake on the outside embodies all the symbols of the New Year holidays. You can decorate the ball this way, but the materials you will need for this are the simplest. You can find them in any craft store.
Materials
To make a Christmas ball with a snowflake with your own hands you will need:
- transparent Christmas ball;
- white glitter;
- decoupage glue;
- decorative snowflake;
- spoon;
- funnel;
- brush;
- small cup.
Step 1
. Take a spoonful of decoupage glue and place it in a small container. Pour two tablespoons of water there. Mix the resulting mixture thoroughly.
Step 2
. Remove the fastener from the ball and pour the adhesive mixture into it through a funnel. After plugging the hole with your finger, turn the toy over so that its entire inner surface is covered with glue. Drain off excess glue.
Step 3
. Using a funnel, pour glitter into the ball. Turning the toy over, distribute them over the entire inner surface. Leave the ball until the glitter is completely dry.
Step 4
. Return the ball mount to its place.
Step 5
. Apply glue to the back of the decorative snowflake and press it with your fingers to the surface of the toy.
Ready!
DIY Christmas ball decor
4.1/5 — Ratings: 78
Similar articles:
- DIY plywood wall decor
- Wall decor with tape
- Paper room decor
- DIY soap – Blue windows
Application technique
To use the decoupage technique using semolina, you will need to perform the following steps:
- Mix acrylic paint with semolina and mix thoroughly until a homogeneous mass is formed.
- Apply the resulting emulsion in a uniform layer to the surface of the ball using a sponge. Thanks to this technique, you will get a snow effect that is relevant for the New Year theme.
- While the ball is drying, prepare drawings cut out of three ball napkins.
- Glue the selected design using a mixture of PVA glue and water to the surface of the toy. Before this, it is best to make small cuts that will allow the picture to fit correctly in a spherical shape.
- Smooth the pattern from the central part to the edges until a uniform image without defects is formed.
When the decorated ball is completely dry, you can begin to use your imagination and your own skills. The edges of the picture should be sanded, ensuring a smooth transition; paint the remaining space in any tone you like. To emphasize volume, decor with structural paste is well suited.
You can create two design visualizations on the toy, separating them with a lace ribbon. For decoupage, choose small lace with a neutral, delicate pattern - this combination will highlight the two hemispheres, while the emphasis will remain on the overall design picture.
In 2020, the reverse decoupage technique is widely used - all manipulations are carried out inside a ball divided into two halves. Each side should be processed in turn, adhering to a single idea. The picture itself is glued to the inside of the toy.
Applying an acrylic layer several times is not mandatory. Often a rough surface is left in order to create a custom rendering that is different from others. When decorating a Christmas tree, such models look unusual and interesting.
DIY decor of transparent Christmas balls
The most interesting product for New Year's decor are transparent Christmas tree balls. You can make not only toys from them, but also various decorative elements and compositions. It is about decorating New Year's balls with your own hands that will be discussed in four master classes.
Master class No. 1: decorating a Christmas ball with sparkles
Ordinary sparkles and small paper figures, which needlewomen often use in scrapbooking, etc., can be an excellent filler for a transparent Christmas tree decoration.
Materials
To decorate a Christmas ball with glitter with your own hands you will need:
- transparent ball for decorating the Christmas tree;
- dry loose glitter or small paper figures;
- glue that dries transparent.
Step 1
. First, you need to carefully remove the hanging mounts from the ball. If you are afraid that it will burst, put on thick rubberized gloves on your hands.
Step 2
. Deliver prepared glitter or small paper figures. Pour them into the ball in the amount you need.
Step 3
. Insert the fastener back into the ball, having previously lubricated the joint with glue.
After the glue has dried, the ball is ready!
Master class No. 2: decorating a Christmas ball with live plants
Live plants can also be used as Christmas tree decorations.
Materials
To decorate a Christmas ball with live plants, prepare:
- transparent glass ball;
- sprigs of eucalyptus, spruce, pine, etc.;
- silver wire;
- scissors.
Step 1
. Cut the prepared branches into smaller pieces. The length of the workpiece should not exceed the diameter of the Christmas ball. Branches of eucalyptus or coniferous plants can be replaced by any other plant that will not lose its appearance or wither during the New Year holidays, for example, dried flowers, spikelets, etc. It is important that they can fit through the hole in the toy.
Step 2
. Carefully remove the fasteners from the Christmas tree decoration.
Step 3
. Place the prepared branches inside the ball. Return the mount to its place.
You can send this decoration for its intended purpose on the Christmas tree or decorate other rooms and spaces in the house with it to bring a fabulous New Year's atmosphere to them. To use balls as decoration, instead of the usual fasteners, make an elongated one from intertwined wire. Collect several of these balls together, making their fastenings different in length. Ready!
Master class No. 3: DIY Christmas tree decorations with superheroes
Fans of comics and superhero sagas will love this master class. In it we will make Christmas tree decorations with superheroes with our own hands.
Materials
To work you will need:
- transparent Christmas balls;
- acrylic paints;
- stickers with superhero symbols.
Step 1
. First you will need to remove the mount from the Christmas tree decoration.
Step 2
. Take acrylic paint and if it is not liquid enough, add a little thinner to it and mix everything thoroughly.
Step 3
. Pour paint into the ball and, turning it, ensure that the paint evenly covers the entire inner surface of the ball. If you want the toy to have a shimmering shine in addition to color, you can add glitter sparkles to the paint.
Step 4
. Leave the ball open until the paint is completely dry and then put the mount back on.
Step 5
. Glue a logo of a suitable superhero to the outside of the balloon.
Likewise, by combining paint tones and stickers, you can make a whole collection of similar toys.
Master class No. 4: DIY Christmas balls with photos
An ordinary Christmas tree toy can be turned into an exclusive souvenir or gift; all you have to do is send it a photo of your child or people close to you and bright moments from your life.
Materials
To make Christmas tree balls with photos with your own hands, you will need:
- transparent Christmas balls;
- New Year's tinsel;
- photos printed on medium-weight paper;
- tweezers;
- tapes.
Step 1
. Remove the fastening from the Christmas ball.
Step 2
. Take the prepared photo. Please note that the paper on which the image is printed should not be too thin or thick. It will need to be carefully rolled into a tube, inserted into a ball and straightened with tweezers. Thin paper will be difficult to straighten, and thick paper may not fit into the hole of the toy.
Step 3
. If necessary, cut the prepared tinsel into smaller pieces. Pour it onto the paper and, folding the end into a half-funnel, pour the tinsel into the ball. Try to get it only on the back side of the inserted image.
Step 4
. Insert the mount into place and instead of a metal hook, tie a loop of ribbon of a suitable tone to the toy. To prevent it from unraveling, you can carefully singe its edges or brush over them with colorless varnish.
Ready!
DIY decor of transparent Christmas balls
3.9/5 — Ratings: 54
Similar articles:
- DIY plywood wall decor
- Wall decor with tape
- Paper room decor
- DIY soap – Blue windows
Nuances of a master class on decoupage of New Year's balls
All master classes on decorating New Year's balls in decoupage style are similar to each other, if you do not take on more complex elements.
Each case necessarily includes its own individual twist, allowing you to learn and try yourself in new techniques.
This feature is especially important for beginners who are just trying to make New Year's balls with their own hands.
The technique of decoupage balls includes several nuances, knowledge of which allows you to avoid mistakes in the process of decorating New Year's decorations:
- Always prepare the ball thoroughly before starting: remove grease and dirt using alcohol and dishwashing detergent. Old toys need to be completely sanded and cleaned of decorative elements and paint - sandpaper and nail polish remover will help with this.
- When using the craquelure technique - artificially forming cracks on the surface, use a hairdryer. Under the influence of high temperature they become more natural and pronounced.
- New Year's balls in decoupage style do not like to be rushed. During registration, each layer must dry well, otherwise all the work will go down the drain.
- For decoration, all kinds of materials can be used that will look appropriate on a New Year's toy: glitter, different tones of paint, pastels, beads, jewelry accessories, threads, ribbons, decorative flowers, dried vegetables and fruits, herbs or pencil shavings. Often different fabric materials are used to divide the ball into several parts. This makes it possible to use one toy to create a real illustration from a book, a cinematic picture, a church custom, and more.
With old MK balls, New Year's visualizations do not always work out. Today you can buy ready-made blanks made of thin plastic, glass and other materials.
This makes it possible to significantly save time at the preparatory stage and immediately begin the product design procedure.
Master class “Painting Christmas balls with dogs”
So, let's start painting Christmas balls with our own hands! First of all, let's prepare the balls themselves. To improve the adhesion of materials to the surface, we will make it rougher: lightly sand the plastic with sandpaper. After this, brush off the resulting dust and degrease (with glass washing liquid, nail polish remover, alcohol-containing compounds).
We prime the Christmas tree balls. Let's dilute the acrylic primer to the state of liquid sour cream and stamp the entire surface with a sponge. Let it dry (you can speed it up with a hairdryer), then evaluate the smoothness. If the surface turns out to be too pimply (from the pores in the sponge), then sand it again. Dry again.
On the palette we mix the Acrylic-Art Violet-red paint with white, achieving a pleasant pale lilac color. Cover the surface of the ball with a sponge. Let's dry it.
To make it more convenient to hold the ball while working, I place it on a wooden sushi stick.
I first make a detailed drawing on paper, and then use a simple pencil to transfer the sketch onto the ball.
I mix light gray color.
And I start coloring the dog. I paint the lightest areas first.
Then I add a little black to the color and paint in the darker areas.
My dog is spotted. I add a little more black to the color and paint spots on the skin.
And our hind legs, which are in the shadow.
Paint the nose black.
I dry everything, paint it light gray and add light accents in some places.
I fill the eyes with pure white.
I mix violet-red with white to get a color darker than the background. I paint the gift box with the resulting color.
I also add light and dark tones.
Now I take a thin brush and start outlining all the elements with black. If you are afraid to work with a brush and feel unsure, you can outline it with a thin black marker.
I put whisker points on the muzzle.
I fill the gift ribbon with golden glitter so that it sparkles and shimmers in the light. Immediately after application, the glitter looks unimpressive, but after drying it will be incredibly shiny!
I dry the glitter and also outline it with a thin black line along the contours.
I add highlights to the ears.
I draw the nose. That's it, the first dog is ready!
In the same way I draw various other funny dogs on balloons.
All dogs are drawn according to the same principle: first the lightest tone, then darker, then the darkest. Then light highlights are added and a stroke is made with a thin brush. These are the interesting New Year's balls painted in the same style.
Snow decoupage of New Year's foam balls
New Year's decoupage of balls is a real art that allows everyone to show their imagination, skills and try themselves at something new. The main advantage of the technique is its versatility, because a beginner who does not have any special skills can handle the design of a toy.
Snow decoupage allows you to fully express your resourcefulness and ingenuity. For this style, it is best to use foam models, since glass ones break easily and crack under pressure.
DIY Christmas balls made of polystyrene foam
Olesya Tulinova
DIY Christmas balls made of polystyrene foam
New Year is one of the most beloved and anticipated holidays; both adults and children love it equally. And when the New Year comes to our home, we gladly surrender to the power of children's habits and traditions. One of these habits and traditions for all of us is decorating the New Year tree . We also started decorating our Christmas tree in class. While decorating our beauty, we became interested and asked where the first Christmas tree decorations and balls ? Why have they been the main Christmas tree decorations for so many years?
The first sacred tree that was decorated and around which merry songs and dances were performed was the apple tree. Later, spruce became a ritual tree, because ancient people endowed living nature with superpowers and in order to receive favor and help, it was necessary to make sacrifices.
The “Christmas tree” was decorated
according to special canonical rules: the top was crowned with the “Star of Bethlehem”, the apples personified the forbidden fruit that the ancestors Adam and Eve tasted. Burning candles are the essence of Christ’s sacrifice.
The first Christmas tree decorations were edible. These were: apples, tangerines, oranges, carrots, potatoes, eggs, nuts, waffles, gingerbreads, figured sugar, candies.
But still, out of all the abundance, apples occupied the most honorable place among the whole variety of first decorations. In the fall, the most beautiful apples were selected, evenly large and strong. They were carefully stored until winter. And it was apples that became the prototype of glass balls.
According to legend, one day there was a bad apple harvest. Then the believers came to the glassblowers with a request to make glass apples for the holiday. And in 1848 In Thuringia, in the town of Lausta, glassblowers proposed a replacement for the apple, a glass ball made of transparent and colored glass, which was coated on the inside with a layer of lead and decorated on the outside with sparkles.
Such balloons immediately won the hearts of people and their production became widespread.
Glass decorations were expensive for a long time (one ball cost as much as a car, so home crafts continued to be a favorite and useful activity. These were toys made of shells, colored paper, cardboard, cotton wool, etc. Now glass balls are gradually becoming a balls are taking their place .
And for you, I offer the option of making New Year's balls from polystyrene foam with your own hands . Styrofoam balls can be decorated using: pieces of felt, sequins, beads, threads, etc.
We decorated our balls with sequins. To decorate the balls we needed:
Foam blank in the shape of a ball,
Sequins of various types and colors,
The sequins are attached to the base using nail pins in a spiral from the center.
By attaching all the sequins you get a very beautiful ball.
Next, we attach a ribbon bow to our ball.
When decorating a ball, you can use a wide variety of sequins and colors, which will give you the opportunity to make many different balls.
Thank you for your attention!
A book with your own hands A book and not just a book, but something dear from childhood. The importance of books for a child is very great, because books broaden children’s horizons and develop them.
Notes on drawing "New Year's balls" Municipal preschool educational autonomous institution kindergarten No. 3 of a general developmental type in the city of Zeya Lesson notes.
DIY New Year's toys made from waste material Hello everyone. I would like to offer you a simple way to make New Year's decorations together with your child. I found this idea on the Internet.
DIY New Year's cards in rustic style Warm greetings to you, my dears! Recently, I have been very fond of and close to me the rustic style in decoration and design of crafts, for this reason.
DIY New Year's souvenirs The wonderful and fabulous New Year holiday is just around the corner, and of course everyone is preparing gifts for their family and friends. But it has long been customary to give.
New Year's balls made of thread The most beloved and most long-awaited holiday of the year is coming - New Year. Many people love the winter season because of the New Year holidays, everyone is waiting.
Project "New Year's Wall Newspaper". Drawing lesson “New Year's balls” Third lesson: drawing “New Year's balls”. Goal: -to develop imagination and a sense of color. -learn to draw a pattern. - foster friendliness.
Relief modeling "New Year's balls" Elena Nikitina Relief modeling "New Year's balls" Summary of an open lesson in the middle group: relief modeling "New Year's balls" Educator:.
Photo report “The most creative DIY Christmas trees” The Christmas tree has long been considered a symbol of Christmas and New Year. The coniferous beauty has firmly settled in people's homes. Every family tries.
Photo report “The most creative DIY New Year trees” New Year is celebrated by adults and children. Every year we look forward to this holiday. Not a single New Year is complete without an elegant beauty.
DIY Christmas balls
Purchased New Year's balls will never replace the sincerity, kindness and homeliness of decorations that were made with your own hands. Today we offer you a very interesting master class on how to make New Year’s balls with your own hands, which we will do in normal home conditions. Of course, children's help in this creative process is welcome. How to make a New Year's ball from newspaper tubes? […]
Purchased New Year's balls will never replace the sincerity, kindness and homeliness of decorations that were made with your own hands. Today we offer you a very interesting master class on how to make New Year’s balls with your own hands, which we will do in normal home conditions. Of course, children's help in this creative process is welcome.
How to make a New Year's ball from newspaper tubes?
Quite simple, but very beautiful. We take any magazine, tear out the pages from it, and roll them up into a tube. Now we glue our Christmas ball (the blank, for example, can be made of foam) with these tubes and fix it with glue.
Making a Christmas ball from felt
We draw flower templates ourselves or find them on the Internet. One will be slightly larger in size than the other. We use white and pink felt. Using tracing paper we transfer our flowers onto felt. Cut it out. The number of large and small flowers should be the same. We sew it together and attach it to the holiday ball with glue or beads. The photo shows the entire manufacturing process.
Ball of paper flowers
The whole process is almost identical, as above, but we will now use paper flowers, which we cut out in large quantities with a figured hole punch. The colors we use are white and purple. We put the flowers inside each other and attach them to the ball blank with beads.
Beautiful New Year's ball made of corrugated paper
We make roses, as in the photo below. We fix the leg with thread, then cut off the excess. Using glue, we attach it to our workpiece.
Making a New Year's ball with sequins
We attach the shiny plates with an overlap to our ball. Color scheme to suit your taste. You can see the final result below.
Decorating the ball with beads
Choose different beads that you like. We take bead pins and string beads on them, we stick this entire structure into the ball. We decorate the ball at the end with a ribbon pendant.
Paper Christmas ball
Using the template, we cut out many paper parts. Having connected them all together, we attach them to the ball.
Paper Christmas ball made of stripes
This option is suitable when you do not have a workpiece. In this case, take the paper and divide it into 4 strips. We create crosses and fasten the top with a stapler. We make a ball by connecting the strips at the bottom as well. Add any pendant.
Unusual New Year's ball made from cinnamon sticks
We attach the cinnamon sticks to the workpiece. Their sizes can be made the same, or different in length.
Paper scale ball
Using a hole punch, cut out a large number of round timbers. Using overlapping glue, we attach it to the desired workpiece. You can use colors at your discretion.
Christmas ball made of twigs
For this tutorial, it is advisable to use a dense rubber ball that can eventually be deflated. We take the branches, cut them into any shape with pruning shears, and then cover our ball with them. When everything is dry, deflate our ball. Ready!
Ball of thread
This process of creating a Christmas tree decoration is similar to the one above. But instead of sticks, we use thread. We soak it in PVA glue and wrap it around the balloon. For a more beautiful effect, you can cover the thread with different sparkles at once. Once everything is dry, we pierce our ball. Ready.
Chocolate ball
Using glue we make drips of different shapes. As soon as it dries, paint our workpiece chocolate color. We decorate with glitter and attach decorative elements.
From acorn caps
Using glue and acorns we decorate the entire ball in a circle.
We fill a garbage bag with cotton wool. Attach the cones with glue.
How to make a ball from pine cone scales?
In principle, the entire creation process is similar to the one in the photo above.
From decorative balls
The entire creation process is in the photo.
Ball with lace
Cut out the elements you like from the lace. We attach them to the ball with PVA glue. Cover with white acrylic paint. Using a sponge we age our surface. Attach a ribbon. Ready!
Making a Styrofoam Ball
Not only a professional, but also a beginner can make a foam ball by following the following technique:
- Cut a ball of the required dimensions from a sheet of foam plastic.
- Create a decor using any creative materials you like. In 2020, thread tying or winding, wrapping in designer paper, and pasting will look appropriate.
- In New Year's visualization, a snowy decoration on a ball surface would look appropriate. To create it, you need to combine semolina, PVA glue and snow-white paint. You can cover the product completely or some fragments with the resulting mass. After the layer has completely dried, the main design is applied and subsequent steps are carried out.
New Year's decoupage of Christmas tree decorations will allow you to decorate your Christmas tree with exclusive handmade products.
Thanks to this, the symbol of the New Year will certainly attract guests, and your efforts will be appreciated at the proper level.
Ball of thread
If you make a ball of thread, it will decorate the Christmas tree, and you can give it as a gift on New Year's holiday.
Materials:
- several balloons;
- PVA glue;
- dense decorative threads or multi-colored thin cords. If you use thin threads, the process of making the ball will be very labor-intensive, and the ball will not hold its shape;
- scissors;
- thick sewing needle;
- a glue container in which you will have to make holes;
- to decorate the balls - threads of beads.
Instructions:
Inflate the balloon to the required size and tie it. To give it a rounded shape, you can crush it a little. Thread a decorative thread through a needle and pierce a plastic container into which you pour glue. Pierce holes closer to the bottom of the container. Pass the thread through and pour PVA into the container without diluting it with water.
If your ribbon is thin, soak it completely in glue. Pull the thread through a container filled with glue, saturate it, and wind it around the ball. Turn the ball constantly to change the winding direction. Remember that the ball will have to be removed later. When the winding density reaches the desired condition, cut the thread and leave a tail from which you will make a loop.
Dry the ball naturally for up to two days, you can use a hairdryer for about 10 minutes. The main thing is that the glue, once dry, hardens. Now you can pierce the balloon remaining inside with a needle. Now you need to carefully remove the deflated ball, pulling it out at the place of the tie.
Use the remaining tail as a loop, which you tie to the ball. DIY Christmas decorations will become the main attribute of the holiday. It will be more fun to celebrate 2014 with them. These decorations are beautiful and economical, and will never break.
Author: Katerina Sergeenko
How to make Christmas balls with your own hands
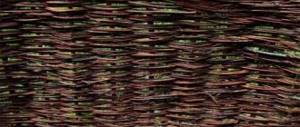
One of the obligatory attributes of the New Year is a decorated Christmas tree. It is believed that decorating a green beauty helps any wish come true. In this material you will find step-by-step instructions for making 5 different decorations: from coffee beans, jute twine, raffia, willow branches and burlap.
In addition, the advantage is that these decorative items are designed in eco-style, like the Christmas tree made from coffee beans.
To create Christmas balls with your own hands we will need:
- foam balls of different diameters (5 pcs.)
- glue gun + 3-5 glue sticks
- spray paint (brown and beige)
- nylon
- coffee beans
- raffia
- jute twine (2 types)
- willow twigs
- sackcloth
- decorative elements (ribbons)
How to make a New Year's ball from coffee beans
Coffee beans enrich the interior not only visually, but also with their aroma. They are used in decoration by many craftsmen who create magnificent things for the home.
Tools and materials for creating New Year's balls from coffee beans:
- foam ball
- glue gun
- nylon
- coffee beans
- jute twine (2 types)
First, we make a loop for our ball. We will need jute twine, scissors and a heat gun.
We make a hole with scissors, drip a little glue there and fix our rope.
Next, we wrap the ball with nylon so that the grains are better attached to the ball.
We fix the nylon with glue and coffee beans.
We continue to cover the ball with grains, placing them as close to each other as possible.
When we have finished the first layer of coffee beans, we proceed to the second.
The second layer is necessary in order to remove all the gaps that we have created. We place the coffees just as close to each other. If this is not done, the ball will look extremely sloppy.
If desired, you can make several different balls by simply alternating the grains in different ways (with and without a slot). The first ball is ready. Let's move on to the next one.
How to make a New Year's ball using jute twine
Jute twine is made from long and soft natural strands, which are obtained from plants of the same name.
Tools and materials:
- foam ball
- glue gun
- jute twine (2 types)
We start making a ball from a loop. Then we wrap it with jute twine.
We fix the thread with a glue gun. For a better look, we do it pointwise.
This is what the first jute ball should look like.
For the second, we take a ball of a different diameter and a coarser thread.
The operating principle is the same.
The final result is wonderful Christmas tree decorations.
How to make a New Year's ball from raffia
Raffia is a palm tree, a palm tree is raffia. Literally, this is how you can summarize all the available information about the origin of this material.
Tools and materials:
- glue gun
- foam ball
- raffia
- jute twine
- beige paint
We start with a method that is already well known to us. Foam - jute - loop.
Next we wrap the ball with raffia according to the previous principle.
We fix it with a heat gun.
We do it in several layers.
If desired, you can leave it in its original form.
. but we will paint the ball beige, since it is a little out of our general trend.
How to make a New Year's ball from willow twigs
After a walk in the park, you may collect beautiful branches, but decide to throw them away. There is no need to rush, because they may come in handy in the process of creating New Year's decor.
Tools and materials:
- glue gun
- willow branches
- jute twine
- brown paint
The branches should not be dry, otherwise they will not take the desired shape and will break.
First we make two circles of branches. We connect them together with a rope and make a loop for the future ball.
Then we straighten the branches.
. and thread new ones.
We make it as close to the ball as possible.
You will get a ball approximately like this.
Brown suits us better. Therefore, we will also paint this ball using a spray can.
How to make a New Year's ball decorated with burlap
In terms of color combination, burlap will harmonize perfectly with beige and dark brown.
Tools and materials:
- glue gun
- foam ball
- jute twine
- sackcloth
- needle and thread
Using a needle and thread, we place our ball in a kind of bag.
We tie a bow and trim the edges, freeing the loop.
This is how our last ball came out.
We can stop there.
In total, we got 6 different DIY New Year's decorations.
If you want to give them individuality, you can supplement them with decorative elements.
We use ribbons and decorative keys.
We use a hot-melt gun to glue everything prepared for the balls.
We made such original decorations for our Christmas tree.