| Place | Name | Characteristics in the rating |
| Top 10 best jewelry boxes from AliExpress |
| 1 | Jewelee Jewelry box | The most popular box on AliExpress |
| 2 | Lelady Jewelry box | Best workmanship |
| 3 | Guanya Jewelry box | Bright colors. The most spacious model |
| 4 | Daddy Chen 4207001 | Great option for a gift |
| 5 | Laspera Storage Box | Unusual design. Many design options |
| 6 | The friend bring I130836 | Mini chest of drawers with lock and handles on drawers |
| 7 | YYW 180925174549 | The best ratio of price and quality |
| 8 | ZJCHAO Jewelry box | Vintage wood product |
| 9 | TSAITLE 2101S | Handmade metal box |
| 10 | SayMakerLace Jewelry box | Best price. Can be used as decoration |
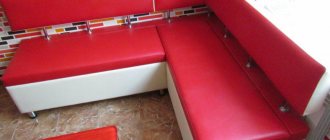
When people think of jewelry boxes, they usually think of vintage wood or metal pieces with a carved lid. But in reality, they are gradually being replaced by ordinary suitcases with drawers made of fabric, plastic and leatherette. They are convenient and compact and do not deteriorate over time. Such organizers will help protect jewelry and costume jewelry from moisture, light, and temperature changes. You can purchase two boxes of different sizes at once: the large one will store the main part of the collection, and the smaller one will be suitable for travel and business trips.
Choosing the right box will take some time, because you need to find the best model that combines quality, ease of use and beauty. Organizers made of synthetic materials do not require special care, are inexpensive, but are not particularly beautiful. Velvet, wood and metal products fit perfectly into the interior, but can deteriorate over time. You also need to consider where the organizer will be placed. It is better to leave a mini chest of drawers or a suitcase in the closet, but a miniature box will decorate the room, especially if it matches the color of the interior. The ranking presents the most popular bags, suitcases and boxes that we could find on AliExpress.
Some tips for beginners
The most important thing in how to make a chest from wood is its final processing. This includes sanding, tinting and varnishing. Even if you have small gaps or knots in the material, you can easily hide them using a special wood putty. After all, thanks to it, the tree retains its beautiful appearance, and at the same time practically no flaws are visible on it.
You may be interested in: DIY book shelf - an ideal solution for storing knowledge
Also, if you want, you can change the size of the chest, and not make it exactly the same size as in the drawings. The main thing here is not to confuse anything with the drawings. Just be careful and attentive, and everything will work out for you.
Making a box
At the first stage, prepare everything you need: a small cardboard box, always with a lid, fabric of different colors, scissors, glue and lace.
It is best to do the craft on a comfortable desk. Then you can carefully lay out everything and not damage the workpieces.
When making a box, follow the sequence of instructions.
- Clear the box of any labels, stickers, glue or tape residue.
- Strengthen the bottom by additionally gluing the base.
- From any fabric, cut a rectangle in the shape of a bottom. Then glue the fabric to the cardboard.
- The most interesting creative stage is decorating the box with fabric. It is advisable to choose colors two shades brighter than the source material. Here you can safely conduct creative experiments.
- Next we glue the outer side and the lid with lace. To do this as carefully as possible, you should find a video on how to make a box with your own hands. You need to apply the glue delicately, because... As a result, traces of glue may remain on the box.
- You can add appliqués or designs inside for an organic combination. For example, in the shape of a heart in a bright scarlet shade.
Leave your craft to dry for a while and that’s it, your box is ready.
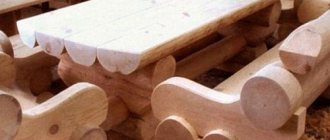
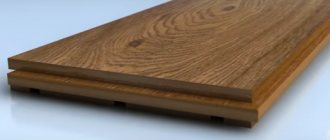
Wooden boxes
Blanks and accessories →
Wooden boxes - blanks for decoration
Cute wooden boxes with or without a lock clasp will become the basis for many decorative techniques .
You can apply acrylic paint or any other paint to the wood - this will be the base. Next, you are offered a choice: decoupage , stencil technique , crackle , gilding , finishing with structural pastes or something else suggested by your imagination.
A little more varnish to consolidate the result. As a result, you will receive an elegant box that you can proudly put on your dressing table or give as a gift to a friend.
You can buy wooden boxes of different shapes: rectangular, in the shape of a chest, casket or book. The blanks are made from various types of wood: pine, birch, linden, etc.
- Subcategories:
- Solid birch boxes (1)
- Solid linden boxes (41)
- Pine boxes (36)
- Plywood boxes (17)
Number of goods: 99
- Sort:
- Name
- Price
- Bestsellers
- Date added
- In stock
- Wooden banknote holder, L-105
Excellent price-quality ratio! Dimensions 180 x 90 x 25 mm. Plywood and solid linden. Very…
- Large rectangular box with 12 compartments
Dimensions of the box: 32 x 22 x 10 cm. Chamfer along the edge of the lid. The partitions are coming out!
- Large chest made of solid linden, 350
Made to order, lead time about 2 weeks. Solid linden. High quality. Dimensions 35 x 25 x...
- Figured banknote holder, solid linden
Dimensions 195 x 105 x 55 mm. Entirely solid linden. Perfectly decorated in Russian and Oriental…
- Wooden box for documents (A4)
External size 33x24x7 cm. Internal size 30x22x4 cm. Plywood and solid pine. Magnetic lock,…
- Solid linden bureau-chest of drawers
Solid linden. The convex lid opens upward. 3 drawers. On legs. Dimensions 235 x 150...
- Chest 25 cm, wooden box, solid linden
Solid linden. Dimensions 250x180x125 mm.
- Wooden box for money, with a chamfer on the lid
Dimensions 180x95x48 mm
- Wooden box, pine, 14x10 cm
Dimensions 145x105x75 mm. Pine, plywood.
- Casket, tea box with 4 compartments, 22x17 cm
The dimensions of the box are 225x170x100 mm. Solid pine, plywood top. The partitions cannot be removed...
- Square box 15 cm
Dimensions 15x15x6 cm. Solid pine and plywood.
- Wooden box (solid linden) figured casket, 25 cm
Solid linden. Dimensions 250x180x100 mm. Big size. Excellent quality, interesting shape...
- Wooden case - pencil case for wine and champagne
Pine. Dimensions 350x105x95 mm. An excellent option for a New Year's gift: a bottle of CHAMPAGNE in…
- Wooden key cabinet, shelf-drawer on top
Solid pine and plywood. Dimensions 17 x 7 x 28 cm. Inside there are hooks for keys. At the back there are loops for...
- Rectangular box, linden, with a chamfer on the lid, 165
Solid linden. Lock. Internal loops. Dimensions 16.5 x 12 x 9 cm.
- Casket-chest, solid linden, with lock, 165
Solid linden. Dimensions 165x120x85 mm.
- Banknote holder on legs, solid linden
Solid linden. Dimensions: 18x9x4 cm. Blank case for a cash gift.
- Book-box with flexible accordion spine, 10 cm
Dimensions 10 x 7.5 x 3 cm.
- Large rectangular box with 8 compartments
Solid pine and plywood. The dimensions of the box are 32x17x9 cm. 8 sections. The partitions are removed. It will become...
- Banknote box, box for banknote size
Solid linden. Dimensions: 18x9x4 cm.
- Square box, solid linden, 100x100 mm
Solid linden. Dimensions 100x100x80 mm.
- Square box 21 cm, with beveled lid, wood, solid pine
Dimensions 21 x 21 x 10.5 cm.
- Open tea bag stand, 6 compartments
Solid pine, partitions can be removed. 25x18x15 cm.
- Casket-casket, solid linden, 160
Solid linden. Dimensions 160x120x100 mm.
- Wooden key cabinet, XL
Solid birch. Excellent quality of wood processing. Dimensions 34 x 23 x 5 cm. Inside there are hooks...
- Solid linden chest of drawers, 3 drawers and a box
Solid linden. The top cover opens. 3 drawers. On legs. Dimensions 235 x 150 x 260 mm.
- Rectangular box with turned lid, 160
Solid linden. Dimensions 16 x 12 x 10 cm.
- Round box (snuffbox), with lid, 6.5 cm
Solid linden. Tightly sealed lid. External diameter 6.5 cm. Height with lid 4 cm.
- Wooden box (solid linden), figured casket, square 15x15 cm
Solid linden. Size 150 x 150 x 95 mm. A wonderful wooden blank for decoration in the Russian style.
- Gift box, plywood case
Dimensions 75x75x60 mm. You will get an elegant case for a small gift and jewelry.
How to decorate a wooden box with your own hands
Despite the external attractiveness of the form, the truly original style of the box acquires after decoration. The technique of relief carving gives unlimited freedom for creativity in this matter.
Using basic carving techniques, unique textures are created on the surface of the boxes. These can be either simple textures or complex ornamental or geometric compositions.
- Using a semicircular chisel to texture the box with small dimples.
- Making the lid of the box with grooves made with an angle chisel.
These photos show more complex decoration options using geometric patterns and complex textures.
Is it possible to restore a box with your own hands?
Undoubtedly, many box owners are wondering: is it possible to carry out repairs on their own without resorting to the services of workshops? Restoration work is truly within the capabilities of every person when it comes to a box that is of no value. For example, you bought this thing on sale and want to decorate it to your taste. Then restoration of wooden boxes is not required - just spend a little time and effort on updating them yourself. Of course, provided that you have good taste and artistic abilities.
On the other hand, if the box is dear to you as a memory, is a family heirloom or a unique antique item, it is not recommended to carry out restoration with your own hands. You can ruin it. An experienced craftsman performs work under a microscope; he uses jewelry-precision instruments. In addition, after restoration, the owner is given recommendations on how to care for the box, which will prolong its life.
The casket restoration service is necessary for every person who wants to update this little thing, give it even more shine, and restore its lost attractiveness. The product will again please the eye, impress the owner and guests with its appearance, and will take pride of place on a shelf in your home.
DIY chest made of wood for the bedroom and nursery
Quite often, there is a catastrophic lack of space in the bedroom to store pillows, blankets and blankets. Of course, most people solve this problem by simply storing bedding in the closet, but this approach is irrational, since this greatly reduces the capacity of the closet. Therefore, making a chest with your own hands for storing bedding will be the best option that will help you solve the problem of lack of space.
- 1 Where to start
- 2 Side walls
- 3 Bottom and side walls
- 4 Cover
- 5 Some tips for beginners
- 6 Toy chest
DIY wooden box: drawings, instructions
Using beautiful wood, elegant design and instructions, the DIY box below makes a great gift.
A design twist with an artistic departure from conventional corner joints, the variable width tenon joint adds flair to the corners of the box. Below we will present an option for making a connection - straight box tenons of variable width.
In production, you can also use pieces of various types of wood with a beautiful textured pattern, stored in advance. You can also make boxes from plywood, you just need to choose the required thickness of the material.
Choose contrasting wood species for the body, lid and handle.
Manufacturing of walls
In this section, we will look at how to make a box with your own hands using straight tongue-and-groove corner joints.
Wooden box assembly diagram. Click to enlarge.
- Prepare end walls A - 10x56x46 - 2 pcs. and longitudinal walls B - 10x56x292 - 2 pcs.
- To set up the saw to make the tenon joints shown in the drawing below, install a 19mm thick mortise disc and make a test mortise on scrap wood, then adjust to 6mm and check the width of the resulting mortises.
- Cut a 19mm wide groove in the trim, trim a 10x305 spacer to a thickness equal to the width of the groove, and check the fit. Then repeat the operation with a 6mm wide groove.
- Reset the groove disc to 6mm, adjust to a depth of 11mm. Attach a wooden extension to the movable stop-carriage, protruding to the right of the saw blade at a distance of 15 cm. Place the extension over the saw blade, cutting a groove. Cut a pin 50 mm long and 6 mm thick from a spacer 305 mm long.
Video on how to make a plywood box with your own hands
- Glue the side stop to the extension plate with double-sided tape and make two cutouts in both ends of the end walls A.
- Without changing the sawing depth, install a 19 mm thick groove disc and make cuts at both ends of the longitudinal walls B.
- Then glue the second side stop onto the extension pad with double-sided tape.
- Remove the first stop and make a center cut in both ends of the end walls A.
Bottom
Next, we will consider the production of the bottom to make a wooden box.
- To mill blind tongues for bottom C (3x133x279 - 1 piece) in end walls A, insert a straight groove cutter d=3 into the collet of the router and adjust it to a milling depth of 5 mm.
Note. The bottom can be made from sanded plywood 3 mm thick. If there is no plywood, then you can plan the board.
- Secure the longitudinal stop at a distance of 8 mm from the cutter. Place masking tape on it and place a mark for the start of milling at a distance of 6 mm to the left of the cutter and an end mark at a distance of 6 mm to the right of the cutter.
- Using double-sided tape, glue the handles from the scraps to the outer sides of the end walls, press the bottom edges against the longitudinal stop and rout blind tongues on the inside of both parts, as shown in the top and bottom pictures. Without changing the settings, mill through the tongues on the inside of the longitudinal walls B.
- Then finally grind the end walls A and longitudinal walls B, making chamfers 1.5-2.0 mm wide at the ends of the tenons.
- Apply glue evenly into the cutouts between the tenons and into the tongues of the end and longitudinal walls. Insert the bottom into the tongues, assemble the structure and secure it with clamps, controlling the squareness of the frame assembly.
- How to make a box out of wood without making compartments in it. Let's make a partition D - 6x43x124 - 1 pc. Sand it and glue it using wood glue in the middle, clamp it with a clamp.
Lid
Prepare a blank for the cover E - 10x168x330 - 1 pc.
- Using clamps, press part E to the supporting board.
- Next, cut 3x32 mm folds along the end edges on the bottom side.
Lid. Bottom view
- Then change the position of the cover on the support board, lower the saw blade and cut 3x22 mm folds along the edges. With the saw blade tilted at an angle of 37° and re-attached to the support board, make bevels on the end and longitudinal edges. Finish sand the lid.
Note. Before cutting out the lid folds, measure the internal dimensions of the case. The rebate dimensions shown in the bottom view allow freedom of movement of the cover in the housing in both directions within 3 mm. If your dimensions are different, make appropriate changes to the fold sizes.
Making a wooden box
Handle and handle base
- Take a 16x30x100 piece for the handle bracket F. Using a 10mm thick mortise disc in the saw, make an 8mm deep tongue in the center of one of the long edges of the piece.
Despite its apparent complexity, the asymmetrical handle adorning the lid is easy to make
- Then make outline templates for the handle parts and cut them along the straight lines of the frames. Glue the staple template to the edge of the workpiece.
Handle bracket template
- Cut the bracket to shape by hand. Sand the edges of the part smoothly.
- Plan the workpiece to a thickness of 10 mm, ensuring that it fits tightly into the tongue of the handle bracket. This will be part G - 10x19x79 - 1 pc. Glue the handle base template G to the workpiece, lining up its bottom edge with the edge of the workpiece opposite the tongue. Then saw out the base of the handle and sand it to the final shape.
Legs
- Make legs H - 10x10x12 - 4 pcs.
- Grind 1.5-2mm wide chamfers on the lower edges of the legs and finish sanding.
- Apply glue and press the legs to the bottom corners of the wooden box.
A craftsman's imagination when making wooden boxes with his own hands
Finish
Inspect all parts and sand them further if necessary.
Apply a finish, such as stain, and then varnish.
Now present the made box to your loved one and enjoy her reaction.
List of materials
Examples of boxes
DIY wooden box
DIY box with an unusual design. Methods of application.
1pomebeli.ru