A few decades ago it was a real problem to get a kitchen set or at least a wall. Today you can find many types of home furniture on sale, and among them there are many unique items. The step stool, which has an unusual appearance, deserves special attention.
Use in the kitchen
This is transformable furniture , a 2-in-1 product that can transform from a stool into a stepladder. Trying to understand why such a combination is necessary, it should be pointed out that a stepladder is a useful and necessary thing in any apartment. This is a tool that allows you to get to any thing you need located at a height. If you place this object in the kitchen, then there will be no need to use a stool to reach products lying on hanging cabinets.
The stool will be useful primarily for owners of small-sized kitchens or minimalist interiors. This is an object that allows you to save space. The model can be used as a stool for sitting and, if necessary, transformed into a stepladder. To do this, just one movement of your hand is enough. The number of steps, depending on the stool model, can vary from 3 to 5. The main advantages of this furniture are:
- convenience;
- ease of use;
- the ability to quickly perform various tasks.
A folding step stool is made of metal or wood. Most often you can see metal products on sale. The aluminum step stool is durable and resistant. A wooden step stool for the kitchen would also be appropriate. You can make it yourself if you have carpentry skills. Plastic stools usually do not have a transformation mechanism.
Stages of work and their features
Scheme of a wooden stepladder.
Before you start making a stepladder, you should sketch out a rough sketch for its manufacture. You need to put all the dimensions on it at once. Only a highly qualified master can afford to work without a sketch. You should not think that a stepladder with your own hands is an object that requires a superficial attitude. Firstly, the safety of those working at height depends on it, and secondly, it is very convenient when you don’t need to constantly measure workpieces, you just need to look at the sketch.
Next, the wood is cut. You will need 4 pieces, each 175 cm long. Basically, the length is determined by the height of the work being done: if a stepladder is needed in the garden, then you should proceed from the size of the trees, but you can’t climb it too high either, other means will be needed. To work on the roof, a type of ladder called a ridge stepladder is used. It is distinguished by the fact that the second half of the folding bed is thrown over the roof, and bars are nailed to the tops for stability.
Then the stair blanks are cut with a grinder. It is better to use a metal profile for this rather than round elements, again for the safety of the worker. A foot on a flat profile will be much more stable than on a narrow cylinder. The blanks should be in the same quantity for both sides of the stepladder - factory ones are made only on one side, but this model will have two working ladders. This is convenient if the work requires two people or hard-to-reach places need immediate access.
Drawing of a stepladder with dimensions.
The length of such elements depends on the distance between the long side bars. The upper ends should be 40 cm apart from each other, and the lower ends should be 60 cm apart. You should get two pieces 57, 52, 47, 42, and 37 cm long. That is, the distance between the steps is approximately 27 cm.
Then holes are drilled in the long elements according to the diameter of the steps if the elements are round, and metal corners are attached for flat ones. The drilling depth should not be less than 2 cm. In the same way, holes for the knitting needles are made slightly lower. Then the structure is assembled without the use of bolts in order to see all the flaws and correct them immediately. All elements are processed, because the material may be damaged by mold or mildew.
Assembling stairs. To do this, epoxy glue is poured into the recesses, and round steps are driven in with a wooden hammer. Then, using fasteners, the spokes are mounted, which are tightened with nuts on both sides. The profile steps are secured with a wrench. After assembly, the glue takes time, so the blanks are put aside for a day. If the installation went without it, then it’s time to start working on the plates.
One part of the elements is attached to the tree, and then the metal ears of the structure are fastened together so that it can freely fold or open. Plates from the mechanism of an old sofa are perfect for this task.
Types of stepladders.
Next, you need to take care of your own safety - the metal chain is cut into two parts with scissors and screwed at the ends to opposite elements. It will prevent the stepladder from unfolding completely if the legs begin to slide along the surface. Naturally, this is done at the bottom of the stairs. The owner will decide at what distance, but usually this is the length of the entire chain, that is, when unfolded, the legs form a regular square with a side of 60 cm. It is advisable to “put shoes on” the legs, otherwise there is a risk that the ladder will slip on a particularly slippery or wet surface. Installation is complete.
For storage, you can soak it with used machine oil so that the ladder intended for garden work can stand all winter untouched by mold or mildew.
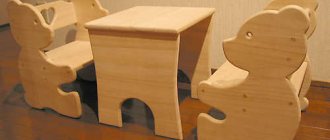
Children's models
A transformable stepladder can be used to help a child quickly adapt to adult life. For example, you can move this product to the washbasin and ask your baby to stand on it. He will quickly learn to turn on the tap, wash his face and brush his teeth. In the future, he will not need adult help.
To get a toy or book from a shelf, a child can climb several steps on such a ladder. He can use the stool to help his mother get her things out of the closet or water her indoor plants. For children, it is necessary to select high-quality products that are stable and safe to use.
Photo
<
>
A step stool is a comfortable and functional piece of furniture. Both adults and children will appreciate its advantages. In order to choose a quality product, you need to pay attention to the material, design features, design, weight, price.
Benefits of a bar stool
Many residential owners place bar stools near an impromptu bar counter. They organize gatherings behind it, but the functionality of this product does not end there. It can be used as a stepladder. This piece of furniture is ideal for this, as it has the following advantages:
- durable frame;
- the optimal height of the stool, allowing you to reach the ceiling of a standard-sized apartment;
- suitable platform width, which ensures the stability of the product;
- ease of operation.
The stool frame is made of metal and is welded. The ladder is fixed on the stepladder without the use of unnecessary elements, making the maintenance process simplified and cost less. Bolt wear is not a problem. You can replace them yourself. Suitable parts can be found at any hardware store. You can sit at a bar stool while cooking on the stove. This will make the process more enjoyable and convenient.
If the apartment is undergoing renovation, you won’t have to buy an additional stepladder to get to hard-to-reach places. A transforming bar stool can easily cope with this function.
Requirements for finished products
The material used for wooden step stools must be quite durable, otherwise it will not be able to withstand the load. It is better to use wood species such as beech and oak. Birch and pine will do. The first two varieties are good, but are quite expensive, so home craftsmen resort to cheaper options. Usually they are replaced by pine boards. But when using such wood, one must take into account that it:
- tends to crumble;
- subject to rotting;
- after some time it becomes less durable and cracks.
It turns out that you have to make a choice between quality and price. If you want the finished object to last a long time, it is better to purchase boards made of high-quality wood, even if you have to overpay for them. Metal rods must be installed on the sides. This will make the structure more reliable.
Types of step stools
Folding designs can be different. Tall models look like large stools equipped with retractable steps. Transformable chairs with three stages are available.
Once folded, they look like regular chairs. Some modifications have a screw module. It allows you to extend the steps. The transformable staircase combines steps that are pulled out using runners for drawers.
“Transformers” differ slightly from simple chairs with backs. This is furniture that looks harmonious in any room.
Manufacturing using standard drawings
The need to use stairs is present in any home. In the absence of a stepladder, housewives have to build incredible structures from stools and chairs, which can lead to injuries. You can use a regular ladder , but a step-stool model will be more convenient. To install such an object at home, you will not need to allocate additional space. When there is no need to climb to a height, you can simply fold the product into a chair.
It is permissible to use various drawings and projects to create a folding stool with your own hands. Plywood and wood are suitable for assembling a transforming chair. These are materials that can be processed without much difficulty and are characterized by reliability, durability and long service life. You will also need:
- glue for wood manipulation;
- dowels;
- screws;
- jigsaw;
- guides (310 mm) for steps - 2 sets;
- sandpaper;
- paints and varnishes.
After preparing all the necessary materials, they begin preparing the drawings.
How to assemble a garden stepladder
When the supports for the steps are ready, they are laid parallel to each other and markings are made for future crossbars. It is worth using a square at this stage to maintain an angle of 90 degrees. Steps are cut from the same profile or corner. When the crossbars are ready, first the lower and upper parts are fixed by spot welding, and then all other elements. If all components are correctly connected and there is no need for correction, welding seams can be made. If the support section is planned without steps, two horizontally located crossbars are welded, and an additional one diagonally. This is necessary to secure the supports relative to each other. All that remains is to fix the limiting cable in the middle of the flight and weld a fragment of a profile or corner to the ends of the supports in the lower part. At the end, the garden structure is primed, then a layer of paint is applied.
An electrician made a reliable assistant with his own hands - watch the video
Like a wooden stepladder, a steel structure is quite easy to assemble. Leave a comment and share your own ideas on how to make a simple stepladder with your own hands.
Element sizes
There are standard sizes, indicated in millimeters, which are used when creating a transforming staircase yourself. According to this drawing, the size of the 2 side panels located in the front is 20*270*400. The rear ones should have indicators of 20 * 325 * 850, the columns for the back of the chair - 20 * 50 * 400. The dimensions of the front seat should be 20*90*400, the rear - 20*165*400. You will need to install 3 steps and 6 slats. The steps should have dimensions of 20*120*360, and the planks should have dimensions of 20*20*95.
The transformable staircase requires such parts as side walls (280*620), seats (280*360), 2 bases with dimensions 280*320 and 200*280, 4 cross bars - 25*60*360, support bars - 2 pieces of 20*250*60, rear walls - 230*240 and side walls - 200*230.
To create the correct drawing, it is necessary to draw in detail all the main components of the product. Patterns should be prepared in accordance with the finished sketches.
Preliminary work
In accordance with the drawing, the internal outlines of the elements are cut out using a jigsaw. Next they move on to the formation of external outlines. Then cut out the outer contours. This procedure is repeated for all elements of the transformer. The end area requires sanding.
To prevent chipping under excessive loads, sharp edges are milled. Finished furniture components are connected in a certain order.
Assembly of components
Pre-assembly is required before all system components can be secured. This will ensure that the components fit together optimally. Next, the final assembly is carried out using dowels and wood glue. Any furniture with a folding mechanism has installation requirements. To assemble a transforming chair, you must adhere to the following order:
- The finished components of the side panels and back are polished and secured with self-tapping screws.
- The seats and steps are installed in the grooves of the small sidewalls in the area of the joints, fixed with glue and screws.
- Furniture parts are connected with a piano hinge.
The step stool is made a little differently. The end area is filed down to make the structure stable. This should be done at an angle of 10 degrees. Dowels connect the ends of the collets and the middle legs. The crossbars should be cut at an angle of 80 degrees. The high legs are connected with screws to the upper drawers. Combine the parts located at the top of the treads using screws. Fix the middle legs on the crossbar and install the steps.
In the case of a transforming ladder, the ends of the chair located on the side are secured and secured with self-tapping screws on the rungs. After this, fix the steps on the stool using a piano loop. If there is a screw module in the structure, the internal areas of the middle and lower tread are milled. A 38 mm hole is made in opposite areas and the leg is fixed. The remaining elements are assembled using self-tapping screws and wood glue.
Stepladder made of timber
A stepladder made of timber with one-sided ascent is a simple enough design that even a non-professional could make it. It will consist of two parts - the main one (ladder) and the support.
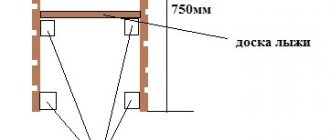
Stepladder diagram
Let's cut the existing timber into the required number of pieces of the required length, namely:
- 200 cm for support legs - 4 pieces;
- 59 cm - 2 pieces;
- 54.5 cm - 1 piece;
- 50.0 cm - 1 piece;
- 45.5 cm - 1 piece;
- 41 cm - 3 pieces.
The resulting pieces of beams should be sanded.
Important! If such a staircase will be used outdoors, it is better to treat it with an antiseptic.
Assembly of the main part
We take two two-meter support legs and make the same markings on them for the five steps of our staircase. The bottom step should be at least 10 cm from the ends of the legs. The further distance between steps is 40 cm.
In the places marked with a chisel, we make grooves with a depth of 1.5-2 cm and dimensions of 5x2.5 cm. Then, at the ends of the bars for the steps, we also use a chisel to make narrowings of the same size that will fit into these grooves.
Since our staircase narrows towards the top, all the ends of the steps are slightly beveled by a couple of millimeters. The steps are driven into the grooves using a hammer or mallet. An additional crossbar is placed and nailed slightly above the top step.
The steps are placed in grooves and fastened with self-tapping screws. The distance between the upper ends is 40 cm, and between the lower ends - 60 cm.
Assembling the support
The support is made from the remaining two-meter legs, only the upper (41 cm) and lower (59 cm) crossbars are placed on them. The crossbars of the support and the additional crossbar of the stairs are made in an overhead, rather than mortise, manner, so as not to interfere with the assembly of the structure.
Important! The distance between the lower ends is the same as that of the main part - 60 cm. And between the upper ends is slightly less - 30 cm
Therefore, the top step is somewhat shortened compared to the top step of the main part (stairs).
A jib is installed between the upper and lower crossbars, which is first measured and cut from a block.
To arrange a summer cottage, find out how to insulate the base of the foundation with your own hands, how to build a swimming pool for a summer house, how to choose garden sculptures, how to make a blind area for a house, concrete paths, a decorative waterfall, a fountain, a flower bed of stones, a rockery, a dry stream.
Ties
To connect two parts of the structure, you should drill 8-10 mm holes in the upper parts of the support legs, departing from the ends of the top by at least 10 cm (depending on the thickness of the stud).
Connect both parts with a pin, put on washers and tighten the nuts on the inner sides of the supports. Select the desired fixed position of the two halves and add lock nuts for better fixation.
For ease of use, you can supplement this stepladder with hooks on which you can hang tools or a bucket.
Final processing
The final stage in creating transformable furniture with your own hands consists of sanding the surface and applying protective agents. To ensure better adhesion of the latter to the wood, the parts should be carefully sanded. Next, apply latex primer to the screws. Wooden or plastic plugs that match the shade of the wooden parts can be used as plugs.
At the end of all manipulations, the structure is coated with varnish of a suitable color. It is better to do this in three layers. After each application, dry the product thoroughly. Contrasting coloring of the back and seat will improve the decorative qualities of the furniture. By following the step-by-step algorithm, you can build a transforming staircase of excellent quality with your own hands. Creating a detailed drawing greatly facilitates self-assembly.
DIY metal ladders
You can buy such stairs. Aluminum products are especially attractive. However, many owners are not satisfied with this solution to the problem for several reasons. This:
- A price that in no way corresponds to the cost of such a simple design. Why spend good money on something you can do yourself?
- “Wonderful” quality of purchased products. Very often there are unflattering reviews regarding the fragility of the light metal “remake”.
They say that now purchased aluminum stairs do not stand up to criticism. They “learned” how to make them so that the products (all their elements) begin to deform after a year of operation, or even earlier.
Materials, tools
To create the most reliable structure, the master will need to purchase a profile pipe: for racks (20x40 mm) and for steps - round (30 mm). You will also need to prepare:
- grinder, powerful drill (900 W minimum);
- special crown for metal (30 mm);
- discs - grinding, wire;
- solvent: acetone, white spirit:
- primer: metal spray;
- car paint: acrylic, alkyd;
- marker, tape measure;
- hammer.
The last and main equipment is a welding machine. You will also need strong rope or plastic ties to temporarily secure the elements before welding.
Manufacturing of metal structures
The process of “creating” a metal ladder goes according to the following scenario:
- First, mark the racks. Two rectangular profiles are laid close together on a flat surface. The elements are aligned along the bottom edge, then both profiles are marked with a marker.
- They make preparations. They are cut with a grinder so that the cuts are perfectly straight, without the slightest distortion. The supports are again laid close together, then, again simultaneously, the places for mounting the steps are marked on them. Precisely control the step between them.
- The mark should be in the center of the round bars. Then it is transferred to the middle of the shelf, measuring 20 mm from the edge. However, make sure that both pipes are aligned along the edge. At the found points they “put a bold cross”, which should be clearly visible.
- The crown is fixed on the drill. The tool is positioned so that the drill is located exactly on the cross. After passing the metal, the tool is removed. Otherwise, it is easy to damage the opposite side of the profile. The remaining holes are made in the same way.
- Move on to marking the pipes for the crossbar blanks. Then the profiles are securely fixed and cut, avoiding any distortion of the ends. The finished elements are polished. Any burr may prevent the step from fitting into the hole in the post.
- They begin to install the steps. The first string is laid on the floor with the holes facing up, then pipe sections are inserted along the entire length. A second stand is placed on their installed ends. An assistant will most likely be required for this operation.
- To secure the ladder for welding, use a piece of rope or plastic ties. Then all the steps are welded to the bowstring profiles. They care not about beauty, but about the quality of the seam. The stronger it is, the more reliable the ladder will be.
Finishing touches
The scale is knocked off with a hammer, then the semi-finished product is carefully ground. The force must be controlled, as excessive force will only weaken the welded joint.
To rid the surfaces of any imperfections, sanding is completed with a wire disc. The last stages of work are degreasing with a solvent, treating the surfaces with a primer and painting with a spray can (2-3 layers).
DIY wooden ladders are operations that do not require welding equipment, which is why they are more popular. If the master is familiar with welding, then it is better to make a super-reliable metal structure that is not afraid of any “inhuman” conditions.
To get acquainted with all the stages of making a more popular and simplest wooden “helper”, it would be a good idea to take a look at this video tutorial:
Use of old furniture
Not everyone has the opportunity to use expensive materials. In this case, you can resort to making a step stool from old chairs. A special feature of these products is the excellent quality of the wood. Commonly used parts are made from cedar, beech or larch. That's why the finished structure has every chance to last for many years. To make such an item, you will need one functional and sturdy chair, as well as components from several other chairs. Even a soft type of stool can be used.
First, the front legs are removed, and grooves are cut out on the rear legs, stepping back 5 cm from the supporting surface. This is done with a router in order to fix the diagonal strips. It is best to equip them from fragments of old chairs. The slats are glued into the chair using the mounting grooves from the front legs. The holes on the rear support are also used. It is necessary to make a jumper between the diagonals and install the last step, which is a component of the stepladder.
To arrange the rotating part, you need to use elements of the backrest with rear legs. They are combined in pairs with the front supports that were cut off earlier. For each such pair, reinforcement is made by means of an internal spacer. The first step is installed on it. The result is the creation of a structure resembling the back of a chair, which is equipped with additional legs. They are bent at an angle of 60 degrees. The stationary and rotating parts are combined using a piano canopy, after which the step-stool can be considered ready.
Coping with the manufacture of a step-stool will not be particularly difficult for people who are familiar with carpentry. Beginners also have every chance to cope with such work, but they need to remember that all parts are connected using a “mortise-tenon” pattern. The joints must be glued. The most important parts are reinforced with corners and metal plates. In addition to the attractive appearance, the safety of the finished stool is also important.
Source
- Author: Alexander Belozerov
Share with your friends!
Step-by-step instructions for creating a classic stepladder with your own hands
The classic model is familiar to every master
And no matter how fancy the store variations may be, the classic model will always be ahead. After all, it is stable, with a comfortable stop, made for specific needs
Materials:
- Wood 6 by 0.20 by 0.1 – 1 pc.;
- Wood 3 by 0.20 by 0.1 – 1 pc.;
- Corner – 2 pcs.;
- Plate – 2 pcs.;
- Screw – 2 pcs.;
- Nut – 2 pcs.;
- Self-tapping screw – 12 pcs.;
- Nail – 4 pcs.
Tool:
- A circular saw;
- Electric planer;
- Stationery knife;
- Electric drill;
- Hammer"
- Paint brush;
- Chisel;
- Mallet;
- Jigsaw;
- Roulette;
- Marker;
- PVA glue;
- Triangle;
- Dye.
Production technology:
- Using a saw, cut the beams in half lengthwise. We process all burrs with a plane and sandpaper. We saw the wood crosswise for the racks. From small pieces we cut the crossbars to the following lengths: 46, 49, 52, 54, 60, 63 and 66 cm. For support, we cut off 2 more crossbars;
Drawing:
- On the widest side of the racks we mark places for cutting 2.5-3.5 cm grooves. The steps will be attached to them. The center of the drawn rectangle should be located at a distance of 20 cm from the top of the structure. Each subsequent beam should be fastened in increments of 33 cm. The contours of the grooves should also be marked on the support beams. From the top down they should be located at a distance of 2.5 cm and 83 cm;
- Using a hammer, holes are made in the wood for the beams. The procedure is performed extremely carefully - so that the holes are even;
- On the boards of the longest and shortest length, places for future tenons are marked. Their length should be 6 cm. Cuts are made along the notches on all 4 sides with a hacksaw. A similar procedure is carried out with the wood from its ends, in the longitudinal direction. This is necessary in order to be able to embed the spikes deep into the structure;
- The lower and upper steps are inserted into the grooves and lightly grabbed with nails. The remaining boards are numbered for ease of installation, and grooves are cut out on all other sections;
- At the stepladder stop, 2 beams are inserted for fixation. The main thing is that there are no gaps and the connection is as tight as possible. The hammered nails are removed and the structure is pre-assembled. If necessary, the fastening points are lightly tapped with a hammer;
- The structure is disassembled and painted. Marked ends are not painted;
- 6 mm holes are drilled in places for installing racks. in diameter. With their help the steps will be fixed;
- Using a wood tool, 7 mm wooden dowel pegs are cut. in section, which will give the structure strength;
- The stairs are being assembled. At the same time, all elements are pre-coated with PVA glue;
- Plates and corners are mounted on the upper part of the structure, which are secured with screws.
We recommend reading: DIY stepladder chair.