An additional room to the total area of the apartment is a balcony. If you approach its arrangement wisely, you can make this space cozy and useful in your household.
A good functional and practical solution would be to place a variety of shelves on the balcony. It’s hard to imagine a balcony without this interior element. A wide variety of useful and not so useful things can be stored here.
You can make shelves on the balcony as a decorative element, then they will act as a decoration for your loggia.
Types of racks and shelves
There are so many types of shelves that sometimes it’s not easy to make a choice.
By design, shelves are often used to store small items, but this is a little wrong, because the shelf, oddly enough, transforms the space.
The shelf can be made by hand, with built-in seats, from a designer, with a mirror, open type, like a partition, floating.
There are actually a lot of varieties. There are also modular shelves, transformable shelves, hanging shelves for the living room - they're all on sale!
Of course, book attributes are the most in demand, and they are chosen according to personal preferences.
Corner shelf
For the living room, a so-called transforming shelf is often purchased, which changes its size and shape. Its disadvantage is that it can withstand little weight, but despite this, it is often attached to the wall.
Another popular variety is shelving, which will perfectly complement any design, especially if the room is in a country or high-tech style. This rack takes up minimal space.
Construction types:
- The cylinder rotates around an axis, and therefore it is easy to have access to all the objects that are placed there.
- Built-in shelves in the living room in a specially created niche make it possible to use every centimeter.
- Stepped rack - sections, shelves. This is the best option for numerous books, as well as for dishes and decor. Used for zoning a room.
- Lattice - a combination of shelves diagonally, vertically and horizontally. Such shelves for the living room on the wall look chic in a room decorated in a modern high-tech style.
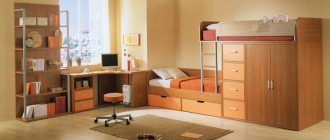
System for storing toys in the nursery
Decorated in pastel colors, the large Billy rack will be an excellent solution for organizing a toy storage system in a children's room. On the upper shelves you can place decorative elements and children's things that the child does not yet use.
In the access zone - those that are constantly required. You can also build a functional children's area from two small shelves.
Small shelving in a children's room, complemented by toy furniture
Modular shelves
It is most appropriate to use shelves covered with glass in the living room. Such modern living room shelves allow you to store some luxurious items.
Interestingly, glass does not catch the eye at all, and therefore this option is applicable in small rooms, for example, in a living room in a Khrushchev-era building.
Open attributes are used near the window, because they can miraculously combine with a coffee table. Hanging shelves - space saving.
In a classic interior, it is permissible to use objects made of wood of the correct shape, which are decorated with carvings and forging.
In country style, it is wise to use untreated, aged items. High-tech style uses glass or metal shelves. Their shape is most often irregular.
How to decorate a shelf with your own hands?
The apartment is most often decorated with your own hands, and shelves are no exception. To get the job done, you need to buy a regular shelf, no frills. Most often it is a piece of wood or plastic.
The decor is made using materials such as leather, natural wood additions, forging, and dyeing.
It’s not at all difficult to design a unique shelf; the main thing is to think through a work plan. It is best to make basic outlines on paper, and then design the product.
There are different options for how to design a shelf, and there are a lot of ideas on the Internet that are worth checking out. There are so many ideas that it’s not difficult at all, even without designers, to create beautiful decorative shelves for a TV in the living room.
The furniture matches the style of the room, and is suitable in style, color, and material. It is best that some of the elements are selected to match the type of furniture.
When choosing, it is important to understand that the shelf must be stable, durable, reliable, and support the normal weight of objects.
Shelves in the interior of the living room are the main attribute, because they are used both as storage of small things and as decoration. The shelf does not take up much space, but at the same time it complements the interior.
If you have to choose a shelf, then you should make the choice according to its further purpose.
Of course, the appearance of the shelf is of no small importance, and therefore you can look through photos of shelves in the living room, see what varieties there are, maybe you will like something and make the choice easier.
Bookshelf
The easiest way is to use the Billy rack for its intended purpose - to store books, figurines and photos. However, you can beat it in different ways, it all depends on the general concept of the apartment design. If space allows, the rack can be supplemented with a cabinet with glass doors from the same series.
An antique clock and a fake ladder transform a simple shelving unit into a solid wardrobe.
Light colors in the interior, and natural shades of furniture and decor fill the room with comfort.
Photos of ideas for placing shelves in the living room
Today I would like to touch on an important topic that relates not to interior design, but to decorative art - that is, in fact, to something that we can do on our own in our free time. And I want to talk about the design of shelving or bookshelves. It would seem, what is there to discuss here? Placed the books/figurines and you're done. But you shouldn’t write off shelving as an exclusively functional thing. With a few principles and tricks, you can transform your shelves into stylish decor that reflects your passions and matches the style of your home.
Anthony Gianacakos
Here your imagination is limited only by the items available. You definitely shouldn’t stop at books only. Put on the shelves everything that makes sense to you: your collections, souvenirs brought from travel, photo frames, cups and awards, beautiful dishes, etc. And we’ll talk below about how to combine all these items and avoid chaos.
Marika Meyers Interiors
lingeredupon.blogspot.com
nicety.livejournal.com
mattsoncreative.com
Limit the number of colors you use
Hide everything unnecessary in boxes and baskets
Beautiful boxes, caskets and wicker baskets look neat and aesthetically pleasing. Remove small items, magazines, books, and dishes that are not intended for display.
thewickerhouse.blogspot.com
How to arrange objects?
Build triangles
I especially like this principle, and I bet 90% of the people you know have never thought about it! Pay attention to the shelving designed by a professional decorator. Everything looks logical and harmonious. But how to achieve the same effect?
Now visually connect vintage Kushinas, white books, figurines, aged greenish bottles with lines... do you see the triangles? Each object in this composition has its own clear position, corresponding to the triangle rule.
Moreover, the triangles do not have to be identical and isosceles. Triangles of different shapes add dynamics to the composition.
Emily Henderson, the famous American decorator, is a true genius of composition. Each item in her works is carefully selected and takes its place for a reason. Pay attention to this rack. Golden rooster tail – bowl trim – chain; blue vase – book cover – plate; gray vases – picture in frame; milky dishes.
And here - do you see the golden, white, black, blue triangles?
An endless number of examples can be given. On this rack you can find a lot of triangles, due to which the composition looks balanced and logical.
Kriste Michelini
Now you can easily notice the relationship between vases of flowers, metal objects, vintage items and book cover colors in this photo.
meganbrookehandmadeblog.com
Here are a couple more examples:
Layering: Use the height and depth of your shelf
All items on the shelf should be harmoniously combined in height: if you want to place a low vase or small figurines on the shelf, place them on stacks of books. This way you will place them on a pedestal and draw attention to them.
lamorechanel.tumblr.com
prepfection.tumblr.com
If you're placing a short item on a shelf, place a book or photo frame behind it to balance the height of the arrangement.
thepursuitaesthetic.tumblr.com
cotedetexas.blogspot.com
Use layers to make your composition interesting and dynamic.
twentytwoavenue.blogspot.com
The same effect can be achieved by combining stacks of books laid horizontally and arranged vertically.
Free space sometimes means more than the decor itself
You shouldn’t fill every centimeter of the shelf with books and decor. Even beautifully grouped interesting objects can become a shapeless heap if you do not visually separate the objects from each other. Free space on the shelves will make the room visually more spacious, which is especially important when working on.
desiretoinspire.net
If you have a huge number of books and you don’t know where to put them, make several compositions: put books on the coffee table, put them on shelves in other rooms, put books that you have hardly opened in the last few years in boxes.
Symmetry and paired objects
Another win-win option: use several identical items standing in a row or symmetrically on adjacent shelves.
cocopearl.blogspot.com
beneathmyheart.net
cotedetexas.blogspot.com
Heavy down, beautiful up
Here we mean not only physical, but also visual weight. Place large encyclopedias and stacks of magazines on the lower shelves. Place small books in beautiful covers, decorative items, and candles higher - at eye level. The lower shelves solve functional problems, the upper ones solve aesthetic problems.
homemydesign.com
desiretoinspire.net
Anyone can design a beautiful shelf or bookshelf; you just need to know a few key principles and not be afraid to use your imagination. I wish you success in this exciting activity!
Shelves are often used not only to complement and decorate the overall interior of the room, but also for a clearer and more expedient organization of space. Thanks to their use, the apartment owner has the opportunity to conveniently arrange a huge number of small things that would simply get lost in closets.
Today, there are a lot of different models on the market that are made of different materials. They also differ in design.
You can choose not only products with classic designs, but also ultra-modern designs.
But more and more often people prefer to make such interior details themselves. Wondering how to make a shelf with their own hands, they re-read a lot of literature and look through many catalogs.
However, this does not mean that making a shelf yourself is difficult and is beyond the capabilities of a person who does not have special skills. No, that's not true at all.
In this case, familiarization with the literature is necessary in order to create a product with a beautiful design that will fit into the overall interior. Let's take a closer look at what kind of shelves there are.
How does this rack compare favorably with others?
- There are no complex carpentry joints here, and all load-bearing units are as strong as possible. This is mainly ensured by the use of double drawers.
- The rack is made from simple and affordable lumber: square or rectangular timber and a narrow edged board. By correctly calculating the material, you will not have any scraps.
- All parts are straight cut and can be easily produced in series by sawing a stack of boards in one pass. If you don’t have a miter box or saw, a simple miter box and a hand saw will suffice for accurate cutting.
- You can easily change the height and width of the rack, the number and depth of shelves. And also, if desired, this rack can be made corner or U-shaped. The drawing is maximally adaptive.
- Despite all the reliability and stability, the rack is very light and mobile. It can stand on its own or be anchored to the wall. It is better to do rigid installation if the height of the rack exceeds 2 m.
Types of shelves
Any specialist will tell you that before you start creating a product, you need to decide for yourself what kind of design you want to get and whether it will be combined with the interior. And only after that you can start creating the product.
After all, for a house decorated in a classically styled style, it is completely unacceptable to use trendy and modern shelves. They will look extremely ridiculous.
The most popular and widely known subtype of shelves is the classic shelf. This is due to the fact that it is quite easy to install, and the appearance, thanks to its simplicity, seems refined and sophisticated.
Both open and closed shelves are used successfully. Closed products are most often used for decoration and installation in rooms decorated in more modern styles. Glass and sometimes plastic are used to construct them.
Open structures can be used both in modernly decorated houses and in apartments with a classic design. Over the past few years, this particular type of shelf has gained enormous popularity and is therefore gradually replacing the classic options.
In small rooms, you can often see corner shelves that have a special method of fastening. They are mounted on adjacent walls that are adjacent to each other. They are most often used in bathrooms, kitchens and utility rooms.
In addition to the above types of shelves that are mounted on the wall, there are suspended and floor-mounted structures. Hanging shelves are mounted in an unusual way.
They are installed using cables and vertical posts, and attached directly to the ceiling. This mount looks quite unusual and original.
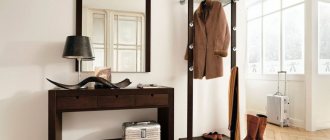
Floor structures are most often used in hallways. After all, hand-made floor shelves for shoes not only look beautiful, but also help you organize the space of a small hallway. At the same time, making them is quite simple.
Advantages of shelving on the balcony
You can equip the free space of the balcony in different ways. Even though its use is no longer considered solely as a storage space, a balcony shelving unit is essential. Such furniture will not only fit organically due to its small size, but will also become a practical addition to the decor, because there are many ways to use such shelves.
Advantages and application of balcony rack:
- Small dimensions allow you to squeeze the rack even into limited space. Due to the open shelves, such furniture does not visually overload the room.
- Corner shelving is usually less practical and is suitable for very small spaces. As an option, you can use corner shelves.
- Along with open shelving, you can also use mini-cabinets with doors. To do this, there must be free space on the balcony to allow easy access to the shelves.
- Original countertops - shelving is often used in limited space. You can install a tabletop on top of them and use them as a dining group or parapet.
Balcony racks are used to store various items that do not have a place in the apartment. Most often these are tools, canned goods, fishing and other special equipment that is used infrequently.
The glazed frame gives more possibilities, while on open balconies it is advisable not to store things that are afraid of dampness and dust. In addition, on an open loggia or balcony it would be preferable to use cabinets and racks with doors to protect the contents from dust and moisture.
How to make a simple shelf?
To create the claimed product, you should purchase or prepare some tools and materials in advance. As connecting elements, you can use whatever suits you best. But the most popular are ordinary screws, brackets and dowels.
Note!
For example, let's take a photo of the shelves with our own hands, which is presented below. It shows a product with the following parameters: width 250 mm, height 300 mm, length 1100 mm. For convenience, the manufacturing process will be divided into stages.
Stages of work
At the first stage, you need to complete the markup. To do this, you should lay the boards on a table or any other flat surface and transfer the measurements from the drawings. The side walls must be exactly 268 mm high.
This marking is optimal because the side walls will be located between the two parts.
The second stage requires cutting the boards. To get smooth and neat cuts, you need to use a jigsaw. After cutting, you will end up with 2 fairly long pieces and 2 shorter ones.
At the third stage, you can begin processing the resulting workpieces. The resulting sections should be coated with a special protective varnish or stain, having previously sanded them.
Note!
If you only plan to paint the shelf, you can get by with treating it with a regular antiseptic primer. This way you will not only increase the service life, but also achieve a more uniform distribution of paint.
At the fourth stage of making a wooden shelf with your own hands, you begin to directly assemble it. The bottom board should be laid on a flat surface. Step back 8 mm from the ends of the workpiece and draw two lines parallel to the cuts.
2 points should be marked on them with a distance of 5 cm from the edge. At the marked points it is necessary to drill holes for self-tapping screws. The same manipulations must be done with the second workpiece.
After this, you should install the side blanks on the lower section of the board and secure them. Once you are done with attaching the side panels, proceed to install the top panel and secure it.
At the fifth stage, you should attach the brackets to the ends of the side panels, and make several holes in the wall for the dowels. After this, screw in the screws so that they protrude by 5 mm. And now your shelf is ready.
You can make acoustic shelves in the same way, but you need to take into account the size of the equipment itself. Measurements should be taken carefully, because if you make a mistake, the work will have to start again.
Note!
Shelves for flowers: manufacturing stages
To secure the shelves inside the box, use metal corners with holes.
It makes sense to make shelves of different heights so that it is convenient to place things of all possible shapes and sizes. To secure the shelves inside the box, use metal corners with holes. For one shelf you will need 4-6 corners: two for the side walls of the box and two for the back wall, if there is one. Chipboard can be purchased already cut to the required dimensions. If you adjust it yourself with a jigsaw, make sure that there are no chips on the colored surface.
Related article: DIY folding bed (photo and video)
Check the fastening of the corners using a level. If the corners are perfect, only then are the shelves screwed to them. If the racks for the balcony should be closed, hinges should be attached to the side walls (2-3 pieces depending on the size of the door), on which the chipboard is hung. The cabinet doors are equipped with handles. You can additionally use magnets or latches. If the rack is made of unprepared wood, it should be painted or treated against fungus, moisture and pests. Laminated chipboard does not need to be processed. Making shelves for flowers or a cabinet on a loggia with your own hands is not at all difficult. And the effort spent will quickly pay off with the order and attractive view reigning on the balcony.
The best posts
- How to make a plasterboard box in the bathroom - step-by-step instructions
- Drywall figures or how to make the interior stylish and fashionable
- DIY decorative corner fireplace made of plasterboard
- Wiring under drywall: lay it out correctly
- Painting drywall - step-by-step instructions
- How to join drywall in corners and the process of building a decorative niche
- Socket boxes for drywall: correct selection and installation
- Sealing drywall joints - recommendations from professionals
DIY photo of shelves
More often than not, decluttering is an easy and effective way to spruce up your shelving. Adhere to the “top and bottom” principle, which states that order should be at eye level first, with heavy items at the bottom and more decorative items at the top.
Design: Bower Architecture
Even the most luxurious and expensive shelving can be ruined by clutter, and conversely, the simplest IKEA shelving unit will be worthy of a photo in an interior magazine if you tidy up the shelves and apply a few design tricks.
Open closet for storing shoes and bags
By complementing the “Billy” rack with a rod for storing clothes in a small apartment, you can create an interesting open dressing room. When filling it with clothes, you should pay special attention to aesthetics and add decorative elements.
If the apartment has niches, you can install rack shelves in them and “hide” them behind folding doors.
See also a selection of ideas on how to decorate IKEA shelves and racks.
Option for a dressing room in a niche.
The only drawback of such a storage system is that it must always be in perfect order.
How to decorate open shelving shelves
Place books in boxes and baskets
One way to decorate a book shelf is to arrange them in low baskets and boxes. For example, sort them by author name or subject. This will make it easier to remove the book from the shelf, including in order to wipe off the dust.
Using this technique, experiment with the arrangement of volumes: covers up, or spines forward.
Design: LiLu Interiors
Tip: cardboard folders can be used to store two- and three-volume books; this will help in the visual organization of books and make the appearance of the shelving more impressive.
Leave some shelves empty
Sometimes you need to be inspired by emptiness to make the interior more interesting. This technique also works with open shelving decor. Leave some free space, so you . In addition, empty shelves will help separate already arranged accessories from each other.
If you don't have much and leaving empty space seems like a luxury to you, combine open and closed shelves with doors and drawers. For example, for IKEA shelving, you can purchase removable doors and drawer inserts.
Place objects symmetrically to each other
One of the effective and simple ways to make a shelving unit stylish is to use the “mirror principle”, when the right side of the cabinet is symmetrical to the left. To do this, arrange items that are identical or as similar as possible to each other in color and shape on two single-level shelves. Steam rooms, baskets, boxes or candles will help with this.
Design: Sabal Homes
Hide the spines of the books
Why is the option “not for everyone”? Firstly, this solution is not suitable for people with dust allergies. It is much easier to wipe the spines of books. Secondly, if you are an avid book reader, it will be inconvenient to choose the next book, taking one by one from the shelf to see the title.
Design: Creation
Who might like it? Owners of large libraries who do not want to throw away ancient volumes, but also will definitely not read all the collections in the near future. We also recommend trying this technique for those who like experiments.
Create a design in several rows
One of the simple and working design techniques is to arrange objects in several rows. For example, on stacks of books there are small figurines or candles in candlesticks. This method makes small accessories more significant and noticeable.
Use the front of the rack to decorate
We're used to framed photographs and small paintings being placed on shelves, but we rarely see anyone hanging them on the front of a shelving unit. In this case, the shelves behind the painting or poster can be left empty or you can put not very aesthetic, but useful things. If you choose the second option, make sure that the objects covered by the picture can be easily reached.
Design: Paces Construction Co
Arrange books by color
Arranging books by spine color rather than alphabetically is a way to make your home library stand out. This technique is suitable not only for owners of a large number of books: you can simply fill one shelf with colorful collected works, and the second with.
Tip: you can not only put books, but also stack them on top of each other.
Design: Kropat Interior Design
Avoid items that are too small
Very small items will most likely not add beauty to your shelving, but rather create visual clutter. Large objects will help hide mismatched book spines and chaos on the shelves, attracting the eye.
Design: Jonathan Raith
Advantages of flower racks
And yet, the racks for balconies have a lot of advantages:
- ease of assembly and transportation - if necessary, you can move the rack to another location and change the position of the shelves;
- a wide assortment on the market - believe me, the store will meet you halfway and offer options that are sure to suit you;
- the service life of the rack is increased due to the anti-corrosion coating;
- ergonomics - everything is done for the benefit of the buyer;
- favorable cost - the price range fluctuates within reasonable limits and anyone can afford a stand. In addition, purchasing it will cost less than buying a storage cabinet;
- the design itself takes up little space and can fit into any niche on your loggia.
Metal flower racks will help you place different types of indoor plants in a relatively small area and provide them all with equally favorable conditions for growth and flowering. You can order a flower stand with the individual dimensions of your loggia, or you can choose the one you like in the store.