Everyone has known about the benefits of sports for a long time. It gives a person enormous opportunities. Most often, having decided to take their body and health seriously, people go to the gym. But there is another solution: do a “gym” at home and exercise in a comfortable environment at any time convenient for you. Our new article is about this.
Indeed, why not?
Working out at home is much more convenient. At least because :
- You don't have to pay for training
- And you don't even have to leave the house
- There is no danger of standing in line for the next exercise machine you need.
- Plus a psychological moment: there is no competition here, and someone’s pumped-up body within a meter radius will definitely not embarrass you.
However, questions immediately arise: how to make a gym at home? What do you need to know and where to start?
Let’s note right away: a gym at home is complete freedom of action. Only you can make all the decisions here. But it takes increased responsibility and self-discipline to force yourself to exercise regularly.
To make training at home regular, buy everything you need for home workouts.
Note that we are not talking about expensive exercise equipment, but about devices that are quite accessible to everyone, which, moreover, are easy enough to remove so as not to clutter up the room.
But our advice to you: it’s better to leave it in a visible place - so that the yoga mat or jump rope will look at you “judgingly” when you miss your next workout.
So, there are only a few devices, but there are a great many exercises with them.
Practice area.
First of all, allocate a room for training. It sounds simple, but in practice it is not so easy. Choose a specific place in the apartment or clear some part of it for training.
Please note that there should be enough space for jumping and stretching .
Test your chosen area as follows: if you are lying on the floor with your arms extended above your head and nothing is in your way, then it is perfect.
Expanding space using redevelopment
This is a radical solution that requires costs. Very often there is a loggia next to the hall. The redevelopment is carried out in such a way that the loggia becomes part of the room. The wall between the two rooms is removed, and high-quality glazing and insulation are installed on the loggia. For glazing, it is best to use good plastic frames with triple glass, which retain heat well.
You can expand your living space by combining a balcony and a room.
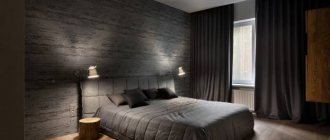
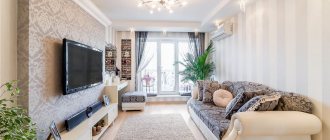
You can do the insulation yourself by removing the old finish from the walls and ceiling, gluing insulation, making a vapor barrier and securing the finishing cladding. The floor should also be insulated. After such renovations, this part of the hall can already be converted into a bedroom. It should be separated from the living room using drapery or a partition. A good solution would be to create a podium that will additionally highlight the bedroom as a separate area. In addition, you can make different cabinets under the podium, which will never be superfluous in a one-room apartment. A large canopy bed looks great on a raised platform. If the loggia is not large in size, then you can use only part of it.
Related article: How to choose a curtain design for a white kitchen
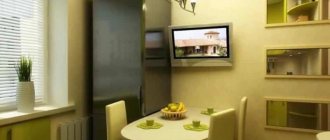
Another redevelopment option is when, in addition to combining with the loggia, the kitchen and living room are combined. Before removing a wall, you should make sure that it is not load-bearing. Load-bearing walls must not be dismantled under any circumstances. This redevelopment option significantly increases the living room space. It becomes more spacious. Usually the kitchen is separated from the living room by a bar counter, which is very convenient as it eliminates the need to use a dining table. At the counter you can dine and relax with friends. This element looks especially good in the design of a room when it is highlighted by well-placed spotlights.
Types of partitions for zoning space
You can partition the room with plasterboard or a wooden panel. You can put a sofa, wardrobe or aquarium as a partition. If such a wall reaches the ceiling, then it must be made partially transparent. That is, if the partition is mounted from plasterboard, then numerous windows should be provided. If it is made of wood, it should be made in the form of a rack or bookcase. If the area is fenced off with a closet, then it should not be too large and high. You must always remember that the task is to create two zones in one room, and not to create two separate rooms. Zoning space is a much more suitable option for a studio than creating two small rooms.
Related article: Wallpaper paint for painting: which one to choose
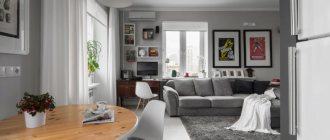
A common way to zone a bedroom and living room is to use a plasterboard partition.
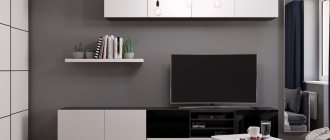
When installing a rack, you should make it so that it fits harmoniously into the overall design of the room. For example, if the design is modern and strict, then a bookcase or rack with carved stands will not fit here. And when choosing the interior for a studio apartment, you should listen to the advice of designers who recommend using minimalism when decorating and abandoning all unnecessary elements. For example, instead of hanging shelves, make niches in the walls that will serve as shelves, abandon the TV stand, dining table, large armchairs and cabinets.
When separating the bedroom from the living room with a closet, you should think about which direction it will be turned. It is recommended to use sliding wardrobes, as their doors slide to the side without requiring additional space. In addition, a mirror is often attached to the door. As you know, mirrors in a small room visually enlarge it. Regardless of which direction the closet is facing - bedroom or living room - you should take care to decorate its back wall. These can be engravings, drawings, drapery or the same mirrors. An undecorated back wall of a cabinet can ruin the design.
Isolating an area with drapery looks great only when the design of the hall already includes fabric decoration. Otherwise, curtains or drapes will look like an alien element. For example, it is enough to decorate one wall of the living room with a small rug or fabric appliqué so that the curtains separating the bedroom are already in place. Everything that has been written about blind partitions also applies to drapery. Fabrics should perform a decorative function. If they completely block the passage, then this will no longer be zoning; the rooms will become cramped.
If the room is decorated in an oriental style, then a screen, which is often used when decorating an interior in Chinese and Japanese styles, is a good choice as a partition. From furniture, you can install a sofa, which will also fence off the bedroom, or you can put a large aquarium. It will serve as an additional source of light in the evening.
Related article: DIY wardrobe bed
Hall in a private house
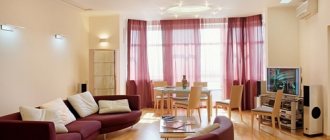
A hall in a private house allows you to fulfill all your dreams, for example, connecting a living and dining area, an acceptable option in which you can comfortably relax in front of the TV and receive guests at the table. Classics can decorate the dining area into a wonderful, cozy corner.
A set of a table and soft chairs, made of natural wood and carved elements, will be visually combined when we arrange a television area in a minimalist style. In general, in this hall design project there can be one color, and its shades, found in two different zones. The interior of the living room of a private house with two windows could benefit from a partition, separating a small part for the sleeping area. In this case, the colors can be completely different, although chosen in the same direction.
A decorated house, built according to the requirements of all residents, may include an office, hide it or highlight it with color, depending on the area of the room. As an option, a podium with a computer desk, or a partition of living plants and flowers, arranged on vertical rails with pots. This layout allows you to use rich colors in the design, deep green or blue, with a matte effect.
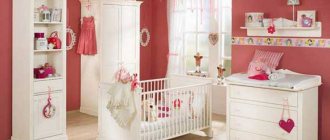
Due to the fact that the room is well lit, you don’t have to be afraid of dark tones. On the contrary, they go well with beige, white as a contrast, and country-style materials. The beautiful interior of a country hall, especially in a private home, will appeal to many. Soft, smooth transitions, favorite checkered designs, textiles on the windows: curtains, curtains and drapes, with ties, ruffles. Everything gives an unusually homely atmosphere.
Even if you have a 5 by 5 room, the rustic genre will fit perfectly into such a space. A sort of grandma’s room, with lots of decor, pleasant warm shades on the walls and window frames. Add light colors, remove old, unnecessary furniture, replacing it with ergonomic options.
We spend the most time in the hall - relaxing, receiving guests, communicating. Therefore, every little detail must be thought out in this place. At least that's how it will be ideally. What form the hall will take depends on many factors, and the financial component is by no means the most important.
It all starts with thoroughly cleaning the ceiling and walls of old finishes. This stage of work must be done as efficiently as possible, otherwise the new finish risks crumbling along with the old one. An exception is when finishing walls with plasterboard; in this case, it is not at all necessary to remove the old finish.
After the old finish is removed, hidden electrical wiring needs to be installed. The final stage is puttying followed by sanding; in this case, a primer can be applied to the surface in advance.
The finish must be extremely firmly fixed to the surface, and it does not matter whether it is brick, concrete, wood or drywall. To do this, we prime the walls; it provides excellent adhesion and protects the surface from damage. On a concrete base, a primer layer is often abandoned, but still in this case there is a real chance that the repair will not be of the highest quality.
But only a primer is not capable of hiding various types of irregularities and surface flaws. To level the wall and hide its defects, you need to putty the wall. Puttying and sanding help make the wall as smooth and even as possible.
Typically, the preparatory stage includes checking the floor for various types of deformation, such as creaking, unevenness and loose beams. If this is the case, then outdated boards are replaced with new ones, and all kinds of defects are eliminated.
Floor repair
Floor repair is the last stage of work.
The following finishing options are used most often:
- Laminate. The material is relatively inexpensive, but high quality. You can choose to match any wood pattern. It is widespread due to its excellent price-quality ratio.
— Parquet is an environmentally friendly material made from natural wood. It retains heat excellently, however, its installation is difficult and the cost is high.
laying parquet in the living room
— Cork floor. The material is made from cork oak bark. It is environmentally friendly, has excellent heat and sound insulation properties. Particularly valuable for connoisseurs of environmentally friendly materials.
- Linoleum. It is used extremely rarely as a finishing material for the floor of a hall, although it can imitate various wooden and stone coverings.
— Self-leveling floor. It is valued due to the possibility of applying 3D patterns and a perfectly flat surface.
- Ceramic tile. It is used extremely rarely as a floor covering, as it is highly expensive and resistant to aggressive environments and moisture (which is overkill for a hall). At the same time, this material is cold due to its technical characteristics. But if the decision is made, it is better to lay ceramic tiles on the so-called “warm floor”.
In any case, before making repairs in the hall, it is better to entrust the choice of material to a specialist.
Living room walls
A variety of materials can be used when decorating walls. Their choice directly depends on the financial capabilities of the owner of the living space, as well as on the pre-designed design. The most popular options are:
— Painting. It is used as a coating for perfectly smooth walls. Each type of paint has its own disadvantages and advantages, but at the same time allows you to apply a unique design to the surface using a stencil (at home). It is considered an ideal finishing material, as it is easy to use, has impressive technical characteristics, and allows you to use your imagination to the maximum when decorating a room.
— Wallpapering. The material is widespread due to the rich variety of textures, patterns and colors. Before making renovations in the hall, the wallpaper is selected first, since it will cover most of all internal surfaces (ceiling, walls).
- Decorative plaster. It is used not only as an element of wall decoration, but also as a finishing touch, eliminating the smallest flaws from the walls.
We apply decorative plaster to the walls in the living room
- Drywall. The material is used quite often, as it allows you to hide any defects in the walls. In addition, wiring cables, various communications, and insulation are laid under it. With all this, the appearance of the wall can be adjusted to the taste of the owner of the living space, because plasterboard is excellent for wallpapering and applying paint.
- Wall panels. They are made from wood, or they use polyvinyl chloride (plastic among the people). The first option is environmentally friendly and has a good appearance. The second material is rarely used for interior decoration of the hall, since the panels have a specific smell.
- Decorative rock. This finishing material is rarely used. It can decorate any room, but at the same time it is very impractical and expensive.
Will we do a redevelopment?
If you decide to demolish walls, create new ones, move doors and other manipulations, then first familiarize yourself with a number of legal acts. Because this is not such a simple procedure as it might seem at first glance, and requires a number of approvals from the relevant authorities. Of course, one can be indignant that even here there is a bureaucracy, again collecting papers, obtaining permits.
How to insulate a floor in a wooden house
However, redevelopment is a responsible task, and how correctly everything is done, whether the strength and load-bearing capacity of building structures is not compromised, and compliance with other points, will further determine your and the other residents’ safety of living in the house. You will spend quite a lot of time, but you will agree, it is still better than if the fact of illegal redevelopment is revealed, you will have to pay a large fine or, even worse, return everything to its original form.
So, after you have imagined how the rooms will be located, all that remains is to transfer everything onto paper. It’s okay if you are not an artist, you can make schematic sketches, this is your creation and the main thing is that you understand your drawings. Of course, you can resort to computer programs for developing the layout and design of apartments; now there are a sufficient number of them; decide which option is closer to you.
Now that you have an idea of what and where you will have it, let’s move on.