At what distance from the wall should the cornice be mounted?
The first question that arises when you start installing a cornice above a window is at what distance from the corner it should be attached. Close? Stepping back 10 cm? 20 cm?
The curtain rod should be placed so that it hangs freely without touching the window sill or heating radiators.
In fact, the distance can be from 8 to 15-20 cm. It is determined depending on the location of the heating radiators and/or window sill. The cornice must be placed so that the tulle and curtains hang freely, without touching either one or the other. Firstly, this way the drapery lies perfectly, secondly, it is better for the fabrics, and thirdly, there is better air circulation, which is important during the heating season.
Installation of a ceiling cornice to a concrete floor
The procedure for attaching a ceiling cornice is not too complicated, but if the length of the product is more than two meters, an assistant will be required. In addition to the fasteners, you only need a drill and a screwdriver with a suitable slot.
This is what an installed ceiling cornice with curtains should look like
Preparing the cornice for installation
Before attaching the ceiling cornice, it is necessary to carry out some preparatory work. The first thing we do is adjust the length. If everything suits you, great. If you need to cut off excess, you will need a hacksaw. It is advisable to use a cloth for plastic, but it is also suitable for metal. If the cornice is assembled, remove the plugs and turns (if any), cut off the excess, then return everything to its place - the turn, the plug.
Adjusting the length of the cornice
If the holes for the fasteners are not drilled at the factory, you will have to make them yourself. Let's start with the markings. Mark so that the distance between adjacent screws is no more than 50-60 cm. If there are joints, then retreat 5-10 cm from the joint on both sides. For better load distribution, it is better to stagger the mounting holes.
After the marks are set, we drill mounting holes in the plastic. Use a drill that is equal in diameter to the size of the fastener. More is undesirable, but less is also not good - when twisted, the plastic may crack.
Even for a single-row cornice, it is better to place the holes in a checkerboard pattern
After all the holes are ready, if the cornice is prefabricated, assemble all the parts. You don't have to install the decorative trim (if any). For now she will only get in the way.
How to attach a ceiling curtain rod
In most apartments and many private houses the ceiling is a concrete slab. Accordingly, we take a drill for concrete. The diameter of the drill should be taken according to the size of the dowel. Then we proceed according to plan:
- We apply the assembled cornice to the ceiling and level it.
- Use a simple pencil or marker to mark the attachment points.
- We drill holes, trying to hit exactly the marks. The depth is equal to the length of the plastic insert. To make control easier, you can stick a strip of electrical tape on the drill.
Fixed ceiling cornice, but no curtains - We insert the plastic part of the dowel into the hole. It should be flush with the ceiling. The protruding parts will interfere with installation, so we either deepen the hole or cut off the excess plastic.
- After all the plastic parts of the dowels are installed, if the decorative strip is attached to the grooves (not with Velcro), install it. It is not always possible to “latch”, so you should not hope that you will install it “later”. Most often you have to put on this bar gradually, moving along the grooves as if on rails. This cannot be done on the ceiling; you have to remove the already mounted cornice. As you understand, this does not improve the mood.
- We attach the assembled cornice to the marks. First we install the fasteners along the edges and in the center. If the cornice is long, we fasten the two halves with an additional one or two dowels. So that the plastic does not sag. The following installation order is arbitrary.
That's all, actually. You know how to attach a ceiling cornice to a concrete floor. If the floor is wooden, everything is even simpler: there is no need to pre-install dowels. After all, wood screws are usually used. In this case, the cornice is leveled and screws are immediately placed in the mounting holes. It’s more convenient to follow the same order: along the edges and in the center, and then - as it turns out.
Installation methods
There are two solutions to your problem, and the choice depends on the weight of plastic ceiling curtain rods. Moreover, we are not talking about the maximum load that they can withstand, but about the actual weight of the curtains.
Another question is whether you can handle this work with your own hands, and whether you have the necessary tools.
Ceiling mount
Plastic ceiling curtain rods can be mounted in this way, provided that the curtains are light. For example, tulle and thin night curtains. It is not suitable for heavy curtains.
First, brief installation instructions:
- See if your curtain rod has through-hole mounting holes. They should be located in increments of about 50-60 cm. If they are not there or the distance is greater, then holes in the profile need to be drilled.
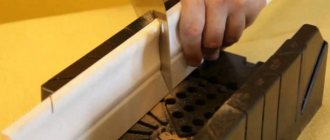
- If the ceiling plastic curtain rod is too long, saw off the excess with a hacksaw.
The easiest way to cut off excess is with a fine-tooth hacksaw.
- Attach it to the ceiling exactly along the fastening line, and through the mounting holes place it on the base of the mark with a pencil or marker.
Note. If the cornice is supplied with rotating elements, then when marking the fastening line, take into account their dimensions.
- Drill holes in the ceiling for the plastic dowels exactly according to the marks.
- Insert the dowels into them until they stop.
- Place the cornice against the ceiling again, aligning the holes, and screw a screw into each.
Now the most important thing. For installation you will need not ordinary dowels, but so-called “butterflies”.
This is what they look like:
Photo of a special dowel for drywall
You shouldn't take too big ones; size 10x50 is enough. 10 mm is the diameter, 50 mm is the length. The price is low - about one ruble per piece. Accordingly, for holes in the ceiling you will need a screwdriver with a 10 mm drill bit.
Note. Self-tapping screws are purchased separately; their optimal size is 3.5x55 mm.
To insert a butterfly into a hole in drywall, its “wings” need to be squeezed with your fingers and pushed into it until the thrust washer touches the surface. When you screw a self-tapping screw into such a dowel, it will pull its shank to the inner plane, due to which the “wings” will straighten and press against the drywall, providing reliable fastening.
Inside view: ceiling plastic curtain rods are securely fastened
For reference. The permissible load on each such element is 16-24 kg. But you shouldn’t take risks by hanging curtains that are too heavy on plastic ceiling curtain rods.
Wall mount
If you plan to place a large load on the plastic ceiling cornice, installation on a plasterboard structure without specially made mortgages is not recommended. In this case, wall mounting is performed.
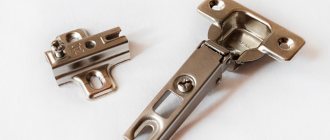
To do this you need to buy these metal brackets:
Wall Mount Bracket
Note. They come in different lengths. Choose taking into account the width of the profile and its distance from the wall.
This installation method is also better to choose when there are active children or large pets in the house, which, through carelessness, can get tangled in the curtains or pull them.
- The brackets are attached to the walls with regular dowels; you can use the ones included in the kit. To drill holes in concrete or brick, you will need a hammer drill.
- The number of brackets depends on the length of your plastic ceiling curtain rod, as well as on the weight of the curtains. If they are not very heavy, you can take a step of 1-1.5 meters. If massive and multi-layered - 50 cm.
- The brackets are attached to the plastic profile using special plates and the screws included in the kit.
How to attach
The procedure is the same, but with markings on the walls.
We recommend watching the video: “How to attach and assemble a cornice with your own hands”
Attaching the ceiling cornice to the drywall
If it was decided to install a ceiling cornice at the renovation stage, most likely there is a special niche in which it is installed. In this case, it is attached to the ceiling, and how to attach the ceiling cornice to concrete and wooden floors is described above. It will be a little more difficult, since freedom of action is limited, but not critical.
Attaching the cornice in a niche is a little more inconvenient
There may be a second option - without a niche. A wooden beam is fixed at the place where the cornice is installed. It is located between the drywall and the main floor. In this case, the ceiling cornice is attached to the beam through plasterboard. You need to use wood screws of sufficient length so that the body of the beam contains at least 2/3 of the length (preferably more).
But if you decide to replace the cornice with a ceiling one after the repair, you will have to look for special fasteners. These are the so-called butterfly and snail dowels. Both are characterized by an increased contact area with the material, due to which the load is distributed over a larger surface. But it’s still better not to use heavy fabrics.
Using special fasteners for drywall
Both types of drywall fasteners - butterfly dowel and snail dowel - come in plastic and metal. Stronger, obviously metal. But the trick is that most likely it is not the dowel that will withstand the high load, but the drywall. To prevent this from happening, reduce the fastener installation step. For example, you can make it 40-45 cm. This will increase labor intensity, but will give at least some hope that the structure will not collapse.
Installing the cornice
To easily install a curtain rod alone, you need to start not from the outermost fastening, but from the second or third from the edge. Because, no matter how tightly the self-tapping screw and dowel sit in the outer socket, the weight of the cornice and the large shoulder create a load quite sufficient to tear the fastener out of the socket. By screwing the self-tapping screw into the second or third socket, you reduce the shoulders, and with them the load.
After this, you can safely tighten the remaining screws and admire the cornice installed in place.
It is important to know: if you are installing a four-row plastic cornice, then it is better to make nests for fasteners in pairs, under the outer rows. Otherwise, over time, the cornice may take on the appearance of an inverted U.
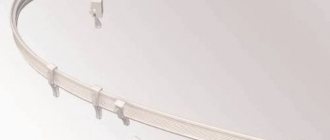
In the case of a string cornice, you need to drill two sockets on both sides of the window, screw the brackets, insert and tension the strings. If the span is large enough - three meters or more - then in the middle you need to mount the included W-shaped bracket to support the strings. Then they will not sag along the entire length.
Well insulation
Installation of a cornice on a suspended ceiling
In the case of a suspended ceiling, the ceiling cornice can only be secured to a pre-installed embedded beam. It is secured before the fabric is stretched. When fastening, use wood screws and attach them directly to the beam through the ceiling sheet.
How to attach a ceiling cornice to a suspended ceiling
The second option is a niche for installing a cornice, but this is also made during the installation of the ceiling and not later. In this case, there is also a wooden beam, but a guide for the stretch ceiling is attached to it.
Attaching a ceiling cornice in a stretch ceiling niche
There are no options for installation on a ready-made stretch ceiling. There is, however, a compromise - mounting to the wall with brackets right under the ceiling. There is a gap to the ceiling, but it is small and not too noticeable.
Marking the place where the cornice is attached
I do not undertake to give design advice, but usually wall cornices are attached approximately in the middle of the distance between the window slope and the ceiling, and horizontally - symmetrically relative to the window or wall. I usually attach the assembled cornice to the intended fastening site to visually represent the future structure. We mark the place of fastening of one of the outer bases, drill a hole, insert a dowel, secure the base and insert the bracket into the base. Holding the cornice, we roughly outline (outline) the attachment points for the remaining bases and proceed to precise marking. If the apartment has suspended ceilings or slopes of double-glazed windows, then it is enough to simply mark the places where the bases are attached, measuring equal distances from the slope or ceiling. If everything is “a little crooked,” then it is best to slightly unscrew the installed base, fasten the thread to the screw and pull it to the place where the second outermost base is supposed to be installed. We fix the thread on the wall with masking tape or electrical tape and use a level to find its required position. We mark with crosses the exact places where the bases are attached.
Attaching the ceiling cornice to the wall
For cases with suspended or plasterboard ceilings, there is another installation option - on special brackets that are attached to the wall. In this case, the distance from the corner is determined by the parameters of the bracket. They have longitudinal slits that allow you to adjust the length at your discretion. There are several holes at a distance of 5-6 cm from each other. Wall mounting brackets usually come with mounting plates that are attached to the plastic case with four small self-tapping screws. The installation step of the fasteners for wall mounting is the same - 50-60 cm; two stops are placed at the joints, 10-15 cm away from the joint.
Types of brackets for wall mounting of ceiling curtain rods
How to attach a ceiling cornice to a wall? The installation procedure is the same as in the case of installation on a concrete ceiling: marking the mounting holes, installing dowels, then attaching the cornice itself to the wall with brackets. But with different brackets the procedure is different.
This is what comes together
Option with long cuts in the bracket body:
- The plates are fixed, the brackets are inserted into the grooves.
- We apply the cornice to the installation site, mark the holes on the wall (circle it). We outline all the holes, how many there are in the cornice.
- We make holes in the wall and insert dowels.
- We remove the brackets and fix them on the wall.
- We put plates attached to the cornice onto the brackets.
- We set it exactly, at the same distance from the wall.
- Tighten the fixing bolts.
Mounting on brackets
This option is good because, if desired, you can move the cornice closer or further within the length of the cut. You can also level out imperfect wall geometry. When using the option with several holes, it is easier to first attach the brackets to the cornice, then lift the entire structure and make markings. After installing the plastic part of the dowels, attach the cornice assembly to the wall again. As you can see, it is very difficult to do without an assistant: you need someone to hold the cornice.
Attaching curtains to the cornice
The final step in installing the curtain rod is the installation of curtain mounts. There are several ways this can be done.
- Rings/hooks - most often they are included in the kit, but you can always buy them in addition.
- “Crocodiles” are reminiscent of clothespins, only they have special teeth that increase the fastening ability.
- Eyelets are metal rings that are threaded directly into the curtains, after which they are easy to hang on almost any hooks.
- Clips - the principle is the same as that of “crocodiles”, with the exception of the absence of teeth. Clips are used for tulle or light curtains.
This completes the installation of the cornice; all that remains is to hang the curtains on it. Remember that the overall appearance of the entire room depends on the correctly chosen option.
Detailed instructions are given by Master Nikolai Kotov, partner of the “Public Services Center 124” .
If you want to make minor repairs yourself, determine the extent of the breakdown, or fix a minor problem in your home, send your question to
,
and you will definitely receive a detailed answer or instructions. And if solving the problem turns out to be difficult for you, the technician will promptly come to the site and fix any problem!
In this issue I would like to offer detailed instructions on how to properly and securely hang a cornice.
We take the most common, cheapest two-row cornice, which is sold in all hardware stores. The instructions I scanned assume that you can install the product yourself.
I would like to offer you a more detailed version of the instructions that I use in practice: