Wardrobe mirror stickers - where to buy
If you don’t have enough imagination, but have a desire, use ready-made ideas by looking at the stickers provided on our website. The catalog on our website contains the widest selection of vinyl stickers and stencils that will transform your room! And quite affordable prices will allow you to update your interior as often as you want.
But on the other hand, stickers can serve you for a very long time; they are very wear-resistant. They can be washed and even rubbed, and they will not fade when exposed to sunlight.
How to decorate a closet in a modern way
Another way to decorate wardrobe doors is with corner patterns. If you want something elegant and subtle, then these stickers will help you realize your desires.
This gives you some advantages:
- small stickers are faster and more convenient to apply (and subsequently remove);
- due to its smaller size, such a sticker will cost very little;
- Without covering the entire space of the cabinet door, you can use them as an ordinary mirror.
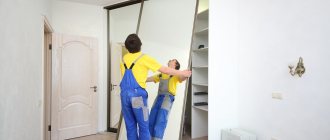
How to apply a sticker on wardrobe doors
- Surface preparation.
Before starting work, the surface must be cleaned of fingerprints, dust and other contaminants. - Preparing the sticker
The sticker should be laid out on a flat surface and smoothed using a squeegee - a special spatula. - Trying on a sticker.
To make sure you place the decal in the correct position without removing the backing, tape it to the cabinet doors and look at it from the side. You may want to move the sticker. Mark the corner points on the door with a pencil. - Applying a sticker.
Carefully remove the backing in small pieces, from top to bottom. Immediately apply the freed surface of the design to the mirror and smooth it with a squeegee without excessive pressure. Take your time, apply the sticker carefully, smoothing it thoroughly. - Final inspection.
Carefully inspect each applied element to ensure that all edges are glued, regardless of the size of the element.
Today we find sliding wardrobes in almost every apartment. The convenience and practicality of this type of furniture is beyond doubt, but its weak point is still decor. Panels and mirrors of a large area are a rather boring picture, which you will certainly want to diversify.
How to decorate a wardrobe? Of course, you can order expensive doors from several panel inserts or with photo printing, but you will have to overpay a substantial amount.
We will offer you 5 inexpensive ways to decorate your closet
with your own hands. What are their advantages?
Wide field for design solutions;
Saving money;
Convenient technologies that do not require special skills or a lot of time.
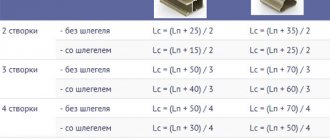
Types of mounting a mirror to a door
There are several types of fastening to the cabinet door:
Attach with double-sided tape. This method is one of the easiest and fastest. Because the mirror sheet will be fixed in literally five minutes. And if necessary, you can simply tear the workpiece from the cabinet and attach it to another place;
Correct distribution of adhesive tape when gluing a mirror
- using liquid nails marked “for mirrors” is a reliable option, but after fixing, the mirror surface cannot be separated from the cabinet;
Liquid nails for mirrors using specialized compounds for mirror and glass surfaces, for example, silicone. In this case, it is extremely important to perform all operations accurately, otherwise the work will not be successful. It will not be possible to remove the glass from the door and any mistake will be fatal;
Distribution of silicone for subsequent gluing of the mirror to the door using a mechanical method, when various fasteners are used, for example, metal brackets, through holders or furniture fasteners with decorative overlays.
Mirror on metal brackets
You can stick a compartment to the door of a closet without having any experience in this matter, and with the help of improvised means. A minimum amount of materials that can be purchased at any hardware store and a standard tool are all you need to install and secure. And most importantly, our instructions with a step-by-step description of each stage of work.
Method number 1. Large vinyl sticker
Vinyl decorative stickers for wardrobes, as a rule, are produced on a single-color German Oracal film, which greatly simplifies color matching. Outwardly, they look like a stylish pattern applied with paint. At the same time, you will be able to care for the cabinet in the usual way. Unless you resort to strong friction. And most importantly, when you get tired of one design on the door of a closet, you can literally remove the sticker in a minute without any traces and apply a new one.
This method is universal and can be used for doors made of any materials. You can safely apply stickers to glass and mirrors of sliding wardrobes. They hold up well and look very impressive. At the same time, you get rid of the obsessive reflection, and fingerprints that constantly appear on the glass surface will no longer be too noticeable.
The procedure for applying a large sticker on the wardrobe door:
- Preparation .
Clean the surface from dust, fingerprints and other contaminants; - Smoothing.
Place the sticker on a flat surface and smooth it with a squeegee (smoothing spatula), which our store always sends in the kit; - Fitting.
Attach the drawing to the door and mark the position of the corners with a pencil or erasable felt-tip pen. For accuracy, we recommend sticking the sticker with a backing onto masking tape and seeing from a distance how the drawing will look. - Removing the substrate and applying
. Since the sticker is large, remove the backing directly from the canvas attached to the tape from top to bottom in small pieces. Immediately apply the freed pattern to the surface and smooth it carefully with a squeegee without unnecessary pressure. And so on to the very bottom. At the same time, remove the transparent mounting film from top to bottom. The work should be done slowly and carefully. Carefully smooth out everything, even the smallest bubbles. It is most convenient to apply non-adhesive adhesives to closet doors with two people. If bubbles still remain, pierce them with a needle closer to the edge and remove the air with a squeegee. - Examination.
After removing the backing and mounting film, take the time to carefully look at how each element is stuck. Even for a small flower, all edges should be level on the surface.
This video will show you how to apply large vinyl stickers on surfaces:
Helpful tip: when applying a sticker to a mirror or glass of a wardrobe, spray the surface with water. The sticker will be easier to smooth out.
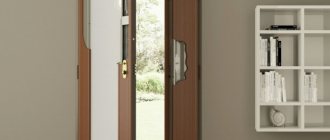
Method No. 2: Decorating wardrobe doors with corner patterns
If you don't want to cover the entire surface of the door, we recommend using vinyl decals with elegant angular patterns. Here you will get additional benefits:
Corner patterns are smaller, so the sticker will cost less;
Small elements are much easier and faster to apply;
By decorating the corners, you will allow the mirror to serve as a mirror.
When applying a small vinyl decal, we recommend removing the backing
. Place it on a flat surface with the pattern down, pick up one of the corners and carefully remove it at an acute angle. If any element sticks to the backing, return the area to its place, iron it again with a squeegee and try to remove further. The sticker should remain on the transparent film with the adhesive layer facing up.
When applying
the sticker,
take the upper corners of the mounting film and stick it, smoothing it from top to bottom along the marking lines. It’s good if you have a second person helping you to support the sticker from below so that it doesn’t stick prematurely.
Epoxy glue is the best option
Indeed, based on experience, we can say that epoxy adhesive is an ideal option that will ensure that all technical requirements are met at once. For example, applying epoxy glue is very simple.
It will not be difficult to separate it even for a schoolchild. The main disadvantage is that when drying, a persistent chemical odor is established in the room. In fact, this can be calmly experienced.
But now, even if the mirror breaks, absolutely all its parts will remain in place. That is, the mirror will be covered with a large number of cracks, but will not fall out.
In addition to all of the above, epoxy glue will also cost significantly less than all the other adhesives mentioned above.
Alexey Zemskov will prove why placing a full-length mirror on the front door is an ideal option:
I never thought that a mirror could be hung on a door, now I even have a desire to hang a mirror to fit the size of the door itself, but in my version glue will not work, only furniture fastenings.
It’s still a little scary to put a mirror on glue alone. No matter how high quality it is. I would also secure it with additional clamps around the perimeter. So. Just in case it's safe.
Method No. 3 Wardrobe decor with full-color posters
Wardrobe doors with photo printing are not a cheap pleasure. Color posters based on vinyl film are much more affordable and often look much better. This is achieved through high quality printing. You can paste a poster on one of the doors or make a composition on all panels of the wardrobe.
Drawings on color posters can be very diverse: from abstract figures to your own photographs of memorable places. They should be applied like regular vinyl stickers.
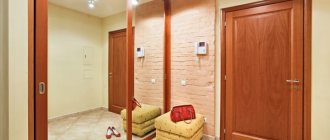
How to replace a mirror in front of a door
In principle, a mirror installed in a small hallway visually adds volume. But when you constantly see your own reflection, it becomes unpleasant. That is why you cannot mount a mirror opposite the bed, or completely lay out the bathroom with mirror tiles.
Feng Shui says that water absorbs the energy of money, it will begin to flow away like water through your fingers.
If you want to admire your reflection at full height, you can put a small wardrobe with mirrored doors in the hallway.
Convenient, functional floor mirror
If there is no space for a wardrobe, install a floor mirror. It can stand anywhere, since energy does not apply to it.
Everyone decides for themselves where to hang the mirror. To believe or not to believe signs, this decision is made depending on one’s own beliefs. Therefore, when creating design in an apartment, listen to your own feelings.
Since placing a mirror opposite the entrance ceiling is highly discouraged, an excellent solution would be to install a partition with a full-length mirror. It will allow you to save space, avoid purchasing a floor product, and comply with all superstitious signs.
Method No. 4 Sliding wardrobe with stained glass windows - economical option
Only very wealthy people have the opportunity to decorate wardrobe doors with stained glass windows. We offer a decoration method that will allow you to experience all the delights of stained glass decoration without significant costs.
The technology is extremely simple. A translucent stained glass film with an adhesive surface is applied to the mirrored door of a sliding wardrobe. The film transmits light, which returns to us through reflection. The result is a glowing effect similar to reflection from colored glass. Applying stained glass to a wardrobe mirror is as easy as a regular vinyl sticker. Check out the decorative effect.
Available to order
How to glue a mirror to the front door?
The fact is that without a full-length mirror it will be very difficult.
You need to evaluate your own image before going out. Moreover, this applies not only to women, but also to men. At the same time, a life-size mirror will require a significant amount of space... This is not true! There are ways that will make it possible to position a mirror without compromising the practicality of using the surrounding space. Read below to learn how to glue a mirror to the front door.
Method No. 5 Matting glass and mirrors using paste or aerosol
Drawings on the mirrors and glass of the wardrobe, applied using the matting method, look very noble and elegant. Matting is a technology that allows you to give a smooth glass surface roughness and opacity. To do this, a special chemical composition is applied.
Matting is usually done to order and is quite expensive. We want to tell you how to make this spectacular decor for a wardrobe with your own hands.
You will need:
- Disposable (adhesive) or reusable stencil for wardrobes;
- Paste or aerosol for matting;
- Spatula for applying paste.
The procedure for performing frosting work on glass and mirror doors:
- Clean the surface from dust and greasy marks using alcohol or glass cleaner.
- Attach the stencil to it. Disposable adhesives are applied using the vinyl sticker method. Reusable ones are secured with temporary spray adhesive. Make sure that the contours of the drawing are securely fixed.
- A thin layer of paste is applied to the exposed areas with a spatula or a special matting aerosol is sprayed. After the time specified on the packaging for the composition has elapsed, the undried excess paste is removed with a spatula, and the stencil is removed.
In this simple way, you can apply even complex designs with small details to wardrobe doors.
Video about matting a mirror using a stencil using paste and aerosol
We hope that the proposed 5 methods will help you easily choose exactly how to decorate your closet doors without extra costs.
Stained glass films from the Crystal Frost series are perfect for decorating wardrobe mirrors, glass doors and partitions, and shower stalls. An exquisite translucent pattern will make the glass surface attractive and open up space zoning possibilities. Several surface patterns are available to order
March 7, 2020 Specialization: master in the construction of plasterboard structures, finishing work and laying floor coverings. Installation of door and window units, finishing of facades, installation of electrical, plumbing and heating - I can give detailed advice on all types of work.
Gluing mirrors to furniture elements is a simple but responsible process. If you make mistakes and do everything wrong, then over time the mirror will begin to move from its place or even fall and break. In this review, we will figure out how to carry out the work reliably and efficiently; you will learn several methods and be able to choose the one that best suits your situation.
Types of fastening methods
First of all, let's figure out what methods you can use to secure mirrors. All of them have proven their reliability, but the technology for carrying out the work differs and is used for certain situations.
Mounting double-sided tape
The simplest solution that has the following advantages:
- Double-sided tape allows you to glue elements very quickly
. It holds mirrors, glass, and other sheet materials equally securely. To understand the technology, you will need a couple of minutes, and the work uses a simple set of devices, which is found in almost every house and apartment;
- The cost of this option is low
, but if quality is important to you, we recommend purchasing materials not from the budget segment, but at least from the middle price segment. When choosing a specific solution, remember that the material must have a soft spacer; ordinary stationery tape will not work, since it is not designed for high loads; - Buying tape is not difficult.
It is sold in hardware stores, as well as in retail outlets that deal in automotive parts. The second option is even preferable, since automotive double-sided tapes are characterized by increased strength and durability;
It is best to select double-sided tape with a thickness of 0.8 to 2 mm; it will smooth out minor irregularities and provide high adhesion strength to the surface. Of the manufacturers, 3M products have proven themselves best; this is the option recommended by professionals.
- It is best to glue elements at a temperature from 10 to 25 degrees
, it is this range that ensures strong fixation. Most often, the room has an optimal microclimate, so there are no problems with this aspect, but if the room is very hot, then it is better to wait until the temperature drops so that the adhesive layer on the tape does not move and the mirror does not move; - It is easy to calculate the required amount of material
. Before gluing the elements, calculate the amount of tape required for the job. To do this, you must know the total weight of the mirror; 60 sq.cm is used per 1 kilogram of mass. double-sided tape; - Possibility of dismantling elements
. If the mirror is glued crookedly, then you can remove it and redo the work. To do this, use a guitar string or a thin polystyrene tape, which is used to cut the foam part of the double-sided tape. After this, all remnants of the old material are removed and the new one is glued.
The disadvantages include the following:
- Double sided tape is not suitable for heavy mirrors
. If the size of the element is large and the weight is significant, then it is better to choose another method of fastening. This option is optimal for small mirrors; - It is important to purchase quality material
. There are many low-quality tapes on sale that do not provide the required level of strength.
Special compounds and liquid nails
The most popular option, which allows you to glue mirrors to any surface:
- Chipboard and laminated chipboard;
- Tiles in the bathroom or kitchen;
- Wooden and veneered bases;
- Plaster, concrete and plastered surface.
Since we are figuring out how to stick mirrors on furniture, we will analyze this option in more detail. Let's start with the pros:
- Low cost
. The price of the compositions is low, and they are sold in all construction stores; - Wide variety of options
. Various solutions are used - from special compounds to liquid nails and silicone for glass. It is best to use silicone, since liquid nails contain ammonia, which over time can damage the mirror amalgam and spots will appear on the surface;
- High reliability
. If the elements are fastened using technology, the fixation strength will be ideal. Below the work process is discussed in detail so that you can do the gluing yourself.
Of the minuses, it is worth noting the following:
- Impossibility of dismantling
. Once the composition has hardened, it will no longer be possible to separate the mirror from the cabinet door or panel in the hallway. You will have to change the entire element, and this is a big expense; - The importance of carrying out the work correctly
. If the technology is broken, then there is a danger that the mirror will simply fall off over time. In addition, if the wrong composition is used, the mirror may deteriorate over time.
Mechanical fastening method
In this case, special fasteners are used, which are designed for installing mirrors on furniture. There are several main options:
- Metal bracket
. The simplest and cheapest solution, which consists of metal elements bent so that they include a mirror of a certain thickness. To prevent cracks from forming on the surface during fastening due to excessive force, silicone gaskets are placed under the lower part;
- Through holders - allow you to attach mirrors to any surface
. On the outside, the installation site is covered by a decorative part, and inside there is a self-tapping screw or dowel, depending on where the installation is taking place. This option is more complicated in that you need to drill glass, which is not an easy task, and besides, you will need a special drill;
- Furniture fasteners with decorative overlays. Most often it is made in the form of clamps that hold the mirror at the top and bottom, and from the outside the installation site is covered with a decorative plug of any color and shape. With this option you can hang a mirror anywhere;
The advantages of this solution are:
- This is a safe installation option
. There is no need to worry that the mirror will slip over time; - You can dismantle the element
. If the mirror is damaged, replacing it is not difficult; the fasteners come off quickly and easily; - Lots of options
. Finding the best one is not difficult.
There are also some disadvantages:
- Difficult to install
. Attachment requires a screwdriver to drill holes and tighten screws. If you make a mistake with the drilling location, you will not be able to seal the hole; the top film of the coating will be damaged; - Not a very attractive look
. Placeholders don't always fit into the design, and this is the main problem.
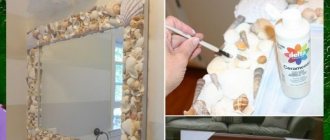
How to hang a mirror without drilling into the wall? 3 easy ways
How to hang a mirror? It would seem that the answer is obvious - using screws, hinges and other metal fasteners. But to do this you will have to drill into the wall, which is quite difficult and sometimes impossible. And then glue comes to the rescue
Liquid nails for mirrors
The very idea of gluing a heavy and fragile mirror seems quite risky. Of course, this cannot be done with simple universal glue. There are special mounting mixtures for mirrors, and their range is quite wide. So what should you choose?
Obviously, the glue that can fix the mirror must be strong and durable. It requires good adhesion to smooth surfaces, as well as resistance to deformation, humidity, and temperature changes. And of course, it cannot be so aggressive as to dissolve the amalgam (the reflective layer on the “underside” of the glass).
The first thing that comes to mind is the so-called liquid nails
. We are talking about glue with a special clay filler, which provides adhesion even to porous surfaces. Using this mounting mixture, the mirror can even be glued to a brick wall.
A relatively small mirror can be glued on your own, but if its area exceeds 1 m², it is better to entrust this work to professionals
Of course, the choice is not limited to liquid nails. The market offers us many special installation adhesives
. For example, “Tytan Professional for mirrors” from Selena, “Glue for mirrors 47A” produced by Soudal MirrorFix (Penosil), “Quelyd Mastifix for mirrors” (Bostik), “Mirror” (Krass), “Mounting glue for mirrors” (Poli- R). The average cost is 150-300 rubles. per package with a capacity of about 300 ml.
Adhesives for mirrors
Most mirror adhesives are based on synthetic rubber and resins in an organic solvent. This formula provides the material with high strength, durability, immunity to moisture and, unfortunately, a strong unpleasant odor. There are also acrylic water-soluble adhesives that do not have this drawback. Their disadvantage is that they are “hydrophobic”, which does not allow use in the bathroom or kitchen.
When choosing an adhesive, it is important to carefully read the information on the packaging. It is not advisable to use universal compounds, even those that allow working with glass - there is a risk of damaging the amalgam.
In an effort to reduce the cost of the material, manufacturers often add caustic substances to the formula that can dissolve the reflective layer. If the product is intended specifically for mirrors, there is no need to worry about this.
If you need to glue a relatively small mirror, you can use a car mirror sealant, such as acrylic-based Permatex or DoneDeal two-component silicone compound. Products of this kind are sold in compact, easy-to-use packaging and contain detailed instructions for use.
Technology of working with assembly adhesive
High-tech mounting mixtures allow you to fix the mirror on any surface - concrete, brick, wood, glass or tile. The operating technology is almost the same in all cases.
The gluing of the mirror should be carried out at a temperature of 10 to 30°C. The colder the room, the longer it will take for the glue to harden.
The first thing to start with is thorough cleaning of the surfaces to be bonded from dirt and dust, as well as degreasing with white spirit, acetone or gasoline. A concrete or plastered wall should first be impregnated with “Concrete Contact” type soil to strengthen the material and make it evenly absorbent.
The glue is applied to the back of the mirror in strokes 5–7 mm wide in increments of about 5 cm, 3–4 cm from the edge. Then apply it to the wall, cabinet door or other surface and remove it for 2-5 minutes. During this time, the solvent will evaporate from the mounting composition and the mass will become sticky. Then the mirror is applied again, leveled (the master has a few minutes for this) and left until the mixture completely hardens, which is usually about 24 hours.
Installation with double-sided tape
An alternative to glue can be special double-sided tape.
. In this way, only small mirrors can be mounted - with an area of less than 0.5 m² and a weight of less than 6 kg. The main advantage of this technology is the extreme ease of installation. The tape is cut into pieces of the required length, laid out on the wrong side, the protective film is removed, applied to the wall and pressed tightly.
If for one reason or another the mirror needs to be removed, this can be easily done using fishing line or a thin metal string. It is brought between the mirror and the wall and the tape is cut with sawing movements.
Examples of mirror mounting tape include Unibob from Tesa and Scotch. The cost of this product is 200-500 rubles. depending on the length, which varies from 1.25 to 5 m.
Using mounting tape, the mirror should be applied to the wall evenly and accurately. It will no longer be possible to correct the error, as in the case of glue.
How to glue a mirror to a cabinet door yourself
We will look at how to glue an element to silicone, since this is the simplest and most reliable option. This method is suitable for any structure, the main thing is to carry out the work correctly and use high-quality materials.
Materials for work
First of all, collect everything you need:
- Special silicone for glass and mirrors
. It is sold in hardware stores and is distinguished by the fact that it does not contain substances that damage the amalgam of mirrors. In addition, compositions of this group have high adhesion to smooth surfaces;
If you find liquid nails that are marked “for mirrors,” then you can use those too.
- Composition for degreasing surfaces
. The easiest way to remove traces of grease and other substances from furniture and the back of mirrors is to use white spirit or another universal solvent. You can also use special automotive degreasing compounds; they are more expensive, but have almost no odor;
- Mirror of the right size. Take measurements in advance and order the element ready-made; the ends will be processed, which is very important for safety.
Tool
The mirror is secured using the following devices:
- Gun for applying sealant
. With its help, the work will be done quickly and efficiently and the consumption of the composition will be minimal. The cheapest option is suitable, since the load on the tool during operation will be low;
- Measuring tool
. To accurately determine the location of the mirror, use a construction tape or ruler. And for marking it is best to use a construction pencil or felt-tip pen; - Rags for degreasing surfaces
. Any clean cloth will do; - Screwdriver or screwdriver
. If the mirror is placed on the door in the cabinet, then it is better to remove it, since it should lie horizontally; - Heavy objects
. To press the glass to the surface of the furniture, weights are placed on it. You can use improvised elements or even ordinary jars filled with water.
Fastening process: step-by-step instructions
Let's figure out how to attach a mirror with your own hands:
| Illustration | Description |
| The workplace is being prepared . It is best to make a flooring on which to lay a door or other piece of furniture on which the mirror will be glued; it can be placed nearby if there is enough space. | |
| Wardrobe door being prepared , the following actions are performed:
| |
| The mirror is being prepared . To do this, the element is turned face down and thoroughly wiped with the same rag soaked in solvent.
|
A mirror, which from time immemorial has been a symbol of wealth, is today an indispensable piece of furniture. And really, how can we do without it? After all, a mirror allows you to visually expand the room and bring more light into the room. It gives its owner the opportunity to look at himself from the outside. But why then are more and more people looking for ways to get rid of this piece of furniture? Is a mirror always appropriate? Let's try to figure this out and find ways to solve the problems that have arisen.
Mirror mounting methods
Consider different methods that differ in execution technique. Simpler methods, such as double-sided tape, are used to secure a mirror of minimal size to a smooth surface. Other options (different types of glue) are used for fixing large structures. When the surface of the cabinet door has defects or is significantly rough, it is better to use a mechanical fastening method.
Mounting double-sided tape
If you install a large mirror using this method, at best it will last for several hours/days, at worst it will not be fixed at the installation stage. You can use double-sided tape to attach products of minimal dimensions. It is best to fix thin mirrors using this method. Double-sided tape securely attaches structures with a mirror surface to chipboard.
- high speed of work;
- for installation, a minimum number of simple tools are used, which are always available at home;
- low price of material;
- Scotch tape is sold at any hardware store;
- if you need to remove a mirror, this process is as easy and quick as installation: use thin, long material with a small cross-section (for example, fishing line, ruler or string).
Myths about mirrors
The most common reason why people strive to rid their homes of mirrors is various mystical legends, originating from the “door to another world” to the source of “energy absorption.”
So, for example, when a person sleeps, his soul temporarily leaves the body. And if there is a mirror in the bedroom, then the soul may accidentally get lost and go on a journey through parallel worlds, where the reflective surface will let it through. In other words, a person sleeping in front of a mirror risks remaining soulless.
It is worth mentioning that in ancient times this did not apply to women, especially redheads, because they were believed to have no soul. Also, many believe that children under one year old should not come close to a mirror - it can jinx them.
In addition to causing everyday troubles, there is a legend according to which a mirror is a portal connecting the past, present and future. That is, if you really want to, you can travel back in time and... not return. Find yourself between two worlds. Never find peace.
But still, these are just myths. Scientific justification is no less interesting than superstitions and largely justifies them. We also know from school biology courses that people tend to figure out what they don’t know. But in the end, instead of a complete picture, the worlds are just a deception, a deception of oneself.
Who knows, maybe both scientists and mystics are right?
And yet, there are objective reasons to remove the mirror in certain places.
Where and why you shouldn't have mirrors
Let us consider cases where superstition and scientific ideas are similar in opinion.
- In the bedroom.
“Losing your soul” is not the first reason to get rid of the mirror in the bedroom. The fact is that when a person is sleeping, the mirror gives him the feeling of the presence of someone else in the room. One’s own actions, especially in semi-darkness, are perceived as someone else’s. And this, one way or another, is a lot of stress. It is already becoming impossible to get a full night's sleep. Frustration, lethargy, reluctance to do anything - perhaps the reason is in the mirror?
- In the nursery.
Similar to the example above, a mirror can scare a child at night. It is especially not recommended to have this piece of furniture where the baby is very small. Problems with falling asleep, frequent awakenings, irritable behavior during the day - this is what a mirror in a children's room entails.
- In the kitchen.
We are talking about all reflective surfaces in the food preparation area. While cooking, it is better to concentrate on the process so that your own reflection does not create a feeling of fatigue in the hostess. And according to popular belief, you shouldn’t waste energy that should go into food on a “soulless” mirror. - In the dining room.
It is believed that a mirror in front of a table with food is a good sign of wealth, but this is only if you do not look into it. One glance and the case is gone. And who can resist admiring themselves while eating? Moreover, from a physiological point of view, a mirror in the dining room will not bring anything good. Looking at one's reflection, a person is distracted from eating, which leads to digestive problems.
So, there's a problem brewing - there's a mirror where there shouldn't be one. Fortunately, this issue is easily resolved - let's find out how.