Peculiarities
Before moving on to methods for installing mirrors with your own hands, we will dwell a little on the features of the surface on which they are supposed to be attached.
Concrete is the most commonly found material in most building structures.
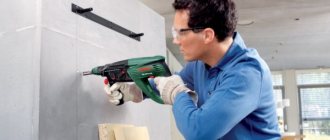
To work on concrete, you will need a hammer drill, and before gluing anything to the concrete wall, it needs to be primed.
Drywall is not a very durable material and may not withstand heavy loads or repairs. Therefore, you need to carefully monitor the weight of the product: the weight of the mirror cloth should not be more than 20 kg, and you will also need special fittings.
On average, the weight of 1 square meter of mirror, depending on its thickness, ranges from 7 to 15 kg. This must be taken into account when choosing the mounting method and type of fittings.
The nuances of placing mirrors in different rooms
Mirrors are installed in different parts of the apartment: from the kitchen to the bathroom. To ensure they last longer and bring maximum benefit, consider the conditions in the room during installation. A few simple tips will help with this.
- Do not hang mirrored accessories at an angle to the vertical, as this will distort the display.
- Before hanging a mirror in the hallway, choose a place where you can look into it at a distance of at least 1-1.5 m, this will allow you to see yourself in full height.
- A canvas height of 60 cm provides a view to the waist, and models from 120 cm provide a full-length view.
- At what height to hang a mirror in the hallway largely depends on its size. The lower edge of a full-length mirror should be no higher than 50 cm above the floor level.
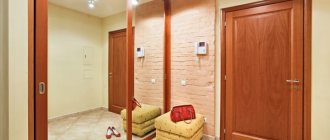
Hallway design
Installing a mirror is not very difficult, although it requires some knowledge and skills. Theoretical knowledge will certainly make the installation process easier, but it is better to practice on small specimens. Entrust large canvases and complex fastenings to professionals.
There is no need to prove that the interior of any room can be made more expressive with the help of mirrors. In the hallway it is good to place a large mirror in which you can see yourself from head to toe; in the living room, a mirror of any shape will create a mood of splendor, and for the bathroom you will need a special waterproof cloth. True, in this article we will not talk about mirrors, but about methods of attaching them.
Attaching a mirror to the wall.
There are different ways to attach a mirror to a wall. If it has no holes, then we take plywood 6-10 mm thick and U-shaped brackets made of galvanized steel. We attach the strips to the plywood with screws so that the length of the end of the strip bent onto the edge of the mirror is 6-7 mm. Then we screw hinged loops or ears to the back side of the base.
Many factories make mirrors with mounting holes. The mounting kit includes mounting anchors and flare nuts. In this case, we apply the mirror to the wall and mark with a pencil the location of the anchors. Then we make holes in the wall and install anchor bolts on the alabaster. Soft cardboard or thick fabric should be placed between the wall and the mirror to smooth out any unevenness on the wall. After the mirror is hung on the bolts, we secure it with conical nuts screwed onto the threads of the anchor bolts.
Recently, double-sided adhesive foam-based tapes have been increasingly used to attach mirrors. Double-sided mirror tape is an adhesive tape based on fine-mesh polyethylene foam with a solvent-based acrylic adhesive layer applied on both sides. Due to the fact that the base of the tape has a significant thickness (about 1 mm) and a specialized adhesive composition with high adhesiveness, the tape can be used on rough and unsmooth surfaces.
The surface areas to which the tape is applied must be dry and free of dust, grease and dirt. To remove contaminants, it is better to use pure solvents (isopropanol, hexane, etc.). The mirror should be mounted on a flat horizontal surface.
The tape is applied evenly over the entire area of the mirror in several parts in order to ensure good ventilation on the back side of the mirror. It is desirable that the number of strips of tape on the top of the mirror be twice as many as on the bottom. The protective layer of tape should be removed immediately before attaching the mirror. Immediately after gluing to the surface, you must press the mirror firmly. To remove the mirror from the surface, you need to cut the base of the tape with steel wire or fishing line and then remove the remaining tape. When reapplying, it is recommended to apply the tape to areas close to the previous attachment points.
Approximate tape consumption for attaching mirrors up to 6 mm thick.
L=(a x b xc/d) x 0.25
where L is the length of the tape required to attach the mirror, cm.
a is the width of the mirror, cm.
b is the length of the mirror, cm.
c—mirror thickness, mm.
d is the width of the tape used, mm.
Mounting a mirror in the bathroom.
Many people install a mirror after finishing the cladding. In this case, as a rule, it is mounted in the same way as in a regular room. However, since there is constantly high air humidity in the bathroom, the mirror becomes unusable within two to three years. Therefore, it is better to install it in the bathroom during the tiling process.
Before ordering a mirror, you need to mark the wall with tiles, taking into account the thickness of the seams. Then determine the desired size of the mirror and its placement on the wall so that the length and width of its edges coincide with the edges of the tiles, and there is a seam between the mirror and the cladding, the thickness of which is equal to the thickness of the seams between the tiles.
Only after such careful marking can the mirror be ordered from the workshop, and in the meantime, start tiling the bathroom.
Before hanging the mirror, cakes of cement-sand mortar with a composition of 1:3-1:4 are applied to the wall surface with a distance of 60-100 mm from each other. After this, take a plastic film with dimensions wider and higher than the mirror by 40-50 mm and apply it to the back of the mirror. A well-pressed mirror will crush the cakes, distributing the solution evenly over the surface, and after the solution has set, it will lie on a perfectly flat surface. The polyethylene film will protect the protective layer of amalgam from destruction by moisture. The edges of the film protruding along the perimeter of the mirror are carefully trimmed, and the seam between the mirror and the tiles is sealed with a 1:4 cement-sand mortar with the addition of a small amount of PVA glue.
If the mirror is secured with staples, drill socket holes in the places where they are installed and insert plugs of well-dried hardwood onto the glue. The staples are attached to the plugs using galvanized screws. If the mirror is small, it can also be glued with mounting tape. Only in this case do we choose waterproof tape so that exposure to humidity does not affect the reliability of the fixation. By the way, some tile manufacturers also produce waterproof adhesive tape for mirrors under the same brand.
The mirror is attached as follows: strips of adhesive tape are glued to the back surface of the mirror (along the perimeter or in vertical stripes), then the protective film is removed and the mirror is glued to the previously cleaned tile. The mounting tape has a foam structure, so it not only glues, but also clogs all the irregularities and grooves that arise. Given the harmful effects of moisture on amalgam, it is worth treating the edges of the mirror with a sealant to prevent the mirror from darkening.
Mounting a mirror in furniture.
Consider attaching a mirror to a cabinet door. The main methods of fastening are using metal U-shaped tabs (or plastic stops), screws, and double-sided mounting tape. It is best to attach the mirror in a horizontal position to a door that has been removed from its hinges. When using screws, holes are drilled in the corners of the mirror. (it is better to use diamond drills and constantly wet the surface). A layer of soft fabric or soft cardboard is placed under the mirror. Plastic washers are inserted under the screw heads.
When using the feet, you need to check the accuracy of their height and, if necessary, install spacers under them. The height of the legs should ensure a snug fit to the glass, but without tension. After marking the holes for attaching the legs, it is recommended to remove the mirror and screw the legs, then bend them, insert the underlying soft layer into the mirror and crimp.
When using tape, you need to degrease the surface of the back of the mirror and the cabinet door, stick the tape in vertical stripes on the back of the mirror, remove the protective film and stick it on the door. If the mirror is large, then the space between the tape is coated with liquid nails. True, in this case it will be almost impossible to dismantle the mirror without damaging it, but such a mirror, if it falls, will only be together with the door. All cabinets and hallways with mirrors presented on our website already come with adhesive tape. Fastening on stops is less commonly used, as, for example, in dressing tables.
Mirrors, like any other type of decor, differ from each other depending on their characteristics. The thinnest mirrors are 5 mm thick; they are very fragile and you must be extremely careful when working with them. The slightest wrong movement when installing a thin mirror will damage its surface. By itself. The thickness of the finished mirror directly affects the weight of the product and installing a thick mirror is much more difficult than a thin one.
The second difference between mirrors is the presence of amalgam. Amalgam
This is a special coating on the back of the mirror, which makes it possible to turn an ordinary transparent surface into a mirror. Frameless models made using this principle are quite cheap, but they also have their drawbacks - sudden fogging when the temperature changes. Usually, this effect appears when installing a mirror in the bathroom, as soon as you open the hot water, the mirror immediately fogs up.
Mirrors coated with silver amalgam do not fog up when the temperature changes. Such mirrors, of course, are more expensive than aluminum ones, but they are much more convenient to use. If you, like all beginners in renovation, are trying to save money, then buy mirrors with silver amalgam for the bathroom, and for all other rooms you can use mirrors with aluminum amalgam.
Methods for attaching mirrors to the wall
When renovating or arranging an apartment or home, sometimes you need to fix a mirror that does not have a frame. Recently, this is the most popular design method. In general, there are five ways of fastening. They are selected depending on the type of base on which the installation will be made and the area of the mirror surface.
You can hang a mirror in the following ways:
- Glue to the surface using special glue or adhesive-sealant.
- Install special holders on the wall.
- Drill holes in the mirror and fasten them to the wall or furniture door. You can use ordinary self-tapping screws, but there are special fasteners with plastic compensators that prevent the fasteners from being “tightened” and protect against cracks.
- Install a decorative profile on the wall, lower the bottom edge of the mirror into it, and secure the top edge using one of the methods described above.
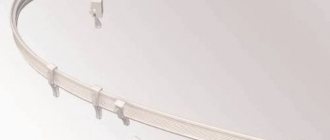
- Hanging with special tape (3M mounting tape).
- Attaching a mirror to a wall without drilling is possible only with glue or special double-sided tape. This may be required when installing on a plasterboard wall, partitions made of foam blocks, or other materials with low load-bearing capacity. This method is also useful if you don’t want to damage tiles, furniture doors, etc. All other methods involve drilling holes.
How to glue a mirror with double-sided tape
Mirrors that are small in size and weight can be glued to a special 3M double-sided tape. An adhesive composition is applied to the foamed polyethylene or polyurethane on both sides. The foam base compensates for some unevenness of the base and also serves to absorb movement of the base. The thickness of the base (adhesive tape) can be from 0.8 mm to 1.6 mm, the width of the tape is 6-25 mm.
Glue quickly and securely using special 3M double-sided mounting tape
Pieces of tape are glued onto a clean, grease-free base. It is distributed evenly over the entire surface. It is not worth gluing along the perimeter; it is better to glue all the pieces vertically in a checkerboard pattern at a distance of about 10-12 cm from each other. The tape consumption depends on the mirror area; experimental data are given in the table.
Consumption of double-sided foam tape for gluing mirrors
| tape width 19 mm | tape width 25 mm | tape width 19 mm | tape width 25 mm | tape width 19 mm | tape width 25 mm | |
| 600 | 14 cm | 11 cm | 19 cm | 14 cm | 24 cm | 18 cm |
| 800 | 19 cm | 14 cm | 25 cm | 19 cm | 32 cm | 24 cm |
| 1000 | 24 cm | 18 cm | 32 cm | 24 cm | 39 cm | 30 cm |
| 1200 | 28 cm | 22 cm | 38 cm | 29 cm | 47 cm | 36 cm |
| 1400 | 33 cm | 25 cm | 44 cm | 34 cm | 55 cm | 42 cm |
| 1600 | 38 cm | 29 cm | 51 cm | 38 cm | 63 cm | 48 cm |
| 1800 | 43 cm | 32 cm | 57 cm | 43 cm | 71 cm | 64 cm |
| 2000 | 47 cm | 36 cm | 63 cm | 48 cm | 79 cm | 60 cm |
| 2200 | 52 cm | 40 cm | 69 cm | 53 cm | 87 cm | 66 cm |
| 2400 | 57 cm | 43 cm | 76 cm | 58 cm | 95 cm | 72 cm |
| 2600 | 62 cm | 47 cm | 82 cm | 62 cm | 103 cm | 78 cm |
| 2800 | 66 cm | 50 cm | 88 cm | 67 cm | 111 cm | 84 cm |
| 3000 | 71 cm | 54 cm | 95 cm | 72 cm | 118 cm | 90 cm |
The final touch is to remove the protective film from the glued pieces and install the mirror in its intended place. Manufacturers of this type of tape provide a guarantee for 10,000 adhesives, so if it is installed incorrectly, you can correct it.
Fastening the mirror to the wall using 3M adhesive tape is reliable - this material is used in industry for gluing smooth fragments. This compound is not afraid of ultraviolet radiation and has a wide temperature range of use (from -40°C to +90°C). The adhesive composition has excellent resistance to water. The only limitation is that this tape adheres much worse to porous surfaces. But with ceramic tiles, laminated MDF or chipboard, adhesion is excellent. If in doubt, you can conduct an experiment - glue something heavy, then try to tear it off. Based on the results, you can draw your own conclusions.
Mirror holders and installation methods
If after some time the mirror has to be removed/replaced, it is more convenient to install it on the holders. They are of two types:
- end-to-end;
- non-through (ordinary).
Blind-through mirror holders are installed on a wall or door. Then the edge of the mirror is inserted into them. They can be attached almost flush to the plane of the wall/door, or they can be remote-mounted. In the second option, a gap of 5 mm to several centimeters remains between the wall and the mirror.
This saves you if you need to install it on uneven walls.
When using conventional holders, they are placed two at the bottom (if the mirror is small, you can place one at the bottom - in the center), two on the sides. When installing, you need to carefully measure and set aside the dimensions. The lower holders are positioned strictly horizontally at an equal distance from the edge, and the side holders are placed so that the edge of the mirror fits easily into their grooves. Moreover, it should not fall out even with a maximum shift to one side.
Typically, the installation distance of the holders should be 2-3 mm wider than the mirror, but there may be variations depending on the design of the holders.
Another option is two at the top and two at the bottom. In this case, the distance between the fasteners is also a couple of millimeters greater than the height of the mirror.
Through holders are used if the mirror surface has holes for fasteners. They can be made in a glass workshop. The holders themselves are ordinary self-tapping screws or dowel-nails with plastic linings and decorative caps of various shapes and diameters.
They are installed like regular dowels:
- First, holes for installation are marked (attach the mirror to the wall, make marks with a pencil or marker), holes are drilled, and plastic plugs are installed for the dowels.
- Then the fastener with the plastic plug in place is threaded through the hole in the mirror surface and installed in place.
- The final stage is the installation of decorative overlays.
Useful video
In a modern home, a mirror has long become an interior item or even a highlight of the room design. Mirrors are installed in the bathroom, in the hallway, in the living room and even in the bedroom. From time to time, mirror glass has to be removed in order to make repairs, hang wallpaper and lay tiles. After re-gluing the wallpaper, the mirror panels return to their original places, and the question automatically arises of how to attach the mirror to the wall with wallpaper.
What other methods of fastening are there?
Hidden fasteners require some effort. In this case, you can do without nails and will not damage the wall. It is best to glue the product onto a plasterboard surface. For a brick wall, you can use nails.
So, the mirror can be glued or hung.
Glue
Sticking a mirror panel is a fairly easy process. You can paste it in several ways.
The advantage of this group of methods will be the absence of visible fastenings on the surface of the mirror, the possibility of using the product without a frame, the ability to decorate the interior using small figured models in the form of butterflies, flowers, polygons and other things.
Gluing is a relatively simple method, perfect for small products.
At the same time, this method of strengthening a mirror in different applications will have three serious disadvantages:
- In many cases, a glued product will not be able to be removed from the wall - it will have to be broken.
- The surface on which you intend to place your mirror must be level and stable. And if the first is easy to check, then it is quite difficult to predict that a wall (especially a newly erected or newly plastered one) will not shrink, which will lead to the destruction of the product.
- It cannot be glued to all surfaces and not in all rooms. It will not stick, for example, to tiles, and changes in temperature and humidity in the bathroom or kitchen can destroy the adhesive layer over time.
For work you need to use a special mirror glue - it does not contain acids that could spoil the amalgam. Before using another adhesive, the back side of the product should be treated with a sealant. Neutral silicone sealant can also be used instead of glue.
When gluing the product in the bathroom, you should use a special silicone sealant for aquariums, which costs a little more than usual, but contains antifungal additives and is originally intended for use in a damp environment.
Prepare, level and degrease the surface. If you are gluing the product to a vertical surface, be sure to prepare supports that will help hold the canvas in place until the glue hardens. For this purpose, you can use planks, or several screws, temporarily screwed in along the lower edge of the marking so that the mirror sheet rests on them.
The glue can also be combined with several strips of mounting tape, which will serve the same purpose and additionally secure the canvas before the glue hardens.
If you want to glue the canvas to the front door or cabinet door, it is better to place them horizontally, removing them from the hinges - this is more convenient. You will not need to use supports, and the mirror sheet will definitely not move before the glue has completely hardened.
You cannot paste canvas onto wallpaper - there is no guarantee that it, in turn, will stay on the wall. Therefore, the wall must be cleaned of wallpaper and other unstable coatings and primed.
Apply the glue in strips, leaving a gap of 8-12 centimeters between them, depending on the size of the canvas. Glue can also be applied in a “snake” pattern, in a checkerboard pattern, or dotted along the entire back side of your mirror. Try to avoid the edge - the glue may bleed out untidy and be difficult to remove from the wall later.
Be sure to put markings on the wall where you plan to glue the mirror, it will help you navigate. Use a level to check that it is applied evenly.
- Place the mirror against the wall, following the markings.
- Be careful: the glue hardens quickly, and you may not have time to adjust the position if you applied the mirror incorrectly.
- Hold the mirror for a few minutes, pressing it tightly, then place supports - they can be removed in a day or two.
You cannot stick a mirror onto a tile: therefore, usually when installing tiles in a bathroom, a free section of the wall is left in advance to fit the size of the future mirror.
If you haven't done this, you will have to remove the tiles or choose another method of attaching the mirror to the wall. To compensate for the height difference, if the thickness turns out to be different between the tile and the mirror (most often, the mirror is thinner), an additional layer of plaster is applied under the product, or a sheet of waterproof plasterboard is installed between it and the wall. The joints can be treated with glue or sanitary sealant.
If the canvas is large, then you need to take additional precautions. So, the surface of the wall under it should be very well leveled, and a special film should be glued to the surface of the mirror: now, if it breaks, it will not be fraught with serious injuries.
Mirror walls made of several large canvases are mounted with a small gap between the canvases so that the mirrors do not break during installation or if the walls shrink slightly during use.
Small mirrors can be glued without glue, only using double-sided mounting tape. The advantage of this method is that the foam base of the tape compensates to some extent both the unevenness of the surface under the mirror and its possible movements.
This method of gluing, in addition, allows for the dismantling of the mirror.
But the mounting tape must be wide, of high quality and designed to withstand heavy loads. The mirror amalgam must withstand the same loads: in some cheap models it may begin to peel off during operation, and there is a risk of damaging it during installation. It is generally not recommended to glue these mirrors.
Just as before using glue, first you need to prepare the surfaces - clean them from dust and wipe them with alcohol to degrease. The adhesive tape is glued to the surface evenly, but it should not be placed around the perimeter or in horizontal stripes - the pieces of adhesive tape are placed vertically in a checkerboard pattern.
Closer to the top edge of the mirror, you can add a few additional stripes.
Hang
If the mirror is without a frame, then you can use various types of fittings available in stores: brackets, profiles, brackets, clamps and strips. With their help, the mirror can be attached either close to the wall or placed remotely - with a gap of 5 mm to several centimeters between it and the wall.
This may be useful if the surface under the mirror is uneven and cannot be leveled.
There are two types of fasteners for mirrors: through and through.
The through method of fastening involves installation using dowels through holes made directly in the mirror sheet. If your mirror already comes with special holes, or the store provides a glass drilling service, all you have to do is install dowels into the wall and screw the mirror.
Typically, a dowel for attaching mirrors (and not only) consists of:
- A sleeve made of hard plastic, placed in the wall, expands and is well fixed in the wall when screwing in the screw.
- Vinta.
- Special clamping pads that are placed between the glass and the wall, the glass and the screw head, and do not allow damage to the mirror when tightened.
- Decorative plugs, which are made of metal or plastic and hide the heads of the bolts.
When hanging the canvas using dowels on ceramic tiles, a wall covered with wood or covered with PVC panels, be sure to keep in mind that fastening to the tile is not enough - you need to go deeper into the base wall, for which longer dowels are used, or it is better to clear the wall of the coating in the place where you plan to mount the mirror.
If the type of surface allows you to directly screw a screw into it (wooden furniture), then you can do without a dowel sleeve.
If the wall is fragile (chipboard, plasterboard), use special dowels.
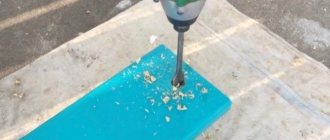
If there are no ready-made holes in the product, but the through-the-hole installation method suits you, and you want to make them yourself, you will need a special diamond drill for glass, a low-speed drill and a little patience.
Before drilling, secure the blade to a flat, preferably wooden, surface so that it does not move, degrease the surface with alcohol and mark with a marker the places where you will drill holes.
The product may crack due to heat during the drilling process. To avoid this, you will have to work at low speed - from 250 to 1000 rpm of the drill. To prevent the fabric that heats up during the drilling process from cracking, mold a “cup” of plasticine around the markings and fill it with water or turpentine.
The liquid will cool the glass and retain the glass dust generated during operation.
If you want to mount the product with non-through fasteners, then the installation algorithm for all types of such fasteners is approximately the same. The larger and heavier the canvas, the more fastenings you will have to use.
Pay special attention to the lower fasteners - they must withstand the greatest load.
Typically, the fastening elements are installed from below - at a distance of 2-3 centimeters from the intended angle of the mirror. And on the sides, so that the mirror is held in this “pocket” under its own weight. It is possible to install the fittings in which the fasteners are installed at the bottom and top, and the mirror is “nested” on the side.
The lower elements are installed strictly horizontally according to the markings, the side ones - usually so that the mirror on one side fits freely into their grooves. Usually this is 2-3 mm from the intended side edge of the mirror, but the distance depends on the specific type and style of fittings you have chosen.
Be sure to check that the mirror cannot fall out when moved to one side as much as possible.
Sometimes, for reliability, a decorative profile is used as a lower element of the fittings, which can be combined with any other method of attaching the upper edge - staples or through dowels.
If you want to give the mirror canvas additional strength, you can glue it to a sheet of plywood or chipboard: such a measure will not only prevent the mirror from breaking simply with careless pressure, but will also make it thicker; take this into account separately during installation.
When hanging a mirror, stick adhesive pads on its corners on the back side: they are sold in stores, they are often glued, for example, to furniture legs. With this precaution, the mirror will not “dangle” in the mounts.
If you are installing a mirror in the bathroom or kitchen, treat the back side and ends of the glass with sanitary sealant.
Mirrors placed in a frame are most often already supplied by the manufacturer with rings or hinges; all you have to do is install a suitable counter part, for example, hooks, on the wall.
You can also purchase hinges or hanging plates from the store.
A mirror in a heavy wooden frame without ready-made fasteners can be mounted on a wall at the top edge using two slats with a cross-section of approximately 50 by 20 mm, with longitudinal cuts at an angle of 45 degrees, which interlock into a “lock.”
One of them is attached horizontally to the wall, the other to the back of the frame at a height of approximately 4/5 of the mirror (at some distance from the top edge). The mirror will be held in the “lock” under its own weight.
When installing wall-mounted models, be sure to take into account the features of the room. So, in a nursery, even small mirrors should be covered with anti-fragmentation film to avoid injury.
In small and dark rooms, install a mirror on the wall perpendicular to the window. Horizontally placed mirrors visually expand the room, and vertical ones make the room appear taller.
Before installing the mirror, be sure to check what it will reflect.
how to glue a piece of furniture to a wall or hang it on dowels, is it possible to attach it without nails?
Having completed the first stage of renovation, many owners are in a hurry to give the room a little more comfort, setting up lighting, adjusting window sashes and installing mirror panels.
Mirrors in the interior become a certain “zest”, they give the room a shine, but it is also a household necessity - try shaving, applying makeup and checking your appearance without a mirror! But how can you hang it if the room is covered with wallpaper? Is it necessary to make holes in such beautiful walls or is it possible to somehow do without it?
How can I attach a piece of furniture?
There are several ways to attach:
- Using glue.
- On special holders.
- For fastening with plastic expansion joints or screws to a furniture door.
- Using a decorative profile.
- On nails or dowels.
Glue
You can also use glue, but keep the following in mind::
- The glue must have a sufficiently high degree of adhesion to the base of the wall. The material will not stick if the surface is covered with cement-sand, gypsum or lime plaster. But this applies to epoxy, silicone and polyurethane glue. With a polymer coating this problem will not arise.
- Since the back side of your mirror is covered with paint (you can buy a special mastic), check the adhesion strength of the surface to the adhesive mass. Not every glue can “flow” properly.
- The strength of the adhesive seam is a separate concern. It must be strong in any direction of load application. For example, cyanoacrylate can hold a weight on a wall, but if the load is directed normal to the surface. If the load is different (bending, shearing), the strength will decrease to 1.5 kg per square centimeter.
Advice
It will be easiest to do the job if the wallpaper was glued to a wall covered with plasterboard. In other cases, contact will be at a maximum of three points, and this is clearly not enough. Even if you smear glue on the entire back side of the mirror, the contact patch will be 10% at best.
Select and install an intermediate plate made of fiberboard, for this:
- A rectangular piece (with an area slightly less than half the surface of the mirror) is cut out of a fiberboard.
- Fix it on the wall (use self-tapping screws and plastic plugs) and attach it to the wall. Use a level while working.
The massive mirror plate is attached with polyurethane glue, the middle one with silicone.
If you want to remove the structure in the future, use a thin string. It will cut the adhesive without any problems.
If the mirror weighs more than 2 kg, it is better not to use the following materials:
- Glue for rubber and hot glue guns.
- Paint (epoxy, alkyd oil, polyurethane, acrylic).
- Sealing silicone sealants.
- Polyurethane foam.
- Double sided tape.
Even if the mirror sticks to the surface of the wall, the wallpaper itself may come off. The result is obvious.
High-quality adhesives - “Zubr”, “Ravak”, “Krass”.
Hang on dowels
- Make holes in the product itself. You can do this yourself, order a service from a specialist, or ask for help in the store itself.
- In the apartment, attach the mirror to the wall and mark the points where the fasteners will be located.
- Drill holes using a concrete drill bit. The depth of each is no more than 10 mm. Secure the sleeves.
- Screw in the metal screws and install the clamping elements.
- Install the caps on top.
- Check if everything is installed securely enough.
Attention
If the product is large (up to 20 kg) and the wall is made of plasterboard, use butterfly dowels. Their feature is longitudinal ribs that prevent them from turning and falling deep into the wall. The same scheme is used for attaching to a rope or fishing line.
Fasten without nails
If you hate to spoil the wallpaper, use double-sided tape or liquid nails. Buy adhesive tape with a width of at least 10 cm.
- Apply liquid nails or tape to the back of the product, maintaining a distance of 6-8 cm from each other. Make small indentations along the edges so that while you press on the mirror, the solution does not come out from the side.
- Press the mirror against the wall for 10-15 minutes. You can organize special supports to help you. If you hang a mirror on a door, remove it from its hinges and place it on the floor - it will be more convenient.
Gluing on tiles is prohibited!
The following household tapes have proven themselves well::
- ABRO on foam base;
- German Orafol;
- adhesive tape "Liderpax";
- heat-resistant mounting adhesive tape 3M VHB GPH 110.
Useful tips
- When choosing materials for fastening, give preference to reliable manufacturers who have been releasing products on the market for more than one year and have few complaints. You can get maximum information on the relevant thematic forums.
- Do not use glue that has expired.
- Prepare the surface for work: eliminate obvious pits and protrusions, level. If a mirror hangs on a wall with defects, it will be under stress and will eventually burst.
- After hanging the mirror, do not touch it for 3-4 days - let it harden.
- If the mirror weighs 2 kilograms or more, secure it mechanically or add a small stand or several fasteners.
- When choosing a place, keep in mind that a mirror installed opposite the window opening visually expands it and makes it lighter.
ImportantIt is better not to hang a mirror near the kitchen stove - it will quickly fade. In the hallway it is more convenient to install a full-length canvas, but in the nursery it is better to hang a small one and cover it with a protective film.
- If you plan to hang a mirror in a room whose walls will be covered with tiles, leave room for the product in advance.
If you are not sure that you can cope with the task, involve experts in the work. If you are overcome by passion and the desire to do everything yourself, don’t be a coward, but don’t rush forward as if to storm. Read several articles on the topic, ask for advice from people with experience - after all, it is important to take into account the quality of materials, the features of the canvas, and dimensions.
Useful video
We invite you to watch an interesting video about methods of mounting a mirror on the wall:
okcomfort.com
Recommendations for placement
When choosing a method for attaching a mirror, based on the wall material and its reliability, do not forget about the place in which this mirror will look most advantageous. It's no secret that sometimes it is not possible to place the mirror canvas where you want.
The reason may be the design features of the room, lack of footage.
In small apartments, each piece of furniture has its own place, which limits the space for the mirror itself. To simplify the task, you can pay attention to some nuances:
In a small darkened room, it is worth placing a mirror opposite the window opening to give more light to the room. A mirror on the entire bedroom wall will double the size of a small room.
- You should not hang a glass product in the kitchen near the stove: high temperature and fumes will provoke frequent maintenance and will affect the appearance of the mirror.
- Before hanging the canvas panel in the bathroom, cover its ends and back with a special sealant.
- Cover the mirror in the children's room with a special film that will prevent the product from flying apart if it breaks.
- Place stylized lighting fixtures on the wall near the mirror in the hallway; this will visually expand the walls in the room and give a stunning effect of diffused light.
- You should not hang decorative elements of this type at an angle to a vertical surface, so as not to distort the reflection.
- To properly fix the mirror in the hallway, choose a place where you can look into it at full height and keep in mind that this distance should be at least 1-1.5 m from you.
- The canvas, which has a height of 0.6 m, guarantees a waist-high view, a product from 1.2 m provides a full view of the entire figure. The choice of mounting height for a mirror in the hall will depend on its height and width. The bottom of the mirror for a full-length view should be placed no higher than 0.5 m above the floor level.
- For high-quality gluing of a mirror, the wall must be level. The thin product will adapt to the shape of an uneven wall, since the glass can take the shape of the base. To stick the product correctly and avoid such a nuisance, you need to choose thick glass or level the wall.
How to hang a mirror on the wall in the hallway
Since the day man invented the mirror, not a single home can do without it. This home furnishing item is constantly used by all family members, but for a woman, a mirror is simply necessary. The mirror has long been attributed magical properties, and therefore the attitude towards it has always been corresponding. The overall energy background of the room largely depends on the correct choice of the location of the mirror. Mirrors are present in almost every room, and before you learn how to hang a mirror on the wall, you need to think about choosing their location.
Rules for placing a mirror in a room
If the lighting in the room is weak, then installing a large mirror in it is not worth it. The place should be chosen so that direct sunlight does not fall on the mirror, as it will fade.
A mirror in the bedroom should not have its reflective surface directed at the bed. According to the Chinese teachings of Feng Shui, in this case it will reflect negative energy onto sleeping people. The door to the room should be visible in the mirror - this evokes a feeling of security and calm.
When installing a mirror in the bathroom, you should take into account that there is high humidity in this room. Therefore, you should choose a mirror from a material that has moisture-resistant properties. If possible, do not place it close to the wall to ensure good ventilation of the rear surface.
In the hallway it is recommended to place a mirror near the entrance door on the right side. According to Feng Shui, it is forbidden to install a mirror opposite the entrance. In this case, the mirror will reflect all the positive energy and will not let it into the home.
Any mirror can visually increase the volume of a room, so it is perfect for a small, well-lit room. An oval-shaped mirror increases either the length of the room or the height. How to hang the mirror depends on the geometry of the room. It is necessary to select mirrors taking into account that their size and shape fit well with the surrounding objects.
Mounting a mirror on the wall
Mirrors are hung on the wall in different ways depending on the surface material. Concrete, brick - drilled. There is a way to attach mirrors with decorative screws. If the wall is tiled, then it is good to mount the mirror directly into it, as one whole. In cases where drilling or nailing is inconvenient or you don’t want to, you can use so-called “liquid nails.” The mirror is simply glued to the wall. In any case, you need to focus not on the method of attaching the mirror, but on the general appearance of the wall with the mirror located on it.
masterim.guru
How to mount a mirror in a frame
This product has a more solid and serious appearance, therefore it is most often used in the design of modern interiors. Attaching a mirror with a frame is much easier than without it. As a rule, such products already have slots that are inserted into the dowels.
If the mirror has ready-made holes, then it is simply secured with screws and special holders.
It should be noted that the frame creates additional weight, so fasteners are selected with a margin of safety.
If the fasteners were not included in the kit, then purchase them yourself from the construction department. The selected fittings are attached to the frame and hung on hinges, hooks or self-tapping screws.
The installation is simple; if the master has not encountered it before, it is worth first studying the video or taking a look at the master class.
When placing a mirror, it is worth considering several nuances. So, if you hang it in a room opposite a window, it will significantly add light to the room. A large mirror covering the entire wall can visually enlarge the space.
The same effect can be achieved in a small hallway if you install lamps near a reflective surface.
Photo example of using a mirror in the hallway
- Design of a hallway in an apartment - tips for arranging a timely hallway and ideas for choosing interior elements (90 photos)
Forged hallways - stylish and fashionable design ideas for decorating with forged interior elements (115 photos)
- Built-in wardrobe in the hallway - design advantages and modern ideas for choosing and arranging the wardrobe (110 photos)
Look here: How to decorate the ceiling in the hallway - design ideas and options for ideal finishing of the ceiling and ceiling structures (video + 135 photos)
Did you like the article?
0
3
Spectacular examples in the interior
The design should be selected to suit a specific interior style. At the same time, the accessory can be luxurious, which is appropriate for the Baroque style, as well as laconic, which is characteristic of the minimalism trend.
If your home has a narrow or long entrance area, you can make one wall mirrored as decoration. This will visually increase the space.
Art Nouveau and avant-garde styles welcome extraordinary solutions. It is worth decorating the space of the rooms with models of unusual mirrors.
A cabinet with a framed mirror can be purchased as an alternative to a regular wall mirror.
How to attach a mirror to a wall using glue?
Using glue to fix a mirror on the wall is considered the simplest, most reliable and fastest way to fix it. Any product, light or massive, will be held on the wall with glue, but only if you use special glue. This glue resembles liquid nails and is sold in tubes. Before fixing the mirror, you need to apply a special adhesive composition to the amalgam, and then press the mirror to the wall. You need to hold the product for 3-5 minutes, after which you can release it. This method is very simple, but there are several limitations
, which must be taken into account when choosing this method of fastening.
After all the finishing work is completed, they begin arranging the room. In the process, a natural question may arise: how to hang a mirror on drywall? Hanging objects of varying weights on gypsum board finishing is associated with one negative property of the material - it is fragile and may not withstand the load. And the fastening screws are not always initially securely fixed in such walls.
Scheme for attaching a mirror to a plasterboard wall
Therefore, when hanging mirrors, you need to take this feature into account, and also be very careful in choosing fasteners and technologies for performing the work. What is worth knowing about how to hang a mirror on a plasterboard wall?
Before attaching a mirror in one of the rooms to walls finished with plasterboard, it is worth considering the following points that may affect the further use of the item.
- firstly, you need to take into account the weight of the mirror being fixed to the drywall; the greater its mass, the more reliable the methods of attachment to it are needed. And the hitch itself becomes more complicated;
- secondly, the location where the mirror is mounted is important. In rooms with high humidity, not all types of fasteners can be used;
- thirdly, the shape of the mirror and various configurations significantly influence the choice of mounting method.
And also no less important is the material used to decorate the walls from gypsum plasterboard, the fragility of the material, the location in the room, and others. It is important to prepare a plane where you can attach the mirror to the drywall. You need to remove all interfering elements (if any) and figure out how well the mirror will fit in this part of the room.
Option for mounting a mirror with glue
If the weight of the product is unknown, it is worth weighing it before securing it in order to be sure to calculate and purchase the necessary fastening material. It is also worth marking the surface for the attachment points.
How to choose a mirror?
In order to choose the highest quality product, it is important to listen to the following recommendations:
- the thickness of the canvas should be more than 6-7 millimeters, then the image will be more realistic;
- the mirror coating must be applied evenly on all sides, in addition, it is important to check that there are no scratches or chips on it;
- the mirror side must be perfectly smooth; the presence of sagging indicates a low-quality product.
Important. It should be remembered that low-quality canvas can easily be damaged during the installation process, so you should not save on such a purchase.
Features of fastening to different surfaces
Much during installation depends on the material from which the walls are made. Different bases have different rules for installing a mirror.
The differences are mainly concentrated in the fastenings (different fittings and different tools are used), the weight of the mirror, which is acceptable for these walls.
Concrete
Concrete is the main material of many home floors. To make a hole in such a wall, you will need a hammer drill. You can glue a mirror product to a concrete wall using a special glue, but initially you should coat it with a primer that increases the adhesion of the mirror to the base. Not every solid mirror will hold securely, so in some cases glue alone will not be enough.
Drywall
This material is in high demand. To install a reflective product on a plasterboard base, you need to drill a hole using a suitable tool (regular screwdriver, professional drill). It is necessary to use special types of fastenings when working (for example, a butterfly dowel or an anchor bolt). The fastening technology is subject to weight.
If the mirror sheet is not too heavy and weighs up to 10 kg, you can use liquid nails or construction tape with two adhesive sides to fix it to the base. If the weight of the mirror sheet is large, additional reinforcement of the wall will be required. However, strengthening is not always effective: drywall is not a good basis for placing massive mirrors.
If excessive stress is placed on it, it can crack and even crumble.
PVC wall panels
PVC panels are a building material used for wall cladding of bathrooms and toilets. Sometimes it is not possible to install a mirror on these panels; it is advisable to look for another place to attach the accessory before installation. This material itself is not suitable for fixing large mirrors, so small products are often attached to it. A base of wooden blocks will help to install a small mirror sheet efficiently.
You can stick an oversized product weighing 1–2 kg on it. If the distance from the facing part to the main side of the wall is small, it is recommended to make a small hole in the plastic covering, drill through the wall itself behind it and then install a mirror on it.
Tile
Tile is another type of cladding; you can attach a mirror to it in many ways. You can pierce the tiles with a concrete drill, but it is better to use a glass drill. You should not fix the product only on the tile: you need to deepen the hole in the wall itself. If you initially know the location of the mirror, you can leave space for the mirror even at the stage of laying the tiles themselves.
To make height differences unnoticeable, another layer of plaster is applied between the tiles and the mirror sheet or the product is secured to fasteners in the form of a plasterboard board that is not afraid of moisture. The joints are treated with a special glue for mirrors and glass.
To secure the product to a wall with wallpaper, you just need to use a standard dowel. But after renovation work, you rarely want to make holes in new walls to install mirrors. Don’t forget: one day you will want to change its location, and when you move it, a hole will be visible in the same place, which will be quite difficult to hide. Therefore, in some cases, based on the dimensions of the mirror, it is glued to the base with double-sided tape, glue with polyurethane and hidden plugs are used.
If the products have large decorative elements, due to which the products become 2 kg or more heavier, there is no point in gluing them to the wallpaper: they may fall and break.