An aquarium in the house harmonizes and calms the atmosphere. In order for it to give peace of mind for a long time and please the eye, the aquarium must be installed correctly and securely. It all depends on the size of the container. For a large aquarium (50 liters or more) you will need a special cabinet, which the owner can make at home.
It is important that the independent approach takes into account the harmony with the color scheme of the room, the functionality of the product, as well as its reliability. In addition, a homemade aquarium cabinet, especially using improvised materials, will cost much less than one bought in a store or made to order.
Creating a cabinet project
The height, width and depth of a special stand depends on the container that will be installed on it. Experts recommend choosing a height that makes it convenient to watch the fish while sitting in a chair or on the sofa. However, this depends on the wishes of the owners of the house.
When creating a project, you need to take into account the weight of a glass container filled with water and additional aquarium accessories. The tabletop of the cabinet must match the dimensions of the bottom of the aquarium.
It is important to consider that the structure can be used not only as a stand for an aquarium. When planning, you can provide shelves for storing accessories necessary for caring for fish. They may be closed. Open shelves can contain magazines, newspapers, souvenirs, and books.
Selecting the size of an aquarium stand, creating a sketch
Before starting work, it is necessary to make a drawing or sketch of the future structure on paper and put dimensions on it. The dimensions of the cabinet are calculated as follows:
- The height of the stand is selected in such a way that the seated person has a good view of the water world, while it is necessary to take into account the height of the legs, which should be from 50 to 100 mm. On average, the optimal size is 600 mm;
- The width is selected according to the size of the aquarium; stands whose width and length are equal to or slightly exceed the dimensions of the aquarium look beautiful. For example, if the dimensions of the aquarium are 415x412 mm, then it is better to make the cabinet in the shape of a regular square - 420x420 mm.
After calculating the size of the cabinet, it is necessary to determine all the internal partitions - their sizes and quantity. It is recommended to make a cabinet with internal cabinets, as this creates additional useful space, which is often used to store various accessories necessary for feeding fish and maintaining the aquarium.
The need for vertical reinforcing partitions, which are located every 30-40 cm of the length of the stands, is also taken into account. If the volume of the aquarium exceeds 150 liters, then it is necessary to use chipboard with a thickness of at least 22 mm. In the entire structure, the strongest and most calibrated tabletop should be, since it not only takes on the main weight of the water, it is also responsible for evenly distributing the load over the surface of the glass. The tabletop is made of the most even and strong material. Under the aquarium, a soft material is laid on the tabletop, which helps to evenly distribute the weight.
Another design difference between a regular cabinet and an aquarium stand is the back wall. If for household furniture it is allowed to make the back wall from thin material, then for an aquarium stand it is made only from thick chipboard. This is done to strengthen the entire structure and as additional support for the vertical side panels. The best way to secure the back wall is to secure it between the outer side walls, not on top of them.
Legs cannot be made of plastic or thin aluminum. Steel and thick aluminum are optimal; the more legs, the better. When purchasing legs, you need to inquire about their maximum permissible load. When calculating the required number of legs, they are based on this indicator, as well as on the fact that there should be no less than 2 pieces for each vertical partition.
Selecting the material
The material for the cabinet must be durable and able to withstand the load. In this case, it is necessary to take into account moisture getting on the surface, which can deform it.
To do this, it is better to use waterproof materials : chipboard (chipboard), blockboard or laminated MDF (fine fraction).
Home craftsmen claim that the doors and shelves of a cabinet that is no longer needed can be used as material for an aquarium cabinet.
Nastena
Choosing a place to install an aquarium At first glance, it may seem that choosing a place for an aquarium is not important. But, for successful maintenance, the location of the aquarium is of great importance. It is not recommended to install an aquarium:
- next to the window. Firstly, near the window, under the influence of direct sunlight, strong fluctuations in temperature and lighting occur. Fish are cold-blooded and cannot regulate their body temperature. Secondly, fish look much better in reflected light. Thirdly, with a lot of light, the walls become covered with algae, and the water can “bloom”.
– under an air conditioner or near a heater. This also affects the temperature. Fish need stable water temperatures.
- on the floor. You can accidentally hit it or break it with your foot.
- next to the door. Firstly, slamming doors can scare fish. Water, floor, walls convey sounds well. Secondly, the fish may be scared by the fact that you are constantly walking in front of them.
It is recommended to install the aquarium:
– best near a wall perpendicular or opposite to the window.
- on a special stand. If there is no such thing, then on a chest of drawers or a table. But, it is necessary to check whether the surface can withstand such weight. An aquarium with water, soil, plants and decorations weighs more than it seems at first glance. The cabinet should stand on a flat floor surface, without tilting in any direction. It is better to set according to the building level. Otherwise, at some point, the seams may leak under load.
Sockets in the aquarium cabinet
- next to the sockets. They will be needed to connect equipment, filter, heating pad, compressor. But the sockets must be located so that water does not fall on them during replacement or leakage.
- in a large space. There should be enough space above and around the aquarium for easy cleaning and for unforeseen circumstances.
Aquarium in the interior
I happen to have an aquarium installed next to the door. There is no other place yet. But this doesn't bother my fish. They are absolutely calm, and on the contrary, when you pass by, they crowd in front of the glass and watch who has passed and what I am doing. And, as a rule, it is difficult to pass by such welcome meetings without paying attention to them.
The choice of location for an aquarium should not only follow the rules, but also be based on the situation in the apartment. It should fit organically into the interior. You want to sit next to them and watch the inhabitants, and not hide such beauty behind a closet. But, of course, it’s still better not to place it near a window or on the floor.
Aquarium preparation
Crack on the tabletop of the cabinet
The long-awaited day of buying an aquarium has arrived. Upon acceptance from the seller, evaluate the external condition of the packaging. Then unpack it and carefully inspect it for defects, integrity of seams, glass, plastic and other elements. In my case, the cabinet ended up with a cracked top, although the box was fine. There were no problems with the return or exchange; they replaced it with another one. But alas, the same equipment was not available, because of this the launch of the aquarium was postponed for about two weeks, I was waiting for it to be delivered.
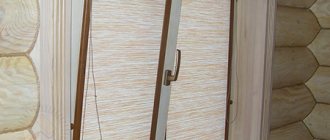
Aquarium cabinet
Aquarium on the stand
After inspecting everything, we proceed to installation. The cabinet must be installed on a perfectly flat horizontal surface. No wobbling or bending to the sides. If you have parquet on joists in your house, the aquarium needs to be placed on them. Use a building level to find the ideal position. We put the aquarium on the cabinet. We examine whether it will be convenient for you to approach it for maintenance, whether you can crawl into all corners for cleaning. If everything is fine, gradually fill it with water at room temperature.
We leave it with water for 1-2 days and observe the behavior of the seams at the time of leakage. Fill/drain 2-3 times using non-toxic cleaning agents, such as potassium permanganate, table vinegar, soda or hydrogen peroxide.
After the first drain of the water, I wiped the inside of the aquarium with a cloth soaked in vinegar, because... there were traces of suction cups, and you never know where he stood. Everything had to be thoroughly cleaned. The second time I poured water with potassium permanganate, a solution of medium saturation (1 g/l). Then I wiped the glass with hydrogen peroxide and rinsed everything thoroughly. After each cleaning, the aquarium was filled with water and left for about a day.
Equipment
Juwel Rio 125 aquarium with Dennerle substrate and Tetra EX 700 filter
Filter water lines
The equipment must also be checked for defects. We fill the canister filter with water, put the inlet/outlet hoses in a bucket of water, run it, and check for leaks. The internal filter can also be placed in a bucket of water and checked for functionality, at the same time rinsing the internal parts. Hoses, tubes and everything that will be in the aquarium must be thoroughly washed, if desired, soaked in a solution of hydrogen peroxide (40 ml per 10 liters of water) or a pink solution of potassium permanganate.
We install a filter, a heating pad, a CO2 reactor, and put the tubes in place.
Soil Soil is closely related to biological processes in the aquarium. Numerous bacteria and other living organisms live and multiply in it, taking an active part in the decomposition of substances. Plants take root in the soil and receive nutrients. Good ventilation and absence of impurities are necessary.
The size of the fraction plays a significant role (read more in “Soil selection”). The most suitable soil for an aquarium is 1-5 mm in size. Sometimes pebbles the size of a hazelnut are placed under the soil layer, especially if there is a bottom filter. The possibility of water circulation and ventilation increases.
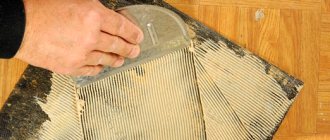
Washing the soil for the aquarium
We thoroughly wash the soil with warm tap water. They are usually washed in a plastic basin or bucket, stirring with a hand or a stick. It will be more convenient if you divide the soil into portions, 2-3 kg. Dirty water is poured over the edge along with small particles and debris. Rinse until the water becomes clear.
Afterwards, it is recommended to disinfect the soil by calcination, boiling or chemicals. Heat in the oven at 100°C, place on a baking sheet and keep for about 30 minutes. Boil in a saucepan with water, stirring constantly for 15-30 minutes. Or, a chemical method, such as bleach. Make up a 10% solution and leave for 2 hours. After disinfection, it is necessary to rinse the soil with warm water. After chemicals, it is especially good to rinse until the smell disappears. Dry it. Although I didn't bother with it.
Nutrient soil for aquarium plants Dennerle DeponitMix Professional
Aquarium soil
Laying soil in an aquarium
Laying soil in an aquarium
If you are going to grow live plants, then you need to think about nutrient soil. Whether it will be soil fertilizer or clay root balls is up to you.
There is no need to rinse purchased nutrient soil for plants. We spread regular soil (pebbles, sand) around the perimeter, and nutritious soil in the center or directly in the planting areas. This is done so that the nutrient substrate is not visible and there is no overuse. Pour regular soil on top in a layer of 5-10 cm. Slopingly, in relief or on terraces, whatever you like. If you want to build terraces, this is done before filling the soil. Aquarium stores sell various materials for this.
Clay balls are buried in 1-3 pieces. (depending on the size of the plants and the brand of balls) at the roots of the plants when planting.
Driftwood and decorations Before using driftwood, you should make sure that it is from the right type of wood. The most suitable driftwood is mangroves, the least suitable are conifers. It is better to buy wood in aquarium stores.
Snag before finalizing the form
Snag after finalizing the form
The driftwood can be processed with a file, giving it the final look you had in mind. Remove excess knots, polish uneven, sharp places.
It is enough to soak the branded driftwood in salted water for about a week. The salt will kill most of the bacteria and draw out the juices and resins, causing it to fill with water and sink. I soaked it alternately in salt, potassium permanganate and hydrogen peroxide. The wood may stain the water a little at first, so soaking for a long time won't hurt. After this you can pour boiling water over it.
If the snag is from the forest, then boiling in salt water for several hours is necessary.
Clay and plastic decorations are soaked in any of the above solutions for several hours and washed thoroughly. All sharp corners need to be inspected and sanded.
Planting plants After purchasing, the plants are inspected, rotten leaves are removed, long roots are shortened, and the presence of snails or eggs is looked for. It is advisable to disinfect the plants (read more “Quarantine of aquarium plants”).
We arrange decorations, stones, driftwood, try on where we want to plant the plants. It is better to draw a layout plan in advance.
Plants can be planted both without water and with water. I planted it with water, filling it 1/3 full. Some aquarists recommend planting plants 1-2 days after starting.
Young plants should be taken for planting; they take root better and take an active part in the process of biological water treatment. Plants are planted either in the ground or in clay pots with soil. When planting in the ground, dig a hole, straighten the roots, sprinkle it and pull it up a little to straighten the roots. The growing point should be on top of the soil. They are planted in pots if the aquarium is inhabited by fish that burrow in the ground; there must be holes on the sides and bottom of the pot for ventilation.
Plants in the aquarium
Large and dense plants are placed along the back and side walls, so that there is space in front for free swimming and feeding of fish. Creeping and bushy plants are planted in bushes of 4-6 pieces. in a checkerboard pattern. Wide, free-standing ones will look good in the center of the aquarium, where they have enough space to spread out. Light-loving plant species are planted in the part of the aquarium that is better lit. Moss looks great on rocks and driftwood.
The aquarium is conventionally divided into background, middle and foreground. In the background we plant tall plants, for example: Vallisneria, Cryptocoryne, Echinodorus, Ludwigia, Aponogeton, etc. In the middle ground: Alternanthera, Blixa, Rotala, Hygrophila, Bacopa, Cabomba, etc. In the foreground: Anubias, Liliopsis, Java moss and etc. Plants have many species and they all differ in size. For example, one species of Echinodorus can be taller than 50 cm, and another up to 30 cm.
Cryptocoryne and Vallisneria root vertically downwards, this should be taken into account when planting. Aponogeton and Echinodorus have flat roots, they go down only a few centimeters and spread mainly horizontally. Elodea and Hornwort are oxygen suppliers and absorb nitrates from water.
Filling the aquarium with water. Launch
Filling with water
To prevent the soil from being washed away when water is poured in, we place a plate at the bottom and pour water onto it. You can use plywood, paper or newspaper, or you can fill the aquarium using a hose from a container placed above, and it is advisable to bend the end so that the stream of water rises up.
Do not add about 5 cm to the edge of the aquarium. The top of the aquarium must be covered with a lid or glass so that dust does not get in and less water evaporates.
Starting up the equipment Before you start the fish, at least 2 weeks, or preferably a month, should pass. During this time, life will begin to emerge and biological balance will be established. This process involves the abundant proliferation of microorganisms. The external manifestation is cloudiness of the water. There is no need to change the water immediately. After a couple of days, the turbidity will disappear and the water will become clear. This process can be speeded up by adding some water from an already established aquarium or using water conditioners with bacteria, which are sold in pet stores (read more: “Water Conditioners”).
At the start-up stage, lighting should be minimal, since plants cannot yet use all the light through photosynthesis and an outbreak of algae is possible. The first week requires approximately 5 hours of light, the second week 7 hours, the third week 9 hours. And only from the fourth week the aquarium should receive full lighting for 10-12 hours. Plants require CO2 in addition to lighting. More light, more growth, and therefore more need for nutrient absorption. Adjust the CO2 supply depending on the lighting correction.
For the first 3 weeks, do water changes by 1/4 - 1/3 of the aquarium volume every 2-3 days, depending on the appearance of algae. Frequent changes are necessary to remove excess nitrates and phosphates from the water, which come from the soil. We remove dead plant leaves and algae from the walls. From the 4th week we start supplying CO2 and you can apply liquid fertilizers.
My aquarium date 2013.05.06
After a long wait, we launch snails and/or a couple of fish first. You should not immediately load the aquarium with a large amount. This can lead to the fact that the not yet fully mature biobalance will not be able to process a large amount of fish waste products. This can cause outbreaks of nitrites and nitrates, which can be fatal to fish. Everything needs balance.
Regular testing of water parameters is necessary. Monitor the level of pH, CO2, oxygen, ammonium, ammonia, nitrites, nitrates. The first month every day, then every week. Observe the behavior of the fish, especially the first days. Inspect the equipment and the entire system as a whole.
Conclusion Preparing and starting an aquarium is a big and responsible job. It will take a lot of time and effort, but it will be worth it. You give the inhabitants care and love, and they give you joy and happiness.
Good luck!!!
Share “Installing and starting an aquarium”
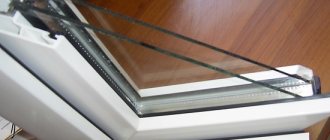
Tabletop features
When adjusting the level of the countertop of the cabinet to the size of the bottom of the container, it must be aligned as much as possible along the perimeter. Any, even the smallest, irregularity can subsequently deform the glass and cause cracks. Or even worse, it might burst.
It is important to pay attention to the thickness of the material for the countertop. The larger the displacement of the aquarium, the stronger the panel should be. For an aquarium from 100 liters, its thickness should be at least 25 mm.
Dimensions
The size of the cabinet is directly related to the size of the aquarium. The tank is glass, so any distortion or overhang can cause uneven distribution of loads. This situation always ends with the appearance of cracks and destruction of the housing. The main supporting element is the tabletop or upper platform. The successful installation of an aquarium of one size or another depends on its size and shape. It is customary to conventionally distinguish between three types of furniture:
- Small ones. These usually include models that can withstand containers with a capacity of 70–100 liters. The length of the support platform is 0.6–0.7 m with a depth of about 0.3 m.
- Average. On such models you can install an aquarium with a capacity of 120–150 liters. Their length can be 0.7–0.8 m, width - 0.3 m.
- Big ones. These are stands for large tanks with a volume of 200 l to 300 l. The minimum height of the supporting plane should be 1 m. It is important to ensure sufficient strength of such a cabinet, since the load will be very large. Any distortion or sagging can cause destruction of the aquarium with dire consequences.
Advantages of a roll-out cabinet, its dimensions and contents
Not only individual cabinets are produced, but also entire sets consisting of 3 tiers:
- lower - supporting structure;
- middle - the tank itself;
- the top - a lid combined with mezzanines.
Usually the capacity of such kits is very large. To ensure reliable support, the design includes additional reinforcing elements and stiffeners. The dimensions of such models are quite large, in length - from 1.5 m, in height - from 1.3 to 2 m. To install a cabinet of this type, you need a large room; it is not advisable to choose such designs in a typical panel apartment.
Small
Average
Big
Three-tier
Tips for choosing
The main selection criteria for most users are the size of the aquarium and the cabinet, as well as the combination of its design with the interior of the room. However, this is not enough for the stand to fully function. The following factors must also be taken into account:
- Moisture resistance. The material must be prepared for possible contact with moisture. Insulating coatings are required. During the manufacturing process of the cabinet, a special impregnation must be used.
- Resistance to deformation. The rigidity of surfaces is determined by the thickness of the parts and the properties of the material.
- Strength. The build quality must match the complexity of the task being performed.
- Presence of holes for cords. The wires and tubes necessary to connect the filters and compressor should be placed as secretly as possible. If the design provides special holes or channels for laying wires, the appearance of the kit will be much neater and more attractive.
- Internal organization. Food, spare filters, devices for catching and cleaning the aquarium, care products, and design elements need to be stored somewhere. If there are various compartments inside the cabinet that allow you not to dump all the accessories in one pile, using the product becomes much more convenient.
Popular designs of modern TV stands, placement options
In addition to these criteria, one should not forget about the size, cost and other features of the cabinet. The optimal option must harmoniously combine the necessary qualities and provide all the requirements and functionality. It is very important that the furniture is safe, especially if children live in the house.
Moisture resistance
Resistance to deformation
Structural strength
Presence of holes for cords
Convenient internal structure