List of required materials
It's simple:
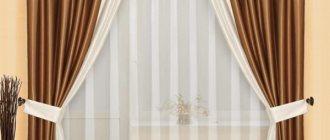
Any fabric you like or ready-made curtain hanging on a rigid curtain rod
Ready-made rod cornice made of plastic, wood or metal
Eyelets in the amount of at least six pieces per linear meter of cornice
Thick eyelet tape or doublerin with a length 2.6 times the length of the cornice, 8 or 10 cm wide
A strip of fabric for making a cuff 25 cm wide, equal to the length of the eyelet tape + 5 cm each for side folds
Installing eyelets on curtains with your own hands
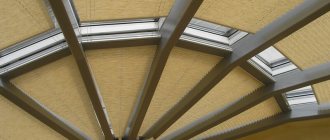
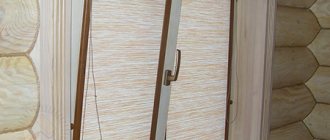
Curtains mounted on a baguette in this way will add style to your interior. The main advantages of this method of attaching curtains:
- The fabric along the cornice is distributed in uniform, beautiful waves.
- In the places where the curtains are attached, the fabric does not tear and is not stretched by curtain hooks.
- A variety of available models and colors of mounts, affordable prices.
All plastic models consist of two parts: a ring and a block, however, the height of the leg varies. Curtains are attached to eyelets using two methods : using small rings and using large ones. Small grommets are installed on the curtain and then attached to the curtain rod with S-shaped hooks.
Large eyelets are placed on the cornice itself. For curtains, you need to choose a diameter of rings 1.5–2 times larger than the diameter of the cornice, so that the curtains can be easily moved in and out.
How to determine the position of the eyelet fasteners on a curtain
The distance from one curtain fastening to another should be between 15 and 20 centimeters.
The greater the distance between the two eyelets, the deeper and larger the curtain wave will be. Accordingly, we select the distance between the fastenings based on the length of the curtain and the material used to sew it. Before attaching the first eyelet ring on the fabric side, make an indent of approximately 4 cm . The number of fasteners for a beautiful appearance of the finished product must be even.
To mark the locations of future fastenings and imagine what the finished curtain will look like, you can pin the rings with pins. You can install eyelets on a curtain using two methods : using eyelet tape or using adhesive fabric.
Installation method with grommet tape
The eyelet tape provides sufficient material density for installation of fasteners.
This gives beautiful folds and increases the life of the curtains. The tape is a strip of dense synthetic fabric with a layer of hot-melt adhesive and is attached to the fabric by ironing it with an iron. Prepare the following materials : grommet tape; iron; scissors and eyelets. Eyelet tape can usually be purchased at sewing supply stores. Work order:
- We install blocks on the tape.
- Sew the edges of the tape to the curtain.
- Mark the holes on the curtain and cut them out.
- Snap the eyelet rings.
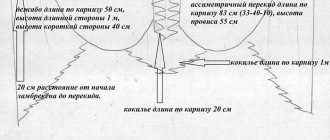
Material calculation
To calculate, you need to take two measurements with a tape measure:
- length of the rod (rod) of the finished cornice between the end caps - distance d;
- height from the bottom of the eaves rod to the floor + diameter of the rod – H value.
We calculate the total width of a single canvas:
- L = d x 2.5 + 1.5 cm + 1.5 cm, where 2.5 is the average increase in the width of the canvas to form beautiful folds when the curtain is closed, and 1.5 cm is the side hems. The minimum value of the width coefficient for tulle is 2, for curtains – 1.5. The maximum value for cornices located far from the walls with large brackets is 4.
Height:
- h = H + 4 cm – 2 cm + 10 cm + 10 cm + 5 cm + 5 cm, where 4 cm is the height of the comb, 2 cm is the distance from the bottom of the curtain to the floor, 10 cm is the two upper hems equal to the width of the grommet tape , 5cm – two bottom folds.
Based on the dimensions obtained, we select a piece of fabric in the store.
If there is a need to install double swing curtains, then the calculation of the width L1 of each curtain will be different:
- L1 = d x 2.5 / 2 + 1.5 cm + 1.5 cm, where 2.5 is the average increase in the width of a single sheet. If size L1 exceeds the permissible width of a roll of fabric in a store, then the coefficient can be reduced to two for tulle and to one and a half for curtains. If this does not help due to the long length of the cornice, you can hem strips of this or another contrasting fabric on the sides of the fabric.
Calculation of material
In the case of making curtains with a cuff, the height of the canvas is calculated using the formula:
- h = H + 4 cm – 2 cm + 5 cm + 5 cm + 5 cm + 5 cm, where 4 cm is the height of the scallop, 2 cm is the distance from the bottom of the finished canvas to the floor, 5 cm is the upper and lower allowances.
Calculation of fabric for sewing:
Types of eyelets
Eyelets come in quite a variety: the most important difference, of course, is in the shape of the fasteners. Round and oval eyelets are undoubtedly considered classics, but now, succumbing to fashion, manufacturers are beginning to experiment with shapes - square, rectangular, triangular, even in the shape of flowers - today you can find absolutely any options that will be functional, but at the same time look very original .
A grommet is most often a plastic or metal rim that is attached to a hole in a particular material.
It was also previously believed that eyelets could only be metallic in color; a little later black, white and gold shades were added. Now you can find everything your heart desires - pastel, bright, with various decorations such as patterns and rhinestones (the latter is most popular in children's shoe stores; not a single princess shoe is complete without pink eyelets in the shape of flowers, decorated with rhinestones).
Eyelets can extend the life of the material, hide imperfections and facilitate its connection to another surface.
By fastening
Grommets also differ in their fastening: some are designed to be fastened with rope, tape or cords and can be soft, while others are only used with hard objects, such as a curtain rod, and must be hard.
Eyelets can be either metal or plastic.
It's also important to clarify that there are differences in how metal rings are attached to fabric: there are options that require the use of a hammer, others can be glued, and others can be sewn to the fabric if they are soft enough. All these options provide a fairly reliable connection between the grommet and the fabric, and therefore it is not particularly possible to single out the most popular option among them.
The main material from which this fittings are made is steel.
By materials (plastic, metal)
Basically, eyelets are made from two materials - plastic and metal; usually the products consist entirely of one material, but sometimes manufacturers mix them. The most reliable, of course, is the metal option: stronger and more durable, this material beats plastic in all respects.
The most practical option is parts coated with zinc, copper or nickel plating.
If we talk about curtains, then it is better to choose metal eyelets, since they will definitely be able to hold any, even the heaviest fabric, will not break under its weight and will create a beautiful, even curtain from the curtain, which will be a good addition to any room. For shoes, on the other hand, plastic eyelets are mainly used because they are lighter and there is no need to keep the fabric suspended on the shoe so that it does not fall, stretch, or lose its shape.
The eyelets have a beautiful color, do not deform during use and do not spoil the surface into which they are inserted.
When choosing eyelets, you need to clearly understand for what purpose they are needed: for canvas fabric, from which a camping tent will later be made, it is better to take the strongest metal fasteners that are available in the store; for curtains - thinner, but still made of metal so that the curtains stay on the ledge and don’t fall, and for thin fabric, if you suddenly have to sew some clothes or something like that, you can get by with plastic eyelets, their strength will be sufficient in this case.
Awnings and tents are equipped with eyelets for more convenient and long-term use.
Fabric preparation and processing
There are two preparation options.
Ready-made swing curtain
The essence of the changes is as follows:
- We measure the width of the finished curtains hanging on the window. If the measured width is equal to or slightly more than half the length of the cornice, then nothing will work, you will have to buy new fabric. If the size is equal to or slightly less than the calculated width L1, then you can continue to work with such a curtain.
- Remove the fabric from the curtain rod.
- We cut off the rings, staples or tapes that used to attach the curtain to the curtain rod.
- We wash, dry and smooth the material.
- We do not rip the side seams.
- We prepare a cuff strip 25 centimeters wide, bought in a store - wash, dry and iron it to prevent future shrinkage of the material.
Would you like to sew your own curtains with eyelets?
No. It's better to buy in a store. No. I already have them Yes. It's cheaper than buying in a store Yes. I'm interested in this I really want to try it
New canvas
The steps here are simple:
- We wash, dry and iron the fabric.
- If there is a need to add additional side strips to increase the width of the fabric to size L1, then before washing we sew the fabric and strips together.
- We process the lower and upper edges of the fabrics using an overlocker if the edges of the fabric are split.
- We make markings from the wrong side of the fabric. If you are preparing a panel with a cuff, then we make the lower, upper and side folds with an iron and sew them on a machine, making edge seams. If the panel is intact, after marking it is enough to bend the edges along the fold lines and iron them.
Seams for processing curtains
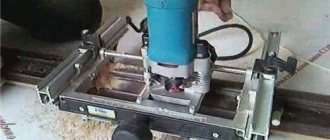
Installation using tools
To install eyelets, you can use a special device created for this purpose.
In addition to a special press, you can use tongs for this. The operations they perform are not so wide, but they establish small diameters well. You can also purchase a set of punches, but this does not solve the issue with the largest diameters, which are used when sewing heavy curtains and curtains.
We invite you to familiarize yourself with Wake Up and Mine! How to keep your windows clean for spring
The dimensions and diameter of the eyelets are specially marked for ease of purchase. Each eyelet consists of a head and a leg, the length of the leg depends on the thickness of the fabric being punched and is designated as L. The diameter of the leg and the resulting hole is designated by the letter D.
How to sew curtains
There are two ways:
- sewing a cuff with eyelet tape to the finished fabric;
- inserting grommet tape into the upper folds of the curtain.
With cuff
Stage 1:
- Take the grommet tape and cut it to the width of the prepared curtain.
- Take a strip of fabric 25 cm wide, intended for making a cuff, cut it in length so that it is 10 cm longer than the length of the tape.
- We fold the fabric in half lengthwise, iron the fold, and get a cuff strip 12.5 cm wide and 10 cm longer than the width of the curtain fabric.
- We open the folded and ironed fabric and lay the grommet tape with the edge along the formed fold so that the adhesive layer is on the bottom.
- Cover the tape with the other half of the cuff and iron the resulting “sandwich” so that the adhesive layer of the tape is securely connected to the fabric. The front side is considered to be the glued side, where the holes for the eyelets will then be marked and cut.
- We open the “sandwich”, fold the long edge of 2.5 cm onto the tape, and iron the seam allowance fold.
- We fold the “sandwich”, fold the edge of the unglued side of the cuff onto the tape, and iron the fold.
- We lay out the cuff in an unfolded state on the table so as to free its untaped side with the edge folded on it. The folded side of the edge should lie on top of the unglued side.
How to hang and take down curtains with eyelets
Tips for calculating rings and choosing cornices
Instructions
More details
How to calculate fabric consumption for curtains
Formulas for thin, medium, dense materials and calculator
Instructions
More details
How to wash curtains with eyelets
How to properly wash curtains with eyelets in a washing machine
Instructions
More details
Stage 2:
- We take the curtain with the edge seams stitched, turn it right side up, place the top fold of the fabric on the top side of the folded seam allowance of the unglued side of the cuff, and pierce the joint with pins.
- The end edges of the cuff after pinning should protrude beyond the curtain fabric by 5 cm from the sides for subsequent folding.
- We use a sewing machine to sew the pinned seam. We take out the pins.
- Lay the curtain with the cuff sewn on, face up, on the table.
- Fold the cuff with the right side with the tape glued to the top.
- We pin it along the edge.
- We make a single seam on a sewing machine along the entire length of the cuff, stitching the upper bend of the curtain material, and the entire lower part of the cuff.
- We gather the free ends of the cuff inside, make side seams, stitching the end folds and edges of the tape.
Scheme
Video instructions:
Without cuff
Everything is much simpler here:
- We take the prepared material with ironed edges. Lay it out on the table with the wrong side up.
- Glue the eyelet tape to the material, aligning the edge of the tape with the top edge of a transparent material, such as tulle, or with the first fold of a dense material. The tape should be located between the side folds of the material.
- We bend the side edges.
- We wrap the ribbon with the side edges, making a full turn.
- Iron the fold with the ribbon.
- We pin the tape wrapped in material with pins.
- We make a fixing stitch on a sewing machine along the bottom edge and ends of the tape.
Scheme
Video instructions:
Installing grommet tape:
What eyelets for awnings look like
Awnings, camouflage nets, tents, marquees, banners, covers for vehicles and equipment, curtains, clothing, shoes - this is just an incomplete list of products where eyelets are used. As a rule, a grommet is the edging of a hole made in the fabric of the product. The slots themselves are used for threading ropes, cables, laces, belts, etc. through them. Eyelets usually have the shape of a ring.
Types of eyelets for awnings
There are two types of eyelets: plastic and metal.
· Eyelets made of plastic.
Nowadays, plastic is widely used as a construction material. The variety of plastic mixtures and a wide range of their properties, combined with relative cheapness, as well as the development of new technologies for the production and processing of plastics, make them a very common structural material.
Eyelets for awnings, made of plastic, are characterized by high strength, quality and elasticity. They can have different shapes: rectangular, round, oval, as well as any size and color. The performance characteristics of plastic fittings for awnings are also high. They are not subject to corrosion, do not damage the awning material, work perfectly in any weather conditions, and are not afraid of temperature changes and increased levels of ultraviolet radiation.
Installing plastic edging requires special professional equipment. An example of this is a machine for soldering two halves of a grommet. It ensures high labor productivity, accurate and fast welding, as well as the strength of the finished product. Such machines can be equipped with an automatic feeding and stamping system, which are used for mass installation of eyelets.
One of the varieties of plastic eyelets for awnings are clips, consisting of two halves and attached to holes previously punched in the fabric.
The main disadvantage of plastic rings is the complexity of their fastening technology. This drawback significantly limits their use, which may soon lead to a complete cessation of the use of plastic eyelets for awnings.
· Metal eyelets.
Metal eyelets for awnings, as a rule, have an anti-corrosion coating (a layer of zinc, nickel, paint). They usually consist of two elements connected to each other: rings and blocks (“male” and “male”).
The main characteristics of the product are:
· Hole diameter is the main characteristic, meaning that after installing the grommet on the awning, the holes will be of exactly this diameter.
· The depth (or height) of the hood at the block, a size that is important when installing the product on an awning.
· Outside diameter.
· Forming profile of cap and ring.
As a rule, eyelets have standard shapes and sizes.
Installation of metal eyelets on awnings is carried out using special tools - a punch and flaring. There is a roller for each ring size and shape. The installation process consists of three stages.
At the first stage, a hole of the required shape and size is made in the place of future fastening using an appropriate punch. At the second stage, a block is inserted into the hole made on one side of the canvas, and a ring is put on the block on the other. And finally, at the third stage, using a roller, the block hood is riveted, and the grommet is securely fixed in the right place.
Sometimes a hand press is used instead of rollers. Moreover, each press comes with a set of attachments for different sizes and types of eyelets. Both methods are manual and do not require special knowledge and skills.
Recently, the use of metal eyelets of various styles and colors when fastening curtains has become fashionable. Curtains with eyelets look very stylish. Rings make it easier to place and remove curtains. A wide variety of shapes and colors of fittings allows you to choose the best design solution for any interior, both at home and in the office.
Eyelets are also used in the production of shoes, clothing and haberdashery. Jackets, lace-up boots, leather belts, bracelets, bandanas, backpacks and handbags with eyelets, all this will help you create your own unique clothing style and stand out from the general environment.
Today, the method of fastening with eyelets has become very widespread. This is truly one of the most used and useful inventions invented by man.
How to install grommets yourself
Stage 1:
- Turn the finished material face up.
- At a distance of 5-7cm from the top edge of the cuff or curtain, draw a horizontal line across the entire width of the material.
- We calculate the distances between the eyelets: X = (W – 7 cm – 7 cm) / (15 ~ 18 cm).
- The number of eyelets must be even.
Scheme
Calculation of eyelets for curtains:
Stage 2:
- On the drawn line we lay out an even number of segments of length X cm.
- We apply eyelets to all the marks indicating the centers of the rings.
- We align them in one line, achieving the same size of scallops.
- We trace the inner contour of each ring with a pencil.
- Cut out the resulting circles along the outer contour of the circles.
- Open the eyelets and insert them into the holes.
Step-by-step video instructions:
Installation materials and tools
To install eyelets using improvised means, you will need the following materials:
- eyelets of the selected diameter;
- pencil or marker;
- ruler;
- stationery knife;
- a special rubber mat or piece of linoleum;
- a flat piece of iron, an iron ruler will do;
- a heavy hammer that fits comfortably in your hand;
- part for flattening the eyelet leg.
The main tool for installing grommets is a heavy hammer.
This part, depending on the diameter, may be different. For small diameters, balls from bearings or commercially available steel rods with a rounded end are used. Rods with a tapered end work well, provided that the main part is larger than the diameter of the grommet.
A lathe can produce a whole set for installation if iron rods of different diameters are available. If you have a tool, rounding the end of each rod and turning it with a cone is not difficult.
Eyelets and hole punches
An important nuance in the edging is the eyelets themselves, or rather, their rigidity and design, as well as the tool to make the holes. The softer the steel, the easier the block will rise and the less effort will be needed to rivet it. One of the companies that has won the trust of needlewomen is ScrapBerry's. You should not take the cheapest fittings - they will not fit well and there is a high risk of damaging the product.
The curtain eyelets have an unusual design - they do not unfasten, but snap into place, so there is no need to look for a large bumper.
Advice! When purchasing eyelets, pay attention to the presence or absence of washers. They are needed for thick fabrics and delicate items, such as loose materials.
Holes for eyelets are prepared using a hand punch, a punch-tweezer, a stationery hole punch, an awl, as well as manicure or regular scissors, focusing on the thickness of the material being processed and the desired diameter of the lumen.
In the case of ordinary blocks, the hole should be made a little smaller - otherwise the grommet will not close the edges securely. However, in the case of curtain, snap-on blocks, a circle is cut with a radius 5 mm larger than the inner diameter of the back part.
Edging with eyelets looks stylish on textiles and impressive in scrapbooking, and in addition, it allows you to protect the edges from fraying and wear. To install the fittings, both special and improvised tools are used - you should choose based on how often you have to work with the blocks and how much you are willing to pay for the fixture.