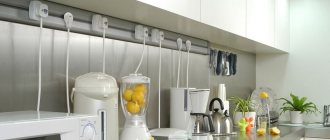
Skinali are decorative panels for wall decoration. The design, made of glass, fits perfectly into the interior and can withstand not only the consequences of cooking, but also accidental impacts.
From this article you will learn about the pros and cons of glass construction, as well as how to make and install kitchen skins with your own hands.
Advantages and disadvantages of glass aprons
Pros:
+ Wear resistance. Glass is impervious to moisture and grease.
+ Fire resistance and fire safety. Glass skinals can withstand up to +120 °C.
+ Hygiene. The seamless panel is easy to keep clean. Fungus does not grow on its surface.
+ Environmental friendliness. The skinals are made of glass, which contains quartz sand and silicon - materials of natural origin. They are safe for the human body because they do not emit toxic fumes.
+ Decorative. You can choose the design of your skins yourself so that they perfectly complement the kitchen interior.
+ Durability. If you keep the panel clean and wash it regularly, it will last more than 20 years.
Minuses:
— Additional holes cannot be made in the glass panel.
— Illiterate installation will lead to condensation and cracks on the skin.
— Such panels need to be washed often and wiped thoroughly to avoid streaks.
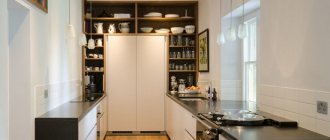
How are the dimensions of a glass apron for a kitchen determined?
When determining the size of a glass splashback for the kitchen, it is worth considering the size of the kitchen unit. If it has not yet been installed, then the glass panels can be made with allowances. This will allow you to hide the edges of the glass kitchen splashback behind the cabinets. If the furniture is installed in the kitchen, then the throws will have a height equal to the distance from the countertop to the bottom of the upper cabinets. It is worth considering that there may be an error in glass manufacturing.
The length of the kitchen apron is determined based on the size of the wall located above the working and hob surface of the kitchen. If it is small and straight, then the kitchen apron will consist of one glass panel. In the case where the length of the wall is significant, or the corner area is being finished, then the skins will consist of several slabs.
What types of kitchen skins exist?
A glass apron can be designed in different ways. The following main options are distinguished:
- transparent. Classic glass aprons that reliably protect the wall from dirt;
- matte. Sandblasting is used to apply designs on them. The image “drawn” by the air stream will remain on the glass for a long time;
- mirrored Visually increase the space. An excellent choice for a small kitchen;
- with painting. A drawing made to order by an artist or personally by you will decorate the kitchen;
- with photo printing. Such skins are distinguished by their depth of color and realistic image;
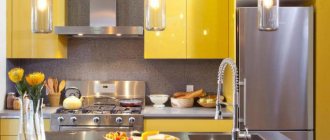
- with backlight. LEDs hidden behind the panel will create additional lighting and a unique interior.
What is skinali?
August 8, 2015
Category: House and apartment design, Repair
Today there are skins for kitchen design. What it is? Skinali are plastic/glass panels that include a printed pattern (any). The skins are intended to decorate a kitchen apron. Modern advantages of the skin: resistance to any temperature, maximum ease of installation, no problems with high humidity, the ability to obtain any image. There is also a design option on the market using photo printing.
How to make the right choice of skins for the kitchen? How to make everything match with the kitchen set?
The history of the development of kitchen skins is very long. For example, previously skins were made from wallpaper, paints, film (self-adhesive), PVC panels, ceramic tiles, and so on. Today on the market there are glass options with photo printing.
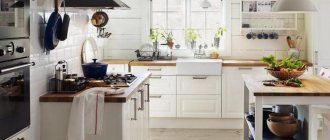
What skins are most suitable for the kitchen?
The ideal option on the market today is glass skins. They are made from tempered glass. An image is applied to the glass. For this, engraving or laser printing is used. The price level for such services will be quite high.
Many owners who have chosen a classic kitchen suddenly realize the main negative side - it’s just boring. Classic is a good option, but you should make such a kitchen using skinali panels original, individual. The psychological aspect is very, very pleasant for apartment/house owners.
What does pricing depend on? The price of services for the introduction of skinali depends entirely on the quality/size of the plastic and glass used. In addition, the method of applying the pattern plays a special role. The most expensive option is the plastic one (it has a colored polymer film). This apron fits as closely as possible to the wall; the film is applied using a special technology. If all technical requirements are not met, there is a high probability of film peeling.
Is it necessary to level the walls before installing the skins?
You don't need perfect walls to take care of installing a kitchen splashback. Fastening occurs using glue or fasteners (hinged or walk-through). Installation will take no more than an hour.
Today there is a maximum skin size. This is within 2-2.5 m. If the length of the wall is greater, specialists use several panels as a basis. They are tightly connected, the joints are almost invisible.
Photo printing is in greatest demand today. There are 2 types:
- use of UV inks;
- vinyl sticker on glass.
The first option is convenient. The glass is prepared (a special solution is applied to it). Afterwards it is placed under a large-format printer, which applies ink. Once the design has been applied, the glass is placed under UV lamps (very powerful). The UV lamp makes the colors as bright and saturated as possible. In addition, the pattern is fixed on the glass.
If you currently have a desire to decorate your kitchen beautifully, you should use skinali. The best option for those who want to put the above room in complete order.
Methods for applying designs to skinali
The type of glass determines the principle of image application, the quality and cost of the panel. At the moment, kitchen skins exist in three variations:
- Ordinary glass. A self-adhesive film or a pattern with oil paints is applied to the back side of the panel. This is the cheapest option.
- Tempered glass. The image is applied using ultraviolet paints using photo printing. When heated, glass acquires additional strength.
- Triplex. This is the name of special laminated glass. It costs more, but has better quality. In this case, the image is applied between layers of glass. These skins are the strongest and most durable.
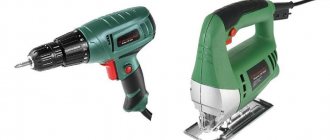
We make skins with our own hands
Working with triplex at home is out of the question. Photo printing on a glass panel cannot be done without special equipment. The only remaining option is to make kitchen skins from ordinary glass.
Glass panel requirements
The dimensions of the skinal are determined based on the location of the remaining elements of the kitchen. Therefore, measurements should be taken only when everything is in place. The skins must have the following dimensions:
- length – from 50 cm to 3 m;
- height – from 50 cm to 90 cm;
- thickness – at least 5 mm.
The ends of the glass must be sanded, and holes for fasteners and sockets must be made at a distance of at least 5 cm from the side edges.
By following these recommendations, you will create the correct skin geometry. Such a kitchen apron will last a long time, will not crack and will be an excellent protection for the wall from dirt.
Skinali design
Once the panel is ready for installation, you can give it a custom design. Skinali will effectively decorate a drawing with oil paints. The glass apron can also be decorated with self-adhesive film.
Glass panel painting
Drawing with your own hands is an opportunity to be creative. Painting is done with special oil paints that do not crack or peel. They are applied to the previously degreased back side of the panel and dried for one day. Two or three layers are enough to give the design a rich color.
Skinned with self-adhesive film
This is an easier way to decorate a kitchen apron than hand painting. Using a sprayer, the glass surface is sprayed with water and liquid soap - thanks to this, the film can be moved while gluing. During the process, the liquid is removed along with air bubbles. The panel is then left to dry completely.
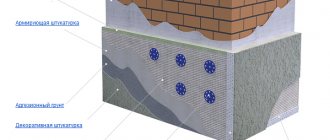
Installing the skin
Before installation begins, you need to prepare the kitchen walls. They should be leveled so that they can serve as a reliable support for the skin. Then the sequence is as follows:
- We apply the skins to the installation site and make markings for their fastenings.
- We drill mounting holes and install dowels.
- We attach the screws with protective gaskets - they prevent contact of metal with glass, thereby reducing the risk of cracks.
- We install electrical network elements: sockets, switches.
- We check the reliability of the structure and wipe it down.
Properly installed skins will last a long time. By keeping them clean, you will never encounter fungus, cracks and other problems with kitchen backsplashes made of tiles and artificial stone.
If you have doubts that the result will not meet your expectations, then you can always turn to professionals. In the specialized online store “Pro Apron” you can purchase tempered glass skinals at an affordable price. We manufacture panels ourselves, carry out high-quality photo printing and carry out work on the transportation and installation of kitchen aprons. We accept orders for individual designs. We provide 3 years warranty for our products.
We are always happy to communicate with our clients. Contact us by phone!
Questions and answers
There have always been questions about the kitchen with the skinali that required qualified answers. Let's list some of them.
Which skins were better?
The best base is tempered glass because it has excellent qualities:
- High strength, which is five times greater than ordinary glass.
- Long service life.
- Resistance to temperature and humidity changes;
- You can apply drawings of any complexity.
Today, manufacturers offer plastic and hardboard panels. They look rather rustic, and not every complex design can be applied to them. But such finishing costs much less.
Which glass to choose for skinal
The choice is not very large: transparent glass, frosted. You can add it here with a smooth or corrugated surface.
I would like to note the most popular finishes today, which are called:
- Listral;
- Satin;
- Cresette.
Typically, glass 6-8 millimeters thick is used for kitchen skins. Today, manufacturers have begun to offer bleached glass (optiwhite). True, it is not cheap.
Are there size restrictions?
Experts say that wall panels for kitchen skins should have a length of no more than 2.5 meters. The thing is that large glass is difficult to work with and there is a high probability of damaging it. And this applies not only to installation. Such a large sheet is difficult to carry into an apartment or lift in an elevator.
If the length of the apron exceeds the designated size, then the skinali is made of several panels. The quality of production makes the joints between parts almost invisible.
And one more point to which I would like to draw your attention. Ready-made glass panels for a kitchen splashback are not cheap. Therefore, when choosing this type of finishing, you must be prepared to spend some money, which may hit your family budget.
Advice! It is better to order skins not from furniture stores, but from the manufacturer. This will significantly reduce costs.
Did you like the article? Subscribe to our Yandex.Zen channel
Great article 0
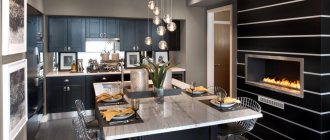
Painting kitchen skins “Black and white graphics”
Black is a mystical color. It fascinates, attracts and frightens at the same time. You don’t often see pure black and white graphics in the interior.
Today we would like to introduce you to an unusual way of decorating a kitchen - Painting in black and white.
The wall to be painted was plastered and painted with water-based paint.
The surface for painting is the space under the wall cabinets and the adjacent wall above the hob.
As planned, the subject for painting is repeating cutlery under the cabinets, a recipe above the hob, and a composition of a tureen with a fork and spoon above the recipe. The entire background space is decorated with various inscriptions.
For work we will need the following materials:
1. Acrylic paints (black and white); 2. Brushes; 3. Roller; 4. Masking tape; 5. School chalk;
Let's get to work! We decided to make the general background under the cabinets not dull black, but lighten it slightly with white. The color turned out languidly smoky. Above the hob it is also dark gray up to the level of the cabinets, and above it is black. To ensure that the edges above the cabinets and the contour around the window are even, we separate them with masking tape.
Paint the wall dark gray. In our case, it is not so important how smoothly the color is applied; light wear and negligence are only welcome.
We also painted the rosettes in a common color, having previously primed them. This is not very practical in the kitchen in such an accessible place, but with careful handling they will look decent for a long time. Over time, they can be replaced with more suitable ones. Although there is nothing more permanent than temporary.
Next, using chalk and a building level, draw a line in the middle along the entire wall. This line will be the center of our plate composition.
In order to draw plates, any round object or compass will do. We used a microwave hood.
We duplicate the plate in three copies at an equal distance from each other. Using chalk and a level, we draw lines for the text and draw forks and meadows.
Paint the resulting plates with white acrylic in an even layer.
You can draw all the forks by hand, or you can draw one device at a time, and then use tracing paper to repeat three times.
At the same time, draw a rectangular scroll above the hob - the future recipe.
Next, we proceed to a more detailed drawing. We decorate the space with inscriptions and draw various small but very important details!
Although our plates are the same, they will be “served” differently.
One will contain a napkin, another will contain a sandwich with black caviar, and the third will contain a sprig of dark grapes! Everything will be done in black and white.
Towards the end of the work, we erase the unnecessary chalk.
At the end of the work, remove the tape from the wall.
At the end, it is advisable to cover the entire skinal with special glass. It is very important here that the wall is level, otherwise the glass will not lie flat.
Thank you all for your attention! Comments are always welcome! It is not always possible to answer, we apologize in advance. Good mood to you all!
How to make a glass apron with a pattern?
Any photo wallpaper with a design you like will be suitable for this purpose. But keep in mind that they will first have to be glued to the wall with an allowance of 6 cm at the top and bottom, and only then covered with an apron.
A more complex and expensive option: order the required design on a self-adhesive film from a printing house.
It can be applied directly to the back side of the glass, but you will have to order an additional cut of the design into fragments in accordance with your measurements. We also advise you to be careful when gluing the film. Our best works