Decoupage as a hobby
Many junior and senior schoolchildren are seriously interested in decoupage. And very rightly: after all, it is this creative painstaking technique that develops imagination, inner peace and a positive attitude towards life. Adults also come to learn the decoupage technique. Some pensioners are seriously interested in decoupage. In addition to being an interesting activity, decoupage becomes a simulator for older people to maintain fine motor skills, another topic for conversation, and the best part is a fairly noticeable increase in a small pension.
Among your friends, too, there will be no one left indifferent to designer gifts and elegant homemade items. The good thing about decoupage is that beginners who have never known how to draw and paint can use ready-made photographs or just napkins to decorate an object with this design. You can decorate absolutely all things in your home: furniture, dishes, walls, mirrors, vases, flower pots, books, photo frames, candles, curtains, lampshade, refrigerator and even your own shoes. Anything you can imagine. Almost any surface can be decorated. Start with decoupage of plastic, ceramics, wood, stones, glass.
Beauty created with your own hands will be perfectly protected with varnish. And a product made using the decoupage technique can even become a source of family pride.
Don’t try to glue the entire napkin, it’s really very difficult to glue it without creases. With experience we will learn. History of decoupage Decoupage is a technique for decorating a wide variety of things with paper cutouts: bathtubs, bottles, pieces of furniture, boxes, frames and other things, other things, etc. . The word "Decoupage" comes from the French word decouper, which translates as "to cut." Decoupage is essentially a type of collage. This technique has its roots in distant China. The technique is so remarkable that already in ancient times it became so widespread that it reached Eastern Siberia.
In ancient China, peasants created colorful paper to decorate various things. This experience was adopted by many nationalities. However, a special boom in decoupage technique began in the 17th century. At that time, Western craftsmen did not have time to satisfy all customer orders for the production of beautifully painted furniture, the kind that came to especially rich houses from the East. Therefore, cabinetmakers began to hire novice artists as apprentices who made copies of famous paintings. Next, these paintings were glued to furniture, and several layers of varnish were applied on top. In those days, a drawing could sometimes be covered with 30-40 (!) layers of varnish.
In the 20th century, decoupage entered a new stage of development. Now there are wonderful three-layer napkins, which, when glued to any surface, become indistinguishable from a subtle and highly artistic design.
Required set of materials
1. Glue. Ideally, a special one for decoupage or for napkins. But PVA diluted to the desired consistency (liquid yogurt) is quite suitable. 2. Good sharp scissors of different sizes. 3. Decoupage paper, napkins. Color photocopies, pictures printed on a laser printer, magazine clippings, and high-quality gift wrapping paper are also suitable. I've experimented with all of these, but nothing is nicer than decoupage paper. Napkins are generally a separate item and cannot be replaced with anything. 4. Paints. Acrylics are universal and irreplaceable. You can also use paints for glass and metal. 5. Base plaster or acrylic coating. Not required, but still recommended. And when working with wood, cardboard, untreated ceramics, you cannot do without it - you need to clog the pores, otherwise everything will be absorbed into them and it will be difficult to achieve the desired effect. 6. Final coating, in other words, varnish. Again, I prefer special water-based decoupage products. They are non-toxic, odorless and give good results. In some cases, depending on the purpose of the item, instead of varnish, you can apply a couple of layers of liquid PVA. The effect is even better than that of matte varnish, but such things cannot then be washed with water or wiped with a damp cloth. 7. Brushes! All kinds of brushes are needed, all kinds of brushes are important. The most important one is the one that is flat and wide. But in general, you can’t have too many brushes 8. Hairdryer This is the most basic thing. Well, and, of course, we also need the very object that we will decorate and imagination!
Here's what you might need extra
It’s impossible to cover everything, because there are a lot of techniques and it’s simply unrealistic to master almost everything! (And buy all these materials too....)
1. Crakele . This is a cracking agent. It comes in several types, I will describe the two main ones. A single-phase product is something that is applied between two layers of acrylic paint. It turns out that the cracks take on the color of the first layer of paint, while the second serves as the main background. A picture is then glued on top of all this. Two-component product. First, the background is made, everything that is needed is glued, and only then work with this product begins. The first component is applied, usually a varnish, which can also simply protect the work. Or you can go further and dry it until STICKY (this is important), apply a second product and wait for cracks. This is such an exciting moment! When they stop spreading, dry everything again and fill the cracks with a contrasting color. It can be oil paint or powder from metal shavings (gold, silver, bronze) or powder paints (pigments).
2. Bitumen . This is such a black thick smelly liquid. Serves for aging, as if it stains the product.
3. Aging varnish or resin . Serves to give the effect of antiquity, gives a sort of yellowish coating.
4. Silicone - for 3D effect
5. Modeling paste - for the same thing
6. Bulino tool... (I’ll show you a photo). Also necessary to create a 3D effect.
7. Soft rubber mat . Required to work with N.6. Sometimes you can replace it with a mouse pad, but they wear out quickly
8. A means for slowing down the drying of acrylic paints - for artistic decoupage.
9. Candle + sandpaper - for shabby effect
TIP: the golden rules of decoupage: - do not brush more than twice over the same place - after dipping the brush into the glue, squeeze it out thoroughly. Excess glue makes a “porridge” out of a napkin - do not glue napkins onto a dark background
TIP: It is very important to degrease the glass with alcohol and glass cleaning liquid before starting work. This is necessary so that the glue and paint stick better.
TIP: a plastic product needs to be roughened a little so that it is not so smooth, otherwise everything will peel off from it later. Ideally, sand it completely, scratch it as if, and then cover it with a base plaster or acrylic coating. And then go through the sandpaper again, finer, so that it becomes smooth again. Then everything will hold up perfectly.
TIP: Don't try to glue the entire napkin, it's really very difficult to glue it without wrinkles. We will learn with experience.
TIP: If I mix paints, I make sure to leave a reserve after painting the product. If the white edges of the napkin do not become transparent, then after drying I tint what “stands out too much white” with this paint (I take a single brush - the thinnest one).
TIP: If the rice paper that will be used for the background is dark or simply bright, the napkin on it will disappear, drying out and becoming transparent. I tried to paint over the napkin (when it was already dry and down to the rice paper), but this is such a hassle that in this case it is better to cut it out of decoupage paper
TIP: the edges of the napkin do not glow only when you cut the motif exactly along the contour. But rarely does anyone succeed. If I cut exactly along the contour, I could go crazy. But it is precisely in these edges that the zest lies that distinguishes decoupage from everything else.
TIP: For iron cans, a base coat is a must. Whatever you like, it’s better, of course, a special one, but don’t paint the jar with paint without this coating - it can peel off pretty quickly. Although, if the paint is for metal, then I don’t know, maybe you can get by
TIP: Even background coverage can be achieved very easily. Instead of a brush, buy or make a foam swab. For the background, take a sponge with the smallest holes. Ideally, make-up sponges (if you don’t mind sacrificing them), but dish sponges are also suitable. And sponges are always washed with soap, otherwise they become disposable
TIP: One coat of varnish is not enough for the final coating. Ideally, three or more. You need to cover the entire surface evenly. Gloss varnish (which adds shine) requires fewer coats than matte varnish.
TIP: I found a method on the Internet called *hot paper*. Place a piece of baking paper on the ironing board - base paper on it - kitchen film on it (the film with which containers are closed, it is transparent and sticky) - a napkin on it - again baking paper on it all and iron everything with a hot iron ( only without *steam* mode). The napkin will stick without a single wrinkle. If you crumple the napkin before ironing and carefully straighten it so that all the folds are preserved, it turns out very quickly and beautifully!
TIP: There is one caveat when working with decoupage paper. The cut out motif should be placed in a bowl of water for some time. Ideally, for half an hour, but if you can’t bear to see the same result, then you can do less. This is necessary so that the fibers of the paper straighten out and it stretches a little (as happens with napkins). Then when gluing there will not be a single wrinkle. In general, paper is more convenient to use if you need large motifs - the end result looks much neater than the napkin version. Oh, and one more thing. You need to cut much more carefully from paper than from a napkin. You cannot leave any edges, as everything will be visible.
TIP: Under pictures from magazines and wrapping paper, PVA is applied both above and below. And you definitely need to “soak” the cut out parts in water, otherwise they will stick together with larger wrinkles.
TIP: I almost never leave glass clear. I tried it once, but didn’t know what to do with the varnish stains. I found this solution for myself: if I want the glass to be slightly transparent, then I cover it with the thinnest white rice paper as a base. It gives a little matte, but does not “steal” transparency. I either prime or use two layers of napkin. The rest is the same as always. I prime with a sponge. I apply regular acrylic paint (white) - two layers. It sticks on tightly, even when you need to wash it off, you still have to try. When applied with a sponge. then you don’t need to apply more than two layers, everything goes on smoothly.
TIP: If you cannot paint evenly with acrylic with a brush (streaks from the hairs of the brush are visible), take a sponge or a piece of foam rubber instead of a brush, wet it lightly with water and wring it out. Then dip it in acrylic paint (I’ll tell you a secret - you can use two at once) and smack it down. Let dry and apply another coat or two. Try it and see how the result surprises you. The smaller the holes in the foam, the better the result.
TIP: napkins glued to dark glass will be completely lost. Therefore, you have 2 options: 1. Place the fragment on the glass, trace the outline and paint with white paint the place where you will glue the drawing. 2. First, glue the bottom, white fragment of the napkin onto the glass (which is usually thrown away after cutting, lightly tint it with white (this is much easier than following the contour), and on top - a drawing
TIP: before applying the crackle, the wooden frame can be coated with simple acrylic varnish and allowed to dry thoroughly. Because The varnish tends to be absorbed into the wood; without preliminary varnishing there is a chance that no cracks will occur. This is one and two - the consumption of expensive craquel varnish is significantly reduced. Well, then according to the scheme, dry it with a hairdryer properly, let the product cool and apply paint. Don’t forget to dry each layer of paint or varnish properly!
TIP: I apply paint to the craquelure with a sponge. The cracks are smaller than those from a brush. and “run” in different directions!!! When first applied, tiny bubbles appear, but then we smooth the paint with the same sponge so that it lies evenly and with each touch we do it more and more gently. Try to blot the bubbles by lightly touching them with a sponge. The result is a perfectly flat surface.
TIP: regarding the background - if I want the background to remain, then I don’t cut out the design on the napkin with scissors, but carefully and carefully tear it out of the napkin. Then the edge turns out uneven and when you paste on the motif, you get the complete impression that these are painted shadows
TIP: after much torment with gluing large fragments of napkins, I invented a trace. technology. Place a napkin over the area for decoupage, place a wet paper kitchen towel on it - literally for a few seconds and then carefully remove it. A napkin with a pattern when wet stretches very easily over the entire area and is laid without wrinkles. From above everything is as always.
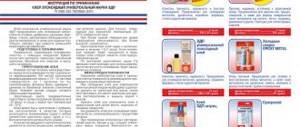
TIP: I glued a large piece of napkin onto the box like this. I smeared the box itself with diluted PVA, and on top of it a damp napkin, sprayed with a spray bottle. It fits wonderfully! There are few folds, and those that exist are very easily pushed out from under the napkin. That's why I only have 2-3 folds for the whole box! Description of Maymeri varnishes: IDEA Patinated varnish for decoupage Article: M5916739, (Italy) Protective varnish based on white spirit, highly resistant. The amber color of the varnish gives the work an old look. Can be applied to any surface. In addition, it can be used as a lower varnish layer in the technique of applying artificial picturesque craquelure. After drying it forms a glossy finish. Dries slowly. With a slight yellow tint.
Water-based glassy topcoat varnish for decoupage Article No.: M5920744, (Italy) Forms a glassy film that is resistant to scratches, abrasive wear and external influences. Easy to use. Perfectly protects and gives exceptional water resistance to the decorated surface. For best results, apply in several thin layers with intermediate drying. After drying, it forms a crystal clear and colorless film with a “wet” glassy sheen. leaves no brush marks. Irreversible.
IDEA Decorative craquelure varnish for decoupage Article: M5920743, (Italy) Ready for use. Water based. Apply with a flat brush directly onto the base paint. Absolutely transparent. Apply an even layer to the base. After 30 minutes, apply acrylic paint on top of the craquelure varnish that contrasts with the underlying layer. As the paint dries, cracks form in the top layer of paint, exposing the bottom layer of paint.
IDEA Decorative craquelure varnish for decoupage/colorless. Article: M5920754, (Italy) Colorless water-based varnish. If you have applied a patina varnish (753), you can quickly and easily achieve a craquelure effect using this varnish. Simply apply it over the surface with a cow hair brush. The first cracks will appear in about 30 minutes. Secure the finished craquelure with acrylic varnish. For added effect, highlight craquelure cracks by rubbing with asphalt varnish before applying topcoat.
IDEA Picturesque craquelure varnish for decoupage Article: M5916740, (Italy) Ready for use. Water based. 6-8 hours after applying the patina varnish, apply the craquelure varnish with a brush. After craquelure has formed, apply another layer of patina varnish to ensure protection. The width of the craquelure cracks will depend on the environmental conditions during drying - temperature and humidity. You can visibly 'reveal' the cracks by wiping the surface with a cotton swab soaked in asphalt varnish.
Taken from https://marthe.at.ua/news/dekupazh_dlja_nachinajushhikh_v_sovetakh/2010-05-12-27
History of decoupage
Decoupage has a long and fascinating history, which can be traced in various styles and art movements in many countries around the world. The technique is boasted by many famous masters, including Marie Antoinette, Madame de Pompadour, Lord Byron and even Matisse and Picasso.
Of course, in order to create masterpieces that will go down in history, you must have an amazing mindset and worldview like Pompadour or Picasso themselves. But no one prevents us from nurturing and developing this gift in ourselves. Pablo Piscasso himself propagated: “Every child is an artist. The difficulty is to remain an artist beyond childhood.” Turn off your head, plunge into childhood, become an artist again.
Glue
When the surface of the product is prepared, the design is pasted on. You can purchase a water-based liquid transparent acrylic gel special for decoupage. But regular PVA, diluted to the consistency of drinking yogurt, will also work. Be sure to shake the glue thoroughly before use. The glue is applied to the paper image with a brush from the center to the edges. You can first dip the brush into water and then into glue. Be very careful to avoid bubbles. If bubbles do appear, they can be removed with your fingers or a rubber roller. Take your time, but don't delay this step either, because the glue dries very quickly. If you apply several layers of glue, then each layer must be thoroughly dried (you can use a hairdryer). Remove excess glue flowing down the edges with a damp cloth, sponge or paper towel.
Photos of products using decoupage technique
Studying technology is not bad, but without knowing the possibilities, it is difficult to imagine what can be done and what can be expected.
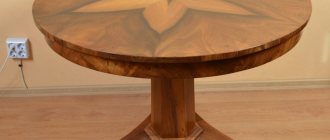
A few photos will help you decide what you can or want to do. Decoupage can transform an old table into a new and very unusual one.
Decoupage for beginners: standard bathroom furniture has become vintage
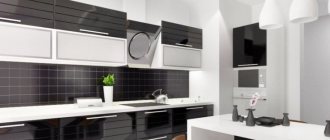
You can turn a boring standard kitchen into a work of art
Transformation of old kitchen facades
Stools are also an art object
This technique is called reverse decoupage - napkins are glued to the glass with the front side
Learning to make glaze
Glazing is an interesting technology of applying several tiers of paint, one after another. The paint used is first thoroughly diluted with running water. Such a solution can be applied either to the treated surface or not. As a result, the resulting shade turns out to be a very deep tone.
Read
How to decoupage a wall clock in different ways
The presented master class, with illustrated photos, will clearly show the beginner what glazing is. In this case, you need a wooden box blank and a picture for decoupage. For example, an unusually beautiful lilac branch with a dominant purple hue. Before you start making glaze at home, you will need to treat the workpiece with fine sandpaper, and then dilute paint similar to the color of the drawing with water. Step by step, apply paint to the box, both inside and outside. This must be done more than once. Remember to take drying breaks between each coat. And also work with fine caliber sandpaper.
Next, we take a picture of a lilac and cover it with acrylic varnish, in several tiers. After each coat, we take a break to dry. Then, cut out the bouquet itself and blot it with water for a few minutes. After this, you need to remove the top layer of paper, which is located on the lid. Varnish is applied to it. The finishing touches provided in the master class are tinting the edges of the product. We need to erase the boundaries between the box and the image. Apply paint with a washcloth, and then coat it a couple of times with acrylic-based varnish.