Internal partitions serve not only to divide a room into certain zones. Furniture and other items are often hung on them. For this reason, interior partitions in the house must be strong enough to support the weight of equipment or hanging furniture.
The main materials for arranging partitions in a house or apartment are: wood, brick, plasterboard and particle boards.
Not all of the above materials for the construction of partitions are strong enough, and this is very important to consider before hanging furniture or a TV on the wall.
Drilling the wall
Craftsmen use a hammer drill, but for a home workshop, an electric drill with a power of ≥ 600 W is usually purchased. It is advisable to have a tool with continuously adjustable speed and a quick-release chuck. It is convenient if a hammer drilling function is provided, making the activity easier.
Wooden, foam concrete walls, as well as partitions made of plasterboard, can be drilled using a regular drill. More durable materials - concrete, brick - will require a carbide drill with pobedite surfacing at the end. If a hole > 15 cm in length is expected, then a hammer drill with a drill is used.
Holes in the walls have to be drilled for different purposes. They are mainly needed for securely fixing wall cabinets. At the preparation stage, the wiring diagram must be clarified to avoid damage. The drill gets very hot during operation, so it needs to be dipped in water periodically.
The brick should be drilled at low (up to 400) speeds in impact mode, pressing quite firmly on the handle and holding the tool strictly vertically. It is more difficult to work with high-strength concrete, since the Pobedit drill often rests on the reinforcement. To pass the obstacle, it is replaced with a regular drill. If a strict straight line of the hole is not a prerequisite, then you can shift the drilling direction. Stones in concrete are crushed with a narrow chisel inserted into the hole, hitting it with a hammer.
When placing the cabinet on a tiled wall, first remove the glaze in the designated areas with a sharp object. To make a hole of a given depth, you can take a piece of cylindrical cambric of the required diameter and length, put it on the drill, resting it tightly against the chuck.
Expert advice: If you can’t find a suitable tube, then ordinary insulating tape, which is applied to the drill in several turns, will help. This technique will eliminate the need to constantly monitor the depth of the drilled hole.
Panel installation technology
A clamp for MDF is a special plate made of perforated metal, which is used to fix MDF panels during their installation. A special feature of this device is “hidden” installation - a method of installing the panel in which the latch itself remains hidden under it and does not spoil the overall picture.
The clamps are marked in the form of numbers 1-6, which reflect the distance from the base (platform) to the tongue of this device. For MDF panels, devices with a gap of 2 mm or more are usually used, but in each specific case, clamps must be selected based on the thickness of the wood.
The use of these devices also has its advantages over other types of fixation of MDF panels:
- traces of installation are not visible, since the clamp is hidden by the casing and support rail;
- fastening material (screws, bolts, etc.) does not damage the panel during installation;
- The clamps are easy to install and remove;
- the cost of this fastener is lower than the cost of other fastening devices;
- Claymers allow you to save money - about 200 pieces are enough to cover an area of 10 square meters with panels.
The average price of clamps for MDF panels is up to 50 rubles per package of one hundred pieces.
MDF panel is a finishing material made from wood chips pressed under high pressure. The panels have the following advantages:
- a high-quality MDF panel does not contain phenolic compounds and resins, and wood chips are glued together by the substance lignin, which is released by wood;
- the material is more resistant to liquid and moisture than natural wood;
- panels provide additional insulation from noise and temperatures;
- the material is easy to process, install on the ceiling and dismantle;
- the panels do not require painstaking care and are easy to clean;
- the cost of MDF ceiling panels is lower than the cost of panels made of natural wood;
- the appearance of this material completely imitates real wood.
The disadvantages of the panels include:
- relatively low strength and resistance to mechanical damage;
- fire hazard;
- the need to hide electrical wiring in a metal sheath in case of its possible contact with the panels after their installation.
The best way to fasten MDF panels is to use clamps.
Before installation, the number of panels is also calculated according to the following scheme: the width of one side of the ceiling is divided by the width of the panel, and a couple of panels are added to the resulting amount in case of defects.
Before attaching the MDF, you need to prepare the tool:
- tape measure and level;
- attachment for a drill or screwdriver;
- fitter's square;
- electric jigsaw or fine-tooth saw.
Before installing the MDF panels, a sheathing is formed on the ceiling. To do this, markings are made on its surface, onto which wooden slats are then attached, making a step of 65 cm between the screws.
The optimal size of the lathing slats is 4 cm wide and 2 cm thick. The maximum distance between the slats can be 50 cm, and a gap of about 1 cm should be left between the wall and the slats.
The lathing is installed using the following technology:
- if the ceiling is uneven, determine its lowest point, which will serve as an indicator of the indentation of the slats from the surface level, or they retreat a few centimeters from the ceiling level and form a sheathing frame around the perimeter of the room;
- at the most protruding point, they attach the first rail, along which the rest will then be leveled, or they begin to fix the slats to the frame on the walls;
- The slats are screwed with self-tapping screws so that their caps go a couple of millimeters above the bottom plane of the wood.
The next stage of creating MDF ceilings is the installation of panels using the following technology:
- the first panel is mounted with self-tapping screws from the corner of the room;
- the next panel is fixed with a clamp inserted into the groove of the first panel;
- long panels are shortened with a jigsaw or saw, and holes are drilled for the communications outlet using a crown-shaped nozzle;
- if the last panel does not fit, it is cut off and fixed into the walls with self-tapping screws;
- After all the panels are secured to the ceiling, a decorative plinth is installed that will hide the screws that secure the first and last panels to the sheathing.
Using a clamper instead of nails and screws, as was previously the case, allows you to achieve the following advantages:
- Increase the speed and quality of installation work;
- Avoid damage to finishing materials in the process of fixing them to the sheathing;
- Get a beautiful surface without a single visible fastener;
- Easy to use, since the technology for fastening the clamps is nothing complicated.
- Excellent operating conditions: no instability of products and their loosening during operation, non-susceptibility to corrosion and other destructive processes.
Kleimer is a popular type of fastener today. Many repair and finishing works cannot be completed without its use.
This hardware allows for a reliable and hidden connection, and a wide selection allows you to select fasteners of the desired shape and size.
Useful drilling tools
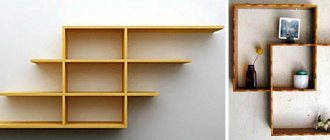
Many home craftsmen have encountered the problem of the drill moving from the intended point due to the heterogeneity of the walls. This leads to the fact that the exact horizontal line is lost and it is not possible to hang a shelf or other piece of kitchen furniture straight.
In such a situation, craftsmen recommend that you independently prepare a sheet of plywood with a hole (a jig) through which the drilling will be carried out. To prevent it from moving when applied to the wall while the drill is operating, double-sided tape or sandpaper is glued to the surface oriented to the plane being drilled. For versatility, you can make several holes of different diameters. If you provide one edge with a plate attached at a right angle, then the dust will not fly away, but almost all of it will settle on this shelf.
To secure cabinets, it is often necessary to prepare holes with a specific distance. Here the conductor will also come to the rescue, on which precise markings are made, and two holes are prepared. Further actions will be aimed at drilling the first socket for the dowel in the wall, in which one side of the conductor is attached with a self-tapping screw. All that remains is to level it using a building level and drill a second hole.
Selection of screws
Traditional fastening of shelves, cabinets, cornices, and decorative elements is done using self-tapping screws, which in their design have a head and a thread with sharp edges, which, when screwed, allows you to independently cut threads in the dowels into which they are screwed. They are selected according to the predicted load.
The material is steel - most often carbon, but stainless steel is also found, as well as brass. Carbon steel products have a protective coating. Self-tapping screws differ according to the thread pitch, which can be frequent, universal, rare. The first type is designed for working with iron surfaces. A rare step is suitable for wood, plastic and other soft materials. Universal varieties are used more often.
There is a separate type of self-tapping screws designed for concrete structures. They are screwed directly into the hole without installing a dowel. This mount cannot be dismantled, so it is rarely used. When choosing the dimensions of the screw, it is necessary to take into account the structure of the wall. The more pores there are, the longer and thicker the dowel and the corresponding self-tapping screw should be selected.
The use of clamps for installing MDF panels
Typically, prefabricated furniture purchased in a showroom, store, or market, or ordered from a factory, is delivered to consumers in disassembled form. If the installation of furniture is not specified in the contract, the craftsmen will not assemble it, so the owner needs to do the entire amount of work with his own hands. On the one hand, if you have a drawing, components, and tools, installation is not difficult.
- unpack furniture parts, fasteners and accessories supplied in the kit. It is imperative to check that the units comply with the declared quantity, quality and color;
- You should check the availability of instructions, diagrams, detailed drawings according to which the furniture is assembled. If some elements are missing, you can purchase additional fasteners or contact the manufacturer;
- it is required to select and prepare fasteners, mounting fittings, connecting elements, drills, electrical and mechanical tools, hardware and other consumables;
- checking that the holes for fixing the fasteners correspond to the attached drawing. The assembly diagram must contain clear instructions for installing the furniture structure;
- if you have no assembly experience, it is recommended to first mount something small, for example, a furniture box, and then proceed with the installation of large furniture, as shown in the picture;
- furniture assembly is carried out in the following order: installation of shelf holders, hinges, strips, ties, connection of frame elements, installation of doors, gluing mirrors, installation of handles, legs;
- complete design with shelves, drawers, decorative fittings. It is convenient if during assembly you can position the model using adjustable legs;
- built-in furniture is fixed to the wall, and a sliding system is first installed under the sliding wardrobe. Stationary furniture is completely assembled and then installed in the chosen location;
- adjustment of facades - use a screwdriver to loosen or strengthen the bolts of furniture hinges. It is necessary to ensure that there is no gap between the doors;
- checking the plane of the kitchen countertop, clearly hanging the upper sections of the upper cabinets, installing household appliances.
The furniture assembly lesson contains general information about installation technology. The assembly of metal furniture, seating areas, sofas, beds, tables with add-ons, radius compartments is carried out taking into account certain nuances. Simple structures can be assembled independently, without using professional equipment, but if you do not have the skills or the necessary tools, and the project is quite complex, it is better to use the services of the manufacturer - professional furniture makers will assemble the product quickly and efficiently.
When assembling furniture with your own hands, you must not overtighten the fasteners, use low-quality consumables, and when using screwdrivers, you must monitor the precise movement of the bit so that the tool does not damage the panels at high speeds. It is better to remove the protective film from the parts after completing assembly.
We suggest you familiarize yourself with Laying cinder blocks in one block
When it comes to assembling furniture, you need to take into account that it will not be possible to connect elements of different products in the same way - the installation of furniture structures requires special fasteners, fittings and a set of tools. There are certain nuances in the assembly process itself - you need to know them in order to work quickly, accurately and accurately.
- A chest of drawers is an example of simple prefabricated furniture with a minimum number of fasteners. You need to install drawer guides on the side panels. Pour a little glue into the blind holes in the sidewalls and ends of the stiffener flanges, insert the dowels and easily hammer them in, connecting the elements, and then attach the confirmations. The top cover is fixed with dowels and minifixes - a pin in the cover, an eccentric in the sidewall, then the confirmations are screwed in until they stop. The next stage is to nail the back wall, having previously checked the diagonal, assemble the drawers, install guides on them, screw the handles into the prepared holes;
- standard sleeping bed. After checking the presence of all structural parts, the base is assembled - the transverse and longitudinal beams of the frame are connected with euroscrews (confirmations) or self-tapping screws. A cross beam is fixed in the center, the lamellas are installed in specially prepared grooves. The side walls of the frame are secured with dowels and plugs. The remaining elements of the bed are fixed with bolts, the legs are screwed in, if there are any, and the mattress is placed in the base box. The double model is assembled according to the same principle;
- bed with lifting mechanism. The standard model consists of a frame (base), a lifting mechanism, a mattress and internal drawers. You will need a screwdriver with a full set of attachments, a screwdriver, a wrench, euro screws with countersunk heads and an internal hexagon, a tape measure and a level. Assembly diagram: connecting three drawers and headboard parts with brackets, corners or ties with screws. In the upper part of the drawers, shelves, corners, a lifting mechanism are mounted - a gas shock absorber (cylinder upwards) is secured with nuts with a stopper, handles and a limiter for the mattress are installed;
- Stationary cabinets are the easiest furniture to assemble. Sequence of actions: connecting the shelves with the side panels using confirmations and screwdrivers, installing the back wall made of fiberboard, for which furniture nails or a furniture stapler with staples are used. After assembling the box, check the same level of diagonals and compliance with the right angle between the elements. The next step is hanging, adjusting the facades, then all that remains is to install the shelves. If the model has drawers or roll-out shelves, guides for them are installed first;
- sliding body - a stationary sliding wardrobe with a plinth begins to be assembled by screwing the plinth to the bottom with minifixes and dowels, and then driving in support nails. The body is also assembled on minifixes and duplicate dowels; it is important to check the correspondence of opposite holes. Next, fix the back wall (nails, staples, installation in a groove), check the diagonal and angle. After this, you need to install shelf supports, guides for drawers, install shelves and a bar. If the cabinet is without a base and trim in the lower rear part, the plinth is dismantled;
- sliding door system – used for all coupe models. Built-in products do not have side walls and are often made without a roof or bottom. Installation consists of attaching shelves to the walls of the room and installing a sliding system. First, install stoppers and limiters, secure the upper guide rail, there is no need to screw the lower one. The door panel is inserted into both guides into the far grooves, the second leaf into the near grooves, and adjustments are made. After this, you can fix the bottom rail and glue the sealing brushes;
- elements of a kitchen set are complex installation; a full set of tools, diverse fasteners, and special fittings are required. Assembly begins with the preparation of the lower sections - the bottom is connected to the side walls with euroscrews, the planks are installed under the tabletop, the back wall made of fiberboard is secured (stapler, nails in increments of up to 10 mm), and the legs are fixed with self-tapping screws. This is followed by installation of hinges in the mounting slots, hanging of hinged facades, and adjustment. Drawers are assembled using the same principle. After screeding the “bottoms,” the tabletop is installed, checking the horizontal level with a building level.
We invite you to familiarize yourself with Which bath lining is better: a comparative review, features and reviews
The upper cabinets of the kitchen set are assembled in the same way as the “bottom” ones; the products do not have drawers, but a more complex installation is required. The upper sections are hung on a mounting strip, anchor bolts, powerful hinges or butterfly dowels on plasterboard at an optimal height of 550-600 mm from the tabletop.
Selection of dowels
When choosing the optimal wall mount, inexperienced craftsmen make several mistakes.
- The diameter of the dowel turns out to be larger than that of the self-tapping screw. Such a design will not fit tightly into the hole and will not allow sufficiently heavy kitchen cabinets to be securely fastened.
- If the diameter of the dowel is smaller than that of a self-tapping screw, the latter will not be screwed in completely, creating obstacles for further hanging a piece of furniture on it that will not be able to hang tightly to the wall.
The most rational solution is to purchase a ready-made set of dowels with self-tapping screws. For drywall there is a dowel equipped with a drill, and there is also a special type of similar product known as the “Butterfly”.
Advantages of tire mounting
A fastening system has proven itself, consisting of a rail, which is a perforated strip of metal with a protruding part designed to be held by hooks located on the inside of cabinets.
Such a mount has a number of obvious advantages:
- quick installation, accessible to a beginner;
- cabinets can be hung effortlessly on a prepared rail, without helpers;
- if leveling is necessary, the height is adjustable;
- the fit of the cabinet after hanging it can also be adjusted in depth;
- The tire can be divided into pieces of the required length.
In the store, you should pay attention to the package, since fastenings in the form of tires and canopies may be included in its composition. In this case, you can be sure that the manufacturer has foreseen the possible load and provided reliable fasteners.
When starting to hang kitchen cabinets, you need to secure the awnings to them with self-tapping screws, placing the hooks in the middle position. Another position is allowed, but this is considered the most optimal.
Using a level, the position of the tire is marked on the wall, holes are drilled and the structure is secured with dowels. Once the cabinet is securely installed, a control measurement of its exact position is carried out. If necessary, it is leveled. If several hanging pieces of furniture are placed nearby, they are fastened together using a clamp. It is advisable to lay thin insulating material between the walls to avoid damage.
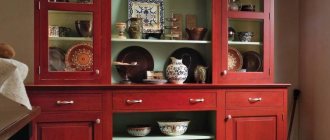
Hidden fastening of furniture parts. (kitchen cupboard)
Arranging a comfortable living space, a comfortable office room, a sales area or a warehouse depends on the correct choice of furniture units.
All types of furniture can be divided into cabinet, modular, project, upholstered products and structures made according to individual projects. How to connect the parts so that the fasteners do not ultimately spoil the appearance of the product?
Of course, glue them together, according to the classics, on dowels/chops.
Yes, for laminated chipboard parts this method is also allowed, but it is not used due to the increased assembly time. Previously, I remember such glued cabinets were delivered as ready-made sets from Italy, somewhere in the Moscow region.
According to the technology, for high-quality gluing and the absence of an adhesive seam, the parts must be tightened with special large clamps
I didn't have this goodness. Buying it is quite expensive.
the result of such perversions was a kitchen without visible fasteners and plugs.
A few more photos of this kitchen
Other types of fasteners
To hang several rather heavy cabinets on self-tapping screws already screwed into the wall, you can attach a strip to their back surface. This flat piece has a slot that resembles a keyhole in configuration. It is selected so that the diameter of the widest part of the hole is slightly larger than the head of the screw. The narrow part of the hole should be slightly larger than the diameter of the thread. When hanging the cabinet, the head of the self-tapping screw enters the wide part of the slot, and then moves under weight into the narrow zone, ensuring reliable fastening.
If you need to fix a fairly heavy object on the wall, made with plasterboard sheathing, then you can first make a hole with a diameter of ≈ 3 cm in the area of the fastening room, through which a solution can be introduced into the empty space, allowing you to create a strong bridge to the wall.
You can simplify the process if you correctly calculate the length of the screw. In order for the kitchen wall cabinet to be firmly fixed, several values are added up: the thickness of the drywall, the gap from the finish to the wall, the layer of plaster, the depth of the hole in the wall itself.
Clasp sizes
All products are classified according to size. Fasteners are marked with numbers from 1 to 6. When choosing, consider the thickness of the strip used. The following types exist:
- No. 1 for installing vinyl siding or wall panels;
- No. 2 for fixing vinyl lining, MDF;
- No. 3 for reliable installation of eurolining and chipboard;
- No. 4 for eurolining;
- No. 5 for lining made of heavy wood;
- No. 6 for installation of a block house.
Also, hardware is divided into types according to their purpose. End or starting fasteners are used to install the first and last rows of cladding. The designs feature a pair of unidirectional hooks and are placed in the corners of the cladding strips, effectively holding them in place. The standard type of clamps is suitable for securing the corners of four slabs and is equipped with two pairs of multidirectional hooks. Side or end hardware is distinguished by a pair of multidirectional hooks and is most often used to prevent horizontal displacement of the planks.
The main group of clamps is divided into six standard sizes. The choice directly depends on the thickness of the building material used in the process of finishing the room.
- No. 1 - Used when finishing with vinyl lining and wall panels
- No. 2 - For fastening MDF and vinyl lining
- No. 3 - Used for eurolining and chipboard panels
- No. 4 - fasten the eurolining
- No. 5 - suitable for wooden linings of heavy species, such as linden and aspen
- No. 6 - used for block house
Widely used standard clamps were mentioned above. But these are not all types of clamps. There are clamps of a specific design used for fastening other building materials. Their design has a specific form, and production and sale are carried out as an addition to the main material. An example of “unusual” clamps are fastenings for decking boards, seam roofing, and others.
On the right in the photo you can see how the terrace board is installed. In this case, the clamp has the shape of a butterfly, and the fixation on the material occurs by snapping it onto the groove of the board (like a clip). Such fasteners are not widely available and can be purchased as an addition to the decking board from manufacturers or suppliers.
All products are classified by size and marked with numbers from 1 to 6. They should be selected depending on the thickness of the board fragment (lamella) that includes the holding hook:
- No. 1 is used for installation of vinyl lining and wall panels;
- No. 2 is used for vinyl lining and as clamps for MDF (analogous to chipboard, but made using a different technology);
- No. 3 is suitable for eurolining and chipboard panels;
- No. 4 – these are clamps for eurolining;
- No. 5 is taken for lining from linden and aspen, as a heavier species;
- No. 6 is used for a block house as the strongest fastener.
you need to divide the length of the board (lamella) by the fastening step (50 cm) and multiply by the number of boards required for finishing. To be on the safe side, you can add a dozen sets. Depending on the method of fastening, these products can be visible or hidden. A thin plastic film, painted in the color of the finishing slabs or plates, is applied to the front surface of visible clasps.
We suggest you familiarize yourself with Which foundation is better for a log bathhouse
The classification is broader in terms of functionality. Start or end fasteners are used to install the first and last rows of cladding. They have two unidirectional hooks, installed at the corners of two facing slabs, each holding two slabs. Ordinary clasps have two pairs of multidirectional hooks that hold the corners of four slabs.