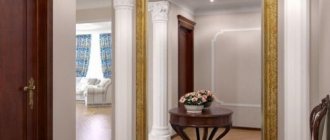
How to properly hang a shelf on the wall
DIY apartment renovation
or wall cabinet correctly How to hang a shelf in a bathroom where the walls are finished with ceramic tiles?
How to hang a shelf on drywall, the main qualities of which are not strength? Similar questions arise quite often. Although there is no difficulty here. After reading this review, you will see for yourself and can easily hang any shelf on the wall with your own hands.
Video material
As you can see, creating a unique interior for a bathroom using cabinets and shelves is not difficult at all. Imagine and decorate every free corner of a small space with unique but functional handmade items. And you already know how to attach interior items to the wall and tiles!
How to hang a shelf on the wall
Any wall-mounted furniture that is mounted on the wall, be it a wall cabinet or a bookshelf, must be equipped with two or more hinges. The mounting loops are quite strong in order to support the weight of the cabinet or shelf along with its contents. Our task comes down to installing fasteners on which loops will be put on, like outerwear on a hook in an apartment hallway. The anchors used to hang wall-mounted furniture are an L-shaped hook with a thread 0.4-0.5 cm in diameter and 5-10 cm in length.
It is better to install anchors in such a way that their axis direction is raised at a certain angle to the ceiling structures. In this case, the hinges will tend to press against the wall, which will ensure a tight fit of the structure.
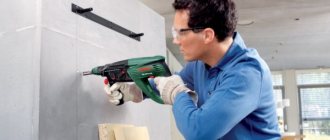
The most labor-intensive step during installation is drilling the holes; for this you will need a hammer drill. You can, of course, try to get by with a regular “impact” drill, or in extreme cases even a hand bolt, but you won’t drill that much into reinforced concrete. The maximum for such a tool is a brick wall.
In the resulting holes we insert plastic or wooden plugs - dowels, into which we screw the anchor.
Problems when installing a shelf can arise for the exact opposite reasons, for example, low strength of the wall structure. Partitions made of gypsum concrete or foam concrete have weak strength. The first ones usually occur in the bathrooms of old houses built in the 70s of the last century. Even a hand drill can take them, but mounting a mount in them can be quite difficult. Starting with the fact that at the first attempt to tighten the anchor, the plastic dowel begins to rotate, and after that it dangles in the broken hole. Now, let's take a closer look at how to hang a shelf on the wall in this case.
A good solution to this problem is to create a support structure that will distribute the load over the largest possible area, for which there are several ways:
- Place some glue into the drilled hole. Having inserted the dowel into the wall, wait until the glue dries and tighten the hook. Liquid nails, adhesive mixture for ceramic tiles, etc. can be used as glue.
- When installing dowels into weak walls, the hole must be drilled using a drill of a smaller diameter. For example, for a dowel with a diameter of 10 mm we use a drill with a diameter of 7-8 mm, for 8 mm a seven-millimeter one.
- We use special spacer-type fasteners, such as “butterfly” or similar.
- We use dowels of the largest diameter possible, or use two nested inside each other.
It is important to remember that self-clamping anchors are not applicable or unsuitable for walls built from foam, gypsum concrete, or hollow brick. They simply crush foam and gypsum concrete and deform fragile bricks.
First we do the marking. Modern hinges on wall-mounted furniture are quite wide, which allows for decent tolerances, but still the markings must be made as accurately as possible, especially horizontally.
Pieces of furniture that will be hung at a fairly noticeable (up to 80 cm) distance from the ceiling must be placed at a horizontal level. Having determined the first attachment point of one of the loops, draw a horizontal line using a building level and a pencil or marker. On it we measure the length of the segment between the centers of the loops, and we get the places for our fasteners.
How to hang a wall cabinet in the bathroom yourself: sequence of work
Hanging a standard, horizontal, corner or mirrored cabinet in the bathroom is quite simple, and any man can cope with this task (with the appropriate tools). The minimum required to install a bathroom cabinet yourself is a hammer drill or impact drill, a tape measure, a level and a screwdriver.
How to install a wall cabinet for a bathroom with your own hands, watch the video.
You need to start work on installing a wall cabinet in the bathroom with markings. And first, you need to draw a horizontal line at a certain height using a level - as a rule, this is 1.6-2 m above the floor level, depending on the type of cabinet and its height. After this, we measure the width of the furniture, divide it in half and mark the vertical axis of the cabinet on a horizontal line - it should clearly coincide with the axis of the washbasin installation. In principle, this point can be transferred to the horizontal using a level, but in most cases it is more convenient to do this with a tape measure, setting aside a certain size from the nearest corner. Now we measure the distance between the lugs of the fasteners, again divide it in half and put the resulting size first in one direction horizontally from the center point, and then in the other. Fastening elements are installed in the resulting locations.
How to hang a bathroom cabinet with your own hands photo
Now we arm ourselves with a hammer drill or drill and, and then in the wall.
You need to drill the tiles with the impact switched off. You can turn it on only after the body of the tile has been passed - otherwise you will get an unsightly crack in the tile.
When the holes are ready, plastic plugs are inserted into them and hooks are screwed in, on which the wall-mounted bathroom cabinet is safely hung.
Bathroom wall cabinets photo
Some wall furniture models use adjustable lugs. If you make a mistake somewhere with the markings, one edge of the cabinet can always be lowered down or raised up by rotating the adjusting screw located on the inside of the cabinet.
Now you know not only how to choose a wall cabinet for your bathroom, but also how to hang it on the wall. In conclusion, I would like to once again remind you that this furniture must successfully withstand the harmful effects of high humidity. You need to choose exactly the one that is made from materials that are not susceptible or slightly susceptible to its effects. An excellent option would be either MDF or high-quality plastic. Also pay attention to the material of the shelves of this cabinet - ordinary chipboard is excluded!
Thus, a person can perfectly see his reflection and place small accessories such as a razor, makeup tools, toothbrush and toothpaste “at hand”. But larger items will have to look for another location.
One of the distinguishing features of this type of bathroom furniture is its low price.
, because less material is used to make it than when creating full-fledged mirror cabinets.
Here are examples of the proposals that I came across:
- Model “Sanflor Karina 45”:
| Parameter | Description |
| Width | 470 mm |
| Height | 700 mm |
| Depth | 140 mm |
| Color | White |
| Ornament | Present |
| Facade material | Medium Density Fiberboard and Mirror |
| Body material | Laminated particle board |
| Equipment |
|
| Electrical equipment | Absent |
| Brand | "Sanflor" |
| Country of Origin | Russia |
| Price | 1980 rubles |
- Model “Vod-ok Tunisia 55”:
- Model “Onika Karina 50”:
- Model "Florena 78.01":
| Parameter | Description |
| Width | 780 mm |
| Height | 860 mm |
| Depth | 170 mm |
| Body material | Moisture-resistant laminated particle board |
| Facade material |
|
| Equipment |
|
| Electrical equipment | Built-in backlight |
| Brand | "Florena" |
| Country of Origin | Russia |
| Price | 7610 rubles |
Wardrobe with mirror door
But this is a true example of “invisible” furniture, since it does not have doors without mirrors, and its entire functional part is completely hidden behind your reflection
.
Moreover, such designs, as a rule, are spacious enough
to accommodate, if not all the accessories you use in the bathroom, then most of them.
It was this option that I chose. Such a mirror cabinet is installed in the bathroom above the sink and is not even felt as part of the furniture interior. If we talk about the visual effect, it is similar to the one we get by hanging a large mirror, that is, we added only a looking glass that “expands” the room.
Here are some illustrative examples of products of this type:
- Model “Vod-ok Lyra 45”:
- Model "ASB-furniture City 60":
- Model "Aquaton Roco 50":
Corner mirror cabinet
Essentially, this is the same hanging cabinet with a mirrored door, but only with an angular shape. This design feature has its advantages:
- Possibility of filling the corner area of the room
, which is usually not used at all. That is, there is an even greater gain in space saving than when using conventional rectangular samples;
- Large capacity
. Behind the mirror you will find a recess the size of the entire corner occupied by the closet, which will allow you to place there many things necessary for taking water procedures and taking care of yourself.
And the cons:
- Limited planning options
. If you decide to rearrange the furniture in the bathroom, then it won’t be possible to rearrange the corner furniture anywhere because of its original shape; - The need to use in conjunction with a sink of a similar design
. That is, if you decide to occupy a corner, you will have to fully staff it.
Examples of models sold:
- Model “Onika Modern 34.15U”:
- Model “Bellezza Lily 34”:
| Parameter | Description |
| Width | 340 mm |
| Height | 720 mm |
| Depth | 340 mm |
| Facade material |
|
| Body material | Moisture-resistant laminated chipboard of the Kronospan brand, coated with four layers of paint and varnish products |
| Number of shelves | 2 |
| Brand | "Bellezza" |
| Country of Origin | Russia |
| Price | 3750 rubles |
- Model "Belux Micro 38":
How to hang a shelf on drywall
In conclusion of our article, let's look at how to hang a shelf on drywall
. Special butterfly anchors and similar ones used for drywall, when installed, can withstand a weight of about 15 kg each. But sometimes a reasonable question arises: how to hang a shelf on the wall if its weight is significantly greater than the indicated figures.
A good solution would be to place an additional support frame at the mounting location. An anchor drilled into such a structure will withstand a much greater load. The following fastening method can be used if, for example, a concrete or brick wall is sheathed with plasterboard. The smaller the gap between the main wall and the plasterboard sheathing, the better.
For fastenings we use tubular self-expanding anchors. When choosing the length of the anchor, take into account the distance from the wall to the drywall and add 5 cm, take the diameter of the anchor 1 -1.2 cm.
We drill a hole using a hammer drill directly through the drywall (here you need to act carefully so as not to gouge an excessively large hole in the weak plaster). The depth to which we immerse the drill into the wall structure must be 5-6mm greater than the length of the anchor. Having completely cleared the drilled hole from dust and other construction debris, we insert the anchor so that its edge is flush with the drywall. By tightening the anchor nuts, we achieve good fixation. Then unscrew the nuts completely. We put metal washers through the threads (the diameter of the internal holes of the washers must correspond to the size of the anchor thread). We put the loops on top and tighten them with nuts.
All our problem is solved. We described the question of how to hang a shelf on the wall in the most popular options, setting out general rules that will also allow you to find a solution in rarer cases, but if after reading you have more questions, you can ask them in the comments to the article.
How to hang a shelf on the wall
After repairs, there is always a need to fix all the decorative elements in their places. When performing this procedure, the problem often arises of how to fix the shelf to the wall in such a way that it looks attractive, harmoniously matches the design, and at the same time is safe and conveniently located. This problem occurs due to walls made of different materials, and before attaching a shelf, you need to know certain nuances.
Related article: How to install a chimney through a wall
Wall cabinet in the bathroom - how to hang it without outside help
In this review, we will figure out how to hang a wall cabinet in the bathroom yourself, so that the result is not inferior to the work of professionals. There is nothing complicated in installation if you know and follow all the basic aspects of the technology and have the necessary materials and tools at hand. After carefully reading the article, you will be able to hang hanging elements of any type.
In the bathroom, cabinets are often combined with mirrors
How to hang a shelf on the wall
During fastening, the type of fastener itself is very important. Once you get acquainted with the mounting methods, you can easily select the desired option:
- Invisible fastener. Using this method, you can hide the fasteners, and the structure on the wall will look light and elegant. It is best that the wall is made of concrete or brick. It is not recommended to use this fastener for walls covered with plasterboard.
- Brackets. In this case, it will not be possible to hide all the elements; they will be noticeable. To save money, you can buy steel or plastic corners. If you need to give your shelf an attractive appearance, choose decorative fasteners, but always in pairs. One nuance needs to be taken into account - the brackets may not fit every interior.
- Loops. This is the most popular method - simple, practical, quick to implement, and at the same time can fit into any design. The manufacturing features of the hinges allow for different loads on the shelf. Not all types of these fasteners can be secured in practice with your own hands. In certain cases, you need to contact professionals.
- Glass holders. These fasteners have rubber seals that protect the surface at the fastening site. Shelf holders come in different designs; there are models with Velcro that look beautiful. They are fixed at the bottom, and a support is placed at the top.
Attention! A corner kitchen will look especially good when choosing glass holders for mounting.
Tools and materials
For fastening you will need:
- electric drill;
- level;
- screwdriver;
- perforator;
- self-tapping screws;
- anchor;
- glue;
- jigsaw;
- drill;
- set of fasteners;
- wrench;
- hammer;
- marker.
What should the wall be like?
When choosing a fastening option, it is necessary to take into account not only its attractive appearance, but also the method of fixation to the wall, which can be made of various building materials:
- Concrete walls are characterized by strength. Therefore, it is almost impossible to attach a self-tapping screw to this wall. You must first try to make the hole.
- Today, drywall is often used for finishing. Butterfly anchors are used for this material.
- If the walls are made of wood, then fixing the shelf will not cause problems. The only difficulty may be finding a place to make the hole. Afterwards, the shelf must be brought to the marked points and tightened with self-tapping screws. To fix the product to a wooden surface, you do not need to buy additional tools; the self-tapping screw can be screwed in with a regular screwdriver.
Hang a shelf on the wall: step-by-step instructions
Before you start drilling walls, you need to make sure that there are no electrical cables in the work area. There are devices for detecting hidden electrical wiring.
Mounting instructions:
- First of all, you need to accurately determine the location of the fastener, taking into account your interior. Shelves for books may differ in width from the same products for plants. Select a shelf of the required length and lean it against the wall in the area of intended fastening. Set it horizontally using a level and draw a line along the bottom.
- Before drilling tiles, you need to check whether it is possible to secure the product by making a hole between adjacent slabs. This way the tile will remain intact and you can be sure that the stand is fixed clearly horizontally. If you still need to drill a hole in the tile, then you need to mark the attachment point on masking tape glued crosswise to the surface. This will make it possible to avoid the hammer drill from slipping. You need to drill a little larger than the size of the dowel, since it must be completely recessed into the wall. With this installation of the dowel, the tile will not crack when screwing in the screw.
- The weight of the stand should be distributed over several fasteners installed in the wall using self-tapping screws. The distance between the fasteners should not be very large so that the product does not hang down in the center. The number of fastenings will depend on the load being installed on the stand. For products made of fiberboard with a thickness of 15 mm, it is best to choose a distance between fasteners of about 55 cm. For models made of MDF, it is advisable to choose a distance between fasteners of approximately 65 cm.
- Place the fastener against the wall so that the top is in the same position as the line that was drawn with a marker. Mark one hole, make sure it's vertical, then mark the remaining holes. In the same way, you need to mark the holes for other fasteners.
- When making holes, you need to use the type of drill that is required for the material from which the wall is constructed. To fix fasteners with a small shoulder, choose 50x5 mm screws, for shelf holders with a long shoulder - 50x7 mm.
You need to approach the fastening of shelves very carefully, even if you have some installation skills with slats and fasteners, wooden or plaster walls. You should always carefully select fasteners and tools for fixation. You can hang the shelves yourself without any apparent difficulties, but if you don’t have any skills in attaching shelves, then it is advisable to seek help from an experienced craftsman. His services will be inexpensive, but they will be performed with high quality.
Step-by-step instructions for installing a plasterboard shelf in the bathroom
How to hang a curtain rod - at what distance from the ceiling and how to hang a curtain rod with your own hands
Creating a shelf from plasterboard with your own hands does not fall into the category of difficult tasks. However, to resolve such an issue, it is necessary to show care and responsibility, otherwise the result of the work will be depressing. Step-by-step instructions for installing a plasterboard structure are as follows:
- According to the markings, holes are drilled in the wall for dowels. Moreover, the length of each of them exceeds the size of the dowel by at least 1-1.5 cm. To increase the load-bearing capacity of the object, the distance between the holes must be at least 10-15 cm.
- Dowels are inserted into the holes and driven until they are flush with the wall. The UD ceiling profile is adjusted to size, applied to the wall and drilled according to the location of the fastening points. A washer is put on the self-tapping screw, it is threaded through the hole in the profile and inserted into the dowel, after which it is screwed in to the very end. A similar action is performed with all fixation points, and the attached profile is checked against the level.
- The UD profile plays a fixing role and sets the direction of the entire structure. It is installed on 2 walls that form a corner, and sets the width and length of the future shelf. On the outside, an angle is formed from it, which is twisted with self-tapping screws. The CD profile is cut to the required length so that there are 2 longitudinal elements and at least 4 transverse strips (our shelf will be about 120 mm long, and they should be placed every 40 mm).
- Longitudinal slats are inserted into the guide profile, with one facing outward and the other inward. They are screwed on both ends with self-tapping screws. In this form, the load-bearing capacity of the shelf leaves much to be desired, so the shelf needs to be strengthened.
- Starting from the outer edge, retaining strips are screwed to the wall every 40 cm (they are fixed with dowels and self-tapping screws). Their size directly depends on the length of the shelf and must correspond to it. After this, the lower parts of the planks should be connected to the extreme points of the longitudinal planks. A similar action is performed using a rack-mount CD profile, the value of which is determined by calculation using the Pythagorean theorem (which refers to the square of the hypotenuse).
- The parts of the CD profile are connected to the retaining rails and inserted flush with the outer longitudinal strip. In this position it is fixed at 3-4 points on each side. Now the frame of the rack is able to withstand heavy loads.
- Sheets of drywall (gypsum board) are cut according to the resulting model. To cover the shelf you will need 5 parts - top, bottom and 3 sides. First, the bottom piece is screwed on and a kind of box is formed. In this case, small grooves are cut out for the retaining slats and only after that, the gypsum board is completely fixed with self-tapping screws in at least 6 places (3 each near the wall and the edge of the shelf).
- The side linings are made in the same way. To fix them, 3-4 screws are enough. The top piece of sheet is laid last, giving the structure a finished appearance. If desired, the holding posts can also be covered with plasterboard and painted.
- The finished shelf in the bathroom made of gypsum plasterboard requires additional processing, which consists of sealing the plasterboard seams and fastening points and will be described in detail below.
How to hang a shelf evenly using electrical tape and a level
The first thing you need to do is decide where the shelf will hang. Consider several important points at once: the shelf should not be located too high so that it is convenient to take things from it, and it should not interfere with you in the room.
Related article: Priming walls before painting with water-based paint
Once you decide on the “where to hang?” question, move on to the “how to hang?” part. If you have a brick wall, then for measurements you can use electrical tape, which can be easily glued to the wall and then removed. To accurately mark the points where you need to screw in the screws, we recommend that you first measure the distance between the hinges on the shelf, and then cut a piece of electrical tape of the same size. Next, determine the point where the screw for one of the hinges will be located, apply a level (now the shelf will definitely hang straight!) and stick electrical tape over it.
Now all that remains is to drill holes close to the electrical tape with a drill, hammer in the dowels and screw in the screws. After peeling off the tape, you can safely hang the shelf!
How to hang a shelf without fasteners
A shelf without corners and brackets can be hung in the corners of an apartment or house, and, you see, there are a majority of such places. First you need to mark the place where the shelf will be located, then check whether the shelf fits tightly to the wall.
The next step is to drill four holes for the dowels. In order for the shelf to withstand heavy loads in the future, you need to screw in the internal screws 2-3 mm lower than the external ones.
Next, grind or bite off the head of the screw or dowel with pliers and drive these screws into the holes so that the tenons are on the outside.
Now you need to place the shelf on top of the spikes, and mark their location on it with a pencil. After this, we move the shelf around the outer short corner, and also mark the extreme position of the tenons with a pencil. We obtained the trajectory of movement of the projection of each spike. We combine the middle of the shelf width and the projection of the grooves for these tenons; here you need to drill neat holes. Finally, we mill out the grooves using the edge of the drill. Now you can fix the shelf on the spikes. This shelf fastening is very reliable and can withstand a load of several kg.
How to hang a shelf on a plasterboard wall
When starting to work with a plasterboard wall, you should remember that all plaster partitions are attached to a metal frame, which means that it is better to choose a place for a shelf where a screw can be screwed into the metal. Finding a profile is as easy as shelling pears - use a magnet.
To work with drywall, you need to take special screws that do not destroy the plaster when screwed in. Screw it into the profile using a screwdriver. You will most likely need to apply a little force.
Important note: Drywall screws may look unsightly, but should only be used. If you need to put a more presentable screw in this place in the future, then unscrew the black one and replace it with a metal one when the hole is already drilled. Remember that the metal profiles are located at a distance of 60 cm from each other, so if possible, pay attention to the shelves of the appropriate size.
If there is no way to drill the wall only in those places where the metal profiles are located, then use a butterfly dowel. In this case, drill a hole in the right place, insert and hammer a dowel into the hole (previously holding the “wings” so that they straighten out on the other side of the wall), and screw a screw into it.
A shelf is a functional and simply irreplaceable thing in the house, which saves a lot of space and allows you to effectively organize space. Ideas from 20 original shelves that you can install yourself will tell you how, with just one element, you can easily and quickly completely transform your interior!
Did you like the article? Then support us, click
:
Types of shelves and fixtures
Everyone, even those who have never encountered such a task, knows that attaching a shelf to a wall can only be done with the help of fasteners. In stores and along with shelves you can find dozens of types of fasteners, which may differ in both appearance and design. But they can be divided into two main types, with hidden fastening and external.
In addition, the shelf mounting itself can also serve a decorative role, creating the desired design effect.
The shelves themselves are also very diverse both in their appearance and in the material from which they are made, and they also do not have a clear classification; they can be single-tiered or multi-tiered and intended for any room. The type and material of the shelf depends only on your needs or tastes. If you wish, you can even make a homemade shelf.
Types of bathroom cabinets
Based on the installation method, the following cabinets can be distinguished:
- mounted;
- built-in;
- free-standing;
- cabinets installed under the washbasin.
You can hang the cabinet right up to the ceiling, in the corner of the room (the so-called corner cabinet), or under the countertop. In any case, a special design is selected that is optimal for each individual case.
You can also build in a cabinet in different ways: to fill the space of a small niche or to occupy a significant part of the bathroom area, access to which will be through a regular interior door. The design of the cabinet may vary.
Below we will take a closer look at the most popular and simple types of bathroom cabinets, on the basis of which you can develop any design solutions.
Classic wall cabinet
This is the most common modification of bathroom furniture; any plumbing store will provide you with dozens of such models to choose from, and hundreds of options are available to order. Square and rectangular, with one or two doors and multiple shelves, the bathroom wall cabinet can fit into almost any bathroom. It will not attract unwanted attention if it is successfully selected in size and color.
Corner cabinet in the bathroom
Installing a corner cabinet is often justified for both design reasons and to save space. The “box” of a classic wall cabinet will not fit in every bathroom, but there is always room for a corner cabinet. It is worth considering that there is not so much space in it, but it has practically no “dead zones”. In combination with a corner washbasin, a corner cabinet looks great.
Cabinet under the sink
A cabinet under the sink allows you to store bathroom accessories and at the same time “hide” the sink siphon. It is better to choose a cabinet with drawers from the bottom, otherwise access to things at the back wall of the cabinet will be difficult. Before purchasing, check the design for ergonomics: if you are uncomfortable approaching the sink because of the cabinet, then this is not your option.
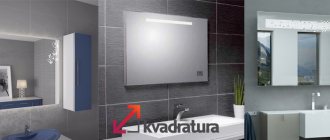
Cabinet-frame for a mirror in the bathroom
A mirror in the bathroom is an essential item. A significant part of perfume is applied directly in front of the mirror; it is convenient to store it nearby. And a mirror with a cabinet looks more interesting. It is logical to hide the cabinet behind the mirror or frame the mirror with narrow pencil cases. Unlike the classic version, a mirrored bathroom cabinet can become the dominant feature of the room and emphasize the style in which the bathroom is designed. The best place for it is part of the wall above the sink.
Built-in bathroom cabinet
The cabinet is not always a separate architectural element of the bathroom. If it is built into a niche, partition, or separated into a separate room in the bathroom space, it is not perceived as furniture. These are all kinds of “secret” built-in cabinets - they create the effect of open, free space in the bathroom. A built-in cabinet will save on material.
Where are shelves most often used?
The main place where you simply cannot do without a shelf is the bathroom. This is where shelves are a must-have attribute, as they allow you to conveniently store bathroom accessories. In most cases, even several shelves are used, but fixing a shelf in the bathroom is the most difficult, since the wall covering here is ceramic tiles, which must be handled very carefully.
You can’t do without a shelf in the kitchen, since it greatly increases practicality and you can place on it all the accessories that the housewife constantly needs at hand.
In the bedroom or living room, shelves mainly serve not a practical, but a decorative role and serve as a stand for souvenirs, jewelry or books.
Basic requirements for bathroom furniture
The bathroom has its own special microclimate, which is different from other rooms. High humidity, sharp temperature changes and lack of space have left their mark on interior items. Bathroom furniture must have the following characteristics:
- High resistance to moisture.
- Endurance to sudden temperature changes.
- Durability of the material.
- Compactness.
Important! Materials such as glass, plastic, metal, MDF, chipboard can be adapted to the conditions of the bathroom, and special types of cabinets will help cope with the lack of space.
Which shelf mounts should I use?
To attach racks and shelves, you can use different types of fasteners, depending on the material of the wall on which they are attached.
Related article: Which insulation is better for the walls of a brick house
For walls made of bricks, blocks and other traditional building materials, you can use:
Anchor bolts, the newest and most reliable fasteners. It can withstand significant loads and is even suitable for aerated concrete or foam blocks, which can crumble during operation. In addition, anchor bolts are easy to work with.
Dowels are also a fairly reliable way to attach a shelf. But they have one drawback: under heavy operating loads, the plastic can wear out and the dowel will simply begin to gradually crawl out of the wall. Therefore, dowels are a cheap way to secure shelves with little load. Usually these are shelves that are used to store souvenirs.
The oldest, but also unreliable method is to simply nail the shelf to the wall. But it is not recommended to nail it if you want the shelf to stand for a long time. In addition, when nailing a shelf, you always risk damaging the finish, and this is undesirable, even if the shelf itself will hide these flaws.
For wooden walls, it is best to use special screws, although in some cases you can limit yourself to nails if you do not plan to use the shelf often.
Shelf installation process
If you bought a shelf along with fastenings in a store, then the first thing you need to do is read the instructions on how to attach it. After all, some modern models have their own algorithm for attaching the shelf to the wall. You should especially carefully look at the instructions if the shelf has invisible fasteners, since in this case you need to use exactly those fasteners that the manufacturer recommends, otherwise you won’t be able to hide them.
Video on how to quickly hang a shelf Before attaching the shelf, you need to choose a place where it will be located. But you shouldn’t rush to drill into the wall right away; before fixing the rack, you need to measure everything so that it hangs beautifully and evenly.
The first thing you need to do this is to attach the shelf to the wall, and mark with a pencil on the wall the place where one of the bolts will be and put a mark there. Be sure to mark the center of the holes.
After this, we measure the distance between the centers of the fastenings, and from the mark made we measure the same, and put a vertical line.
Type of fastening
Then we simply apply a level to the wall and place a horizontal line in the area of the previous mark. The intersection of these lines will be the center of the bolt hole. You can check this by simply placing the shelf back against the wall.
Then you need to carefully make holes in the wall. To do this, you need to use a drill of the same diameter as the fasteners. If you take a smaller drill, the bolt simply won’t fit into the hole, and if you take a larger one, it will simply wobble and fall out.
In addition, when drilling, it is important to keep the drill level so as not to widen the hole, since in this case the fastening may also fall out, especially if you are using dowels rather than anchor bolts. Additionally, the hole should be deeper than the length of the mount you plan to use. After all, the drill does not remove all the debris from the hole, so you need additional space inside so that you can easily install the shelf.
When the mounting points are ready, you can hang the shelf. This also needs to be done carefully; if the fasteners do not fit into the hole, then you just need to lightly tap them with a hammer. First you need to install the shelf itself, and then install the fastenings. It's much simpler and easier.
Well, in the end you just need to tighten the anchor bolts or dowels until they stop.
The fasteners attached in this way will hold the shelf securely and firmly.
Cabinet creation process
First of all, choose the material for the future cabinet and take the necessary measurements.
Important! It is best to create a drawing to determine the exact amount of material needed and the method of fastening.
General recommendations:
- With all the abundance of material, wood remains the most popular. We recommend using natural materials for the relaxation room.
- To effectively use every corner of the room, you can make a cabinet for the bath.
- Carry out the work on making the cabinet in a room that is located near the bathroom, so that you can go in at any time and make the necessary adjustments.
Assembly
The process of creating a cabinet is quite simple:
- Make future shelves and walls from the boards.
- Mark the mounting locations for the shelves on the side walls.
- If you plan to add lighting inside, then make holes in the side board to connect the furniture to electricity.
- Fasten all the parts using a furniture corner and self-tapping screws. A more professional connection involves the use of minifix and rafix.
- Install cabinet doors on hinges. We recommend using chrome hinges.
Important! If the design involves mirrored doors, then use more massive hinges for reliability. For mirrored doors, take care of the hinge closers so as not to damage the mirror when closing.
Shelf in the bathroom
The bathroom has its own nuances when working with shelves. If the walls are covered with tiles, then you can fix the shelf only at the seams. After all, if you try to drill a tile in the middle, vibration may cause it to crack or even fall off. Of course, there is special equipment that allows you to drill tiles, but it is expensive and it is not economically profitable to buy it.
Even at seams, you need to drill the tiles carefully, and it is not recommended to turn on the vibration function until the drill reaches the wall. Only when you get to the base, then you can drill like a regular wall.
If you have a corner version of the shelf, then, as for a straight one, you must first make markings. But in the bathroom it is not necessary to use a level, since the anchors will still be in the seam, and even if it is uneven, it will still not be possible to retreat.
Tips and tricks
We select and install fittings for kitchen furniture on our own
When choosing furniture for your bathroom, it is better to follow some tips.
They will help you choose the best and most suitable cabinet option:
- The cabinet in the bathroom must be combined with the style of the room itself.
- It should match the color scheme, not standing out too much, but not merging with the walls.
- It is better if the texture of the cabinet matches the texture of the walls. Glass, mirrored or lacquered cabinets work well for glossy tiles.
- The dimensions of the cabinet must fully correspond to the room. Small cabinets will look ugly in a large bathroom. If the room is small, then a large wardrobe can simply take up all the free space.
When choosing a product, you need to pay attention to any little detail, from which way the doors open to the presence of meta inside the cabinet. The right decision would be to choose durable furniture; it will last for many years without any complaints. Before purchasing, the product should be thoroughly inspected for chips, paint peeling or other defects. Accessories can be of either good or bad quality
It will not be very good if the fasteners rust soon after purchase.
- If the surface is laminated, it may happen that part of it comes off during use. In this case, it will be necessary to immediately glue the laminated element.
- Wardrobes equipped with illuminated mirrors are very convenient. They need to be placed close to the outlet so that it is convenient to connect the lighting, and also not at a very high level so that it is possible to replace the light bulb.
- The place where the cabinet should be placed must be chosen in advance and be sure of the convenience of such a location.
Useful tips
Even if you think that you don’t know how to hang a shelf correctly, you shouldn’t immediately call a professional. All you need to do is show a little effort and diligence, and you can easily get the job done. If, for example, you also need a shelving unit hung in the closet, then you can first practice on it, and then move on to working in rooms where there is finishing.
In addition, the greater the planned load on the fixed rack, the stronger the fasteners should be used. After all, over time, they may weaken, and the shelf will fall with all its contents. And this is extremely undesirable. Therefore, it is not recommended to skimp on bolts, as this can have negative consequences.