Selection of material and stages of work
There is no better building material for a bathhouse than coniferous wood. However, there is a pitfall - some varieties have increased resin content and therefore can be used for the construction of the box, but for finishing it is better to find an alternative. Pine and cedar have excellent properties.
Their healing effect from essential oils is described in medicine, however, breathing vapor at high temperatures is prohibited. The airways and pores have a detrimental effect, the resins clog them, doing the same with their wounds on the trunk. It is better not to use these varieties for steam rooms, but to use a spruce board - this species has the least leakage.
What to choose as a building material – timber or logs? It's a matter of wallet. If the bathhouse will not be used in the winter - for example, a summer cottage with a seasonal stay, then timber will be enough.
For a residential building, a bathhouse in winter is a blessing. Then a log is a must - the object will require less time to warm up. You can repeat the material of the house and build a bathhouse according to it, then the two objects will be built as a single complex.
The construction of a bathhouse follows similar stages as a residential building:
- Base.
- Construction of the frame of the house and its veranda.
- Roof.
- Interior work and finishing.
Each stage has its own nuances, which should be considered in advance, before starting work. Details below.
Bathhouse project with veranda
A do-it-yourself veranda attached to a bathhouse is usually used as a place to rest after taking procedures. It's very convenient and pleasant. However, an object constructed outside the common foundation may create problems in the future - uneven shrinkage, deformation of the roof, etc. It is better to leave such structures to professionals - they will draw up a verified project, focusing on the finished object, and will carry out the work of connecting to the bathhouse correctly and efficiently.
Owners building a bathhouse from scratch should initially consider projects with verandas - this way you can avoid the problems described in the future, and it will be much easier to obtain a building permit than creating your own options that lack engineering thought.
Expert recommendations take into account the following:
- For three people to be in the steam room at the same time, the comfortable area should be up to 10 m². The height of the room is 2 m. Such parameters will allow rational use of heat sources.
- Natural drainage of water is required - the construction of the subfloor is made at an angle.
- The entrance and windows are located on the south side - this will again reduce heat loss. In addition, in winter, less snow accumulates on this side, and it begins to melt earlier.
- All communications related to energy must be of increased safety due to interaction with steam. These are special cables and lamp shades - you cannot save on this.
It is difficult for amateurs to take into account all the nuances, so when performing this or that work, you should understand in advance all the processes associated with it, and not deviate from the sequence of actions.
Veranda to the bathhouse with your own hands from the foundation to the glazing
The construction of a small bathhouse always entails an expansion of the area. Gradually, the owners realize that there is not enough rest room, and there is not enough space for guests. How to solve the problem without spending a lot of money and effort? There is an exit! The veranda to the bathhouse will add romance, airiness to the building and add usable space. The veranda can be made open or closed, and can be used not only in the warm season. Let's look at how to attach a veranda to a bathhouse with your own hands in more detail in this article.
The veranda to the bathhouse can be used as a place for receiving guests and relaxing
Practical placement of the veranda to the bathhouse
How to place the structure and where to build it is not an easy question. The most practical and inexpensive option is to make an extension directly in front of the porch, so there will be no need to change the layout and the veranda will fit organically into the building.
The easiest way is to place a veranda extension on the side of the bathhouse.
But there are modern ways to place a veranda next to your bathhouse. Let's take a closer look at some of them, reviews of which are mostly positive.
Shape and its features
A veranda is not always a rectangular extension with regular shapes. Semicircular, oval or triangular attached models look organic. Especially if the facade is completely glazed and has an original design. These will not only become a decoration and highlight of the bathhouse, but will also be a gathering place for your guests.
The semicircular veranda looks rich.
It will be more difficult to build a semicircular or oval structure with your own lessons, but the bathhouse will look modern and original.
Design features
The veranda can be either part of the bathhouse or a separate building. When the structure is built separately, it is connected to the bathhouse by a covered corridor. A long or corner model can be divided into two zones: a kitchen and a relaxation room. Traditionally, for a long model, the largest bath wall is chosen, but this is not a prerequisite. The structure may have several exits: the main one and the one to the garden or pool.
Covered veranda to the bathhouse under a separate roof.
The veranda can be fully covered or partially open, with a balcony or loggia. The loggia is used only in the warm season; it usually overlooks the garden. You can divide the interior into a small dressing room and a main part with a seating area. In large models, craftsmen manage to place a guest room, which is used in the summer.
All the nuances are worth noting when drawing up a diagram. You should not start construction without first diagramming the chosen option. The plan will help not only not to make mistakes during construction, but also to correctly calculate the building material.
What material is suitable for constructing a veranda?
Traditionally, the same material from which the bathhouse is assembled is used to build a veranda. But you can approach the issue with imagination and make a model from a completely different material. So, for a brick bathhouse you can build a terrace from timber or rounded logs. With proper finishing, the design will look harmonious.
You should not build an extension to an already established wooden bathhouse from material with natural moisture. The shrinkage of the structure will be uneven and the terrace will be skewed. Take the choice of material seriously; its quality will determine not only how long the building will last, but also its appearance.
Once the design and material have been selected, you can proceed to construction. It will not be difficult to cope with the construction of a terrace with your own hands, the main thing is to follow all the details and instructions.
Choosing a foundation for the veranda
It is easier to build a terrace together with a bathhouse, so the shrinkage of the structure will be uniform and you will not have to fasten two foundations together. But alas, not everyone thinks about the veranda at the stage of building a bathhouse.
Schematic design of the veranda to the bathhouse.
The weight of the terrace is small, so a simpler foundation option is chosen for it. Since it is in any case better to install the veranda on a separate foundation, you can use a trick and illusoryly create the effect of structural integrity. To do this, place the veranda as close to the bathhouse as possible, leaving a gap of 20–30 mm between them, which is then filled with polyurethane foam or mineral wool and covered under the casing.
To ensure that two different bases do not harm each other, everything must be carefully calculated and the characteristics of the soil taken into account. It often happens that the soil on an area of 1–3 m is different.
Between themselves, the bathhouse and the terrace, if calculated correctly, will behave like exemplary neighbors and cracking and separation will not occur. But for strength, you can connect the foundations with metal brackets, 1-2 at the joining points. They will not reduce the load, but will not allow the veranda to move away from the bathhouse.
For a small lightweight veranda, strip or columnar types of foundation are suitable. The columns are laid out under load-bearing walls in 1 m increments.
Assembling veranda walls
The easiest way is to build a frame terrace with your own hands. The walls are assembled from the bottom trim. The lower log or beam is taken with a larger section, so if the main one is 100x100 mm, then the strapping should be made of 100x150 mm. All wooden elements are treated with antiseptic compounds before assembly.
The veranda posts are attached to each other using metal corners.
The frame is attached to the foundation using metal anchors. Anchors attract the tree to the base using a nut and washer. It is necessary to lay anchors at the stage of pouring the foundation.
The bottom trim must be secured with a level. It must be strictly horizontal. After the bottom trim, vertical posts are attached. There are two ways to attach the racks:
- cutting;
- using metal corners.
The second option is easier to do yourself. But it is better to take reinforced, galvanized corners. Each rack is secured on both sides with corners, and to provide rigidity, temporary jibs are attached. Jib beams can be used small for each rack separately or long for several beams at once.
The vertical beams should be fastened so that the windows and doors of the veranda are between them, otherwise it will be impossible to leave the opening in the right place.
Next, attach the upper harness to the lower trailer. In the corners, the strappings are joined using corners or notches.
The walls are insulated with mineral wool or ecowool and sheathed simply with boards or panels. The top of the veranda is sheathed with imitation timber, block house or siding.
The floors on the veranda may or may not have additional insulation, but the ceiling will have to be additionally insulated.
Glazing of the veranda - subtleties and features
The veranda attached to the bathhouse is rarely built warm, but in any case it has glazing. Windows give the veranda airiness and light. You can glaze the veranda in several ways:
- Full glazing;
- Partial glazing.
Let's look at the features of each type in more detail.
Full glazing
With a fully glazed veranda, the walls consist of almost nothing but large windows. All windows are panoramic, in some cases considered small.
Balcony windows on a fully glazed veranda are installed along the entire perimeter.
The windows are not made to open, but for better ventilation they are made with 1–2 vents. Making full glazing yourself is difficult.
Partial glazing
Partial glazing is a structure in which 120 cm of walls are assembled from lumber or brick, and the rest is glazed. You can glaze using the type of balcony frames, an easy way to do it yourself.
The veranda can be partially glazed or completely open.
Due to the large number of windows, the veranda is always bright until sunset, and it is not necessary to add additional lighting. For large verandas with a guest room, some of the windows are covered with curtains or blinds are installed.
How to make a veranda roof correctly
The roof structure of the veranda can be separate or common with the bathhouse. It all depends on the design features of the veranda.
When the gable of the bathhouse is located above the veranda, the roof is combined and made into a common slope. The good thing about the option under a common roof is that there is no need to think through the water drainage system.
For a structure located perpendicular to the gable, it is easier to make a separate roof. A single-slope roof is made with your own hands, and the upper part should extend 15 cm under the slope of the bathhouse roof, so water will not get inside the veranda. The slope has an angle of inclination depending on the selected roofing material and wind load.
The roof is assembled using the following technology:
- The rafter system is being installed.
- Vapor and waterproofing is attached to the top.
- Next, the lathing is done in increments depending on the chosen roof.
- Roofing material is being laid.
The roofing material chosen is the same one that lies on the roof of the bathhouse. So, the design will fit into the overall design.
What verandas to the bathhouse are like can be seen in more detail in the video:
The veranda will give the bathhouse a special coziness and the owners will not have to think about where to place guests at a large table during the rain or in the heat, when insects do not allow them to sit in the open air.
banyabest.ru>
Base
If there are no prerequisites for installing a monolithic slab - floating soils or high groundwater levels - then you can opt for a columnar platform. This will be useful in a sense - moisture will flow freely to the ground and the floorboards will remain dry. How to do:
- The area is cleared of flora and fauna and leveled. Be sure to use a level - the foundation should descend evenly.
- Holes are dug under concrete pillars or pouring and cushioned with crushed stone and sand. The installation frequency is regulated by the project. The veranda also requires supports.
- The foundation must withstand its term - for log baths, the area of which is impressive, this period is at least six months.
When the foundation is completely ready for further work, it is checked for compliance with the level - the ends of the pillars or racks must be in the same plane. If this is not the case, then the base is brought into the desired state using a circular saw. The finished foundation is tarred with bitumen mastic.
Box
Construction from logs has its own nuances:
- The first mortgage crown is placed on a larch board - it will not interact with dampness.
- Immediately install the floor joists and install the subfloor.
- When building from a simple planed log, the elements alternate - butt to top. This way, the level of the walls will be maintained.
- The elements are secured with wooden dowels - square rods, similar to the handles of shovels.
- Corner joints for a bathhouse are made into a bowl - this way, heat loss is reduced and the object will freeze less in winter.
- Each crown is interspersed with a jute seal - the material is non-hygroscopic and is not of interest to birds and rodents.
- All window and door openings are cut out after the peak of shrinkage, that is, after a year.
The rafter system is not installed immediately - the log is a capricious material, and it is not possible to know how the box will behave during the shrinkage period. Therefore, to avoid collapse, the roof is made last.
Spacious project with terrace
If you want to build a bath complex on your site, you can make a construction project yourself or use the ready-made solutions offered.
A fairly simple project, but it takes into account all the moments necessary for relaxation in this building.
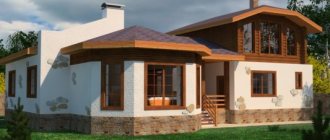
Project of a one-story bathhouse with a terrace
The bathhouse has dimensions of 4 x 6 square meters. m, the ceiling height is 2.2 m, it has a spacious recreation room with two windows. The entrance to the steam room is from the shower room. The usable area of both rooms is 3.52 sq. m. m. Two-level shelves can be installed in the steam room.
Bathhouse made of profiled timber 4×6 meters with a relaxation room and a terrace
Profiled timber is offered as a material for the construction of a bathhouse.
The bathhouse can be not only an independent building, but also located inside a residential building. This building can also be used as a guest house.
The entrance to the building, built from rounded logs with a diameter of 180 mm, is from both the porch and the terrace. The building has two bathrooms, a large hall with a living room, a steam room with an area of almost 9 square meters, two bedrooms and a kitchen. On the spacious terrace you can spend your leisure time with your family or friends. The entrance to the second floor is via a spiral staircase.
1st floor plan
This building has everything you need for living outside the city.
2nd floor plan
The bath house measuring 8.2 x 11.8 m is intended for year-round living outside the city and receiving guests. It provides everything you need:
- steam room;
- 2 shower rooms with toilet;
- spacious living room;
- 4 bedrooms;
- Utility room;
- a large terrace under a canopy, which can be glazed if desired.
Photo of the rest room
Staircase to the second floor
The one-story frame structure on a pile foundation has a total area of 43 square meters. m. and a ceiling height of 2.5 m. The design of the bathhouse is both simple and stylish. There is nothing superfluous inside - a small bathroom, a steam room and a relaxation room.
Bath complex
Such an architectural structure will not only provide vacationers with everything they need, but will also decorate any area. If everything necessary for bathing procedures, cooking and gatherings is located on the first floor, then on the second floor you can allocate space for a bedroom and a small billiard room.
Bath complex
Brick bathhouse
In such a brick building, lined with plaster, it is possible to place a kitchen-living room, a bathroom, a shower room, a steam room, a compartment for firewood, and even a small font, the cold water of which is incredibly useful to plunge into after visiting the steam room.
Brick bathhouse
The open terrace is located at an angle - along the facade and end of the building. The open extension has a common roof with the bathhouse. The presence of an attic allows you to use it as a bedroom and leave space for storing household belongings. The windows of this room are located in the roof structure.
Ground floor plan
We suggest you familiarize yourself with How to attach an extension to a wall without a box
Attic plan
Block building
A small building, which can be erected in a short time, accommodates two living rooms, a bathroom with a shower and a not too spacious but functional steam room.
Bathhouse made of blocks
The small but cozy terrace can accommodate several people.
Scheme of a bathhouse made of blocks
The material for the manufacture of this building in a minimalist style is tongue-and-groove blocks made of aerated concrete. The area of the building is 6 x 6 m, the terrace occupies 19 sq. m. m.
The building contains a bathroom and rooms where you can wash, steam and relax. Outside, in addition to the open terrace, there is a place to store firewood. The roof is gable, the external walls are finished with plaster.
Bathhouse project made of aerated blocks
Prices for gas blocks
Gas block
There are many ready-made solutions for installing a bathhouse with a terrace. Based on their needs and capabilities, everyone can choose the right option for themselves. If you wish, you can come up with a construction project yourself.
Externally, the bathhouse with a spacious terrace looks very compact, but inside the room fit as many as 7 spacious rooms.
Construction of a veranda
The supporting crowns for the veranda are placed without separation from the main building - the connections must be located under the walls of the bathhouse. Since the veranda is a lightweight object, for its construction you can use timber with a cross-section of 150 mm or more. Further:
- Install racks. They should immediately receive harnesses - upper, lower and middle.
- For ease of work, subfloors are immediately filled.
- The walls are raised - if the veranda is completely glazed, then they are raised to the required level.
- A do-it-yourself wooden bathhouse with a veranda will be under the same roof, which means that the construction of the rafter system will be postponed until the shrinkage period.
You can attach a metal veranda frame to the bathhouse. It is mounted by welding and has many advantages over wood - strength, durability. The only drawback is the susceptibility to corrosion, and bathing procedures increase this risk.
Bathhouse projects with a terrace: photos, examples, features
Previously, the bathhouse was used to cleanse the body, today visiting the bathhouse is primarily a relaxation in nature. People go to the steam room, then breathe fresh air outside and make barbecue. For this reason, most of those who plan to build a bathhouse choose the option of designing a bathhouse with a terrace.
Bathhouse projects with a terrace: advantages
The terrace is an open area connected to the house. It has a foundation and a roof, with supports located at the corners. The walls of the terrace may be absent, have a height of approximately 1/2 of the walls or almost up to the roof.
Almost everyone likes to go out to the terrace after bath procedures or during breaks, drink herbal tea, enjoy the beauty of nature and silence. If the project does not provide for it, then you will have to sit in the rest room, and this is a completely different feeling. In the city we breathe dust, but in nature you get the opportunity to breathe clean air, which is beneficial for our body.
Essentially, a terrace is an additional room, and its cost is significantly lower than building a separate room. The terrace allows you to functionally expand the usable area of the bathhouse, while significantly saving money.
You can make a small household block on it, arrange a place to relax, or put up a barbecue. And if you place a stove on the terrace, you will get a sauna with a barbecue.
A bathhouse with a terrace can have different roofs or be located under one. The second option is the most popular and has an important advantage. The project of a bathhouse with a veranda under one roof will cost much less than the construction of two separate buildings: a bathhouse and a gazebo. The savings are about 30%. The advantage of having the bathhouse and veranda under one roof is that in this case it is easier to lay utilities.
Buildings usually have different roofs if they were not built simultaneously, but one after another, for example, you already have a bathhouse, but you decided to make an extension in the form of a gazebo.
If you are just starting construction, then the best option is a bathhouse with a terrace under one roof. Projects for such construction can be different, we will talk about them later.
Bathhouse projects with a terrace: photos, features
There are many designs for bathhouses with a terrace. They differ primarily in size. If you have a very small area, then pay attention to baths measuring 3x4 m, 3x5 m. Since such baths have a small area, they usually have a relaxation room replaced with a terrace. This option is only suitable for you if you plan to use the bathhouse only in the warm season, since in winter it will be impossible to be on the terrace.
Sources: https://jsnip.ru/bani/proekty-karkasnyx-ban.html https://proekt-banya.ru/article/proekty-karkasnyh-ban https://banyabest.ru/vidy-i-tipy- ban/proektirovanie-i-stroitelstvo-bani-iz-brevna-s-terrasoj.html https://postroitbanju.ru/proekty-ban/proekty-ban-s-terrasoj-foto-primery-osobennosti.html https:// eurosamodelki.ru/katalog-samodelok/samodelki-dlya-dachi-ogoroda/udobnaya-katushka-dlya-polivochnogo-shlanga-svoimi-rukami
Roof
You cannot deviate from the project - even simple gable roofs require great responsibility. For a rafter system of this type you will need:
- Timber with a cross section of up to 150 mm.
- Beam 50 mm.
- Fasteners – anchor bolts, brackets. Self-tapping screws are too unreliable.
Sequence of work:
- The central part – the ridge – is installed. This is a prefabricated structure in the form of a wooden frame.
- The rafter legs are attached to the penultimate crown - it is not secured with anything during the construction process.
- The gables in the form of shields can be assembled on the ground and then moved upstairs in finished form.
- The rafters are covered with sheathing, into the sectors of which insulation is inserted, and this, in turn, is covered with waterproofing.
- The last step will be laying the roof. Its choice depends on the angle of inclination - the steeper, the more structural the material. For gentle slopes, you need a smooth coating - corrugated sheet, ondulin.
The construction of the bathhouse with a veranda is almost complete. All that remains is to carry out the interior work and finishing.