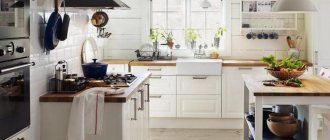
A kitchen is a room intended for preparing and eating food. Therefore, the entire space here must be properly arranged. This applies not only to the purchase of different interior items, but also to the creation of uniform and high-quality, as well as uniform lighting. With proper distribution of light, the cooking process becomes simple and easier. The main lighting, for which ceiling lamps are used, is required, but LED lighting for the kitchen is additionally created. To use it, you need to choose the tape wisely, as well as carry out its proper calculation and installation.
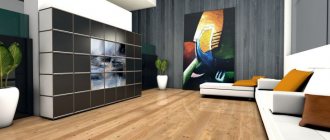
LED strip in kitchen design.
Advantages of using LED strip
Using LED strip for the kitchen has many advantages. LEDs themselves are special semiconductors that emit light when electrical energy passes through them. The brightness of the lighting depends on what chemical elements were used in the production process of the LED strip.
Illumination of the work area in a white kitchen.
It is not allowed to connect the LED backlight to the power supply directly, as this can lead to its breakdown, so a special stabilizer must be used.
LEDs are available in different colors, so you can make the backlight in different bright and unique shades. They are used for various kitchen interior items, so additional light sources are guaranteed.
Kitchen backsplash lighting with LED strip.
The advantages of using LED strip include:
- The lighting is bright and of high quality;
- The LED strip is highly resistant to various mechanical influences, which is important for the kitchen, so you don’t have to worry that the lighting won’t last long;
- For installation, you can choose different colors of tape;
- Installation is easy to do with your own hands, so there is no need to involve professionals in this process, which minimizes the cost of creating uniform and high-quality lighting;
- The light source may have different emission angles;
- LED strips in the kitchen look attractive and interesting, and also guarantee the formation of additional lighting for the most significant and important areas of the room;
- SMD LEDs do not heat up during operation, therefore they are safe and easy to use;
- In the process of creating the LED strip, environmentally friendly materials are used, so the LED backlight does not release any harmful components into the air.
The LED strip illuminates the most important items in the kitchen interior.
Thus, LED strip in the kitchen is used quite often, and at the same time it has numerous positive parameters.
Proper kitchen lighting. Recommendations from professionals.
Kitchen lighting has always been a very popular phenomenon, and with the development of lighting technologies, new opportunities for solving this problem are emerging. Not so long ago, spotlights, often used to illuminate kitchen units, began to lose popularity, and LED kitchen lighting is becoming increasingly popular. It can be divided into several components: contour lighting for kitchen cabinets, and accent lighting for the kitchen. We will talk about each of these options, how to make them correctly, what materials to use, what and how to install in this article, with visualizations, and all possible options. But first, we will talk about the main mistakes that people make when they decide to illuminate their kitchens with LED strips or light their kitchens with track lights.
And so, the main mistakes when creating kitchen lighting:
- Wrong choice of equipment, both LED strip and accent lights (track or spotlights). This is one of the most common mistakes; the wrong choice of LED strip can lead to excessive brightness and a blinding effect, unnecessary spots on the surface of the tabletop, and even breakdown of the entire equipment. And not choosing the right track lamps can be fraught with wasted money, since you will not get the desired effect, and in place of high-quality accent lighting, you will have to admire the track lamps purchased for quite a lot of money.
- Incorrect placement of equipment - this reason is less clear to people, since by placing the LED under the kitchen cabinets, making the wrong kitchen floor lighting, or pointing track lights at the wrong elements, you will still get some kind of lighting effect, but from what you can achieve - it will be very different, and the full potential of kitchen lighting will not be realized.
- Wrong concept for kitchen lighting. People choose a kitchen set quite scrupulously, based on their own preferences. And it is necessary to make LED lighting for the kitchen so that it matches the design of the selected furniture.
These mistakes are made most often and lead to poor quality solutions when creating kitchen lighting. Next, we will tell you how to properly make kitchen lighting, what options there are, and what materials to use.
Contour lighting of the kitchen with LED strip under the cabinets:
The pictures show two correct options that will make your kitchen unforgettable. There are basic rules for such lighting: 1. Be sure to use a light aluminum profile. It will not only protect the LED strip from moisture, extend its service life, acting as a cooling composite material, but most importantly, it will soften the rather rough light emitted by the LEDs. 2. Choose the power of the LED strip based on the size of the light aluminum profile, in this order, then your kitchen lighting will be as uniform as possible.
Let's look at these examples in more detail: In the first example, we see the corner lighting of the kitchen with LED strip. Such lighting ensures maximum flooding of the tabletop with light, achieving maximum brightness levels on it. In the example, we have a square light profile, with a glow in two directions. You can also use a semicircular one - it’s a matter of taste. The width of the profile is selected based on the required brightness, we recommend using an aluminum profile for the LED strip NUGL.1515R (rectangular) / NUGL.1515S (semicircular) (15mm width), NUGL.3030R (rectangular) / NUGL.3030S (semicircular) (30mm width ), and NUGL.5555R (rectangular) / NUGL.5555S (semicircular) (55mm width), each of these aluminum light profiles is equipped with a specific LED strip model. Contact our specialists and we will advise you in detail on the necessary equipment and configuration. In this type of kitchen lighting, only a matte diffuser should be used!
In the second example, we see the background lighting of the kitchen with an LED strip, creating a light gradient on the back wall. Such lighting should be less powerful, using a direct overhead LED profile of small width, for example NS.2525 and NS.3535 (25 and 35 mm, respectively). These profiles are also equipped with several options for LED strips, which we will always help you choose. In this kitchen lighting, you can use a transparent diffuser and an LED strip, with a small number of LEDs per meter. This solution is perfect for lighting a kitchen in a modern style. The main rule is that all contour lighting of the kitchen with LED strip under the cabinets should be done close to the back wall! Otherwise, the lighting effect will be, to put it mildly, poor...
Choosing the Right LEDs
Additional lighting in the kitchen.
It is important to choose products wisely to create high-quality LED lighting. When choosing, it is recommended to use the recommendations of specialists:
- smd 50*50 is considered an ideal solution for creating high-quality tabletop lighting, and the design of such a strip contains three crystals, so truly bright and uniform illumination of the work area is guaranteed;
- smd 35*28 cm is suitable exclusively for decorative purposes, so it can be used to decorate various shelves or other stands, and due to the high-quality and correct placement of this lighting, the creation of a romantic and pleasant atmosphere in the kitchen is guaranteed;
- If you want to create colored LED lighting, then select products that have more than one crystal.
LED strips of different sizes for kitchen lighting.
Before purchasing tapes, you should make calculations to determine how much material is needed to complete the job.
LED lamp for the kitchen.
When choosing LEDs, you should additionally pay attention to their power. It determines how bright the lighting will be, as well as how much electrical energy will be consumed by this contraction.
How to choose LEDs
Spot and linear lamps have a given power, level of moisture protection and other characteristics. The moisture resistance of the backlight is indicated by the IP marking. For the kitchen, lamps with IP65 and higher are used. The tape has more parameters, so choosing the appropriate model is more difficult.
First of all, the backlight differs in the way the diodes are assembled. In everyday life, SMD tape is almost always used. The marking means that the electronic filling is built into the surface of the luminous strips - for compactness. Such light sources are divided according to the following criteria:
- the number of crystals in one lamp is 1-4 pieces;
- size;
- type of glow - monochrome or full color.
You can most often find two basic models on sale: SMD 3829 and SMD 5050. The first is more used for decorative lighting (single-chip structure, brightness - 5 lm). The second is for illuminating the work area. There are 3 crystals inside her mini-lamps. Brightness - 15 lm.
The strips also differ in the density of placement of LED light bulbs (30-240 pcs/m). The brightness of the backlight and the amount of electricity consumed depend on this. The tape body can be closed or open. The second option is cheaper and a little brighter, but less protected from aggressive environments.
Advice. The LED backlight is connected to the network via a power supply, like a laptop. For every 5 m of the product you need a separate power source. A simple formula will help you calculate the required power: multiply the power of the belt by its length, and then by a factor of 1.25.
How are LEDs used?
Lighting the area under the kitchen cabinet.
LED strips in the kitchen can be installed in different ways, but the most optimal is to mount them in areas:
- Creation of a glass apron that changes colors due to the presence of LED lighting;
- On shelves or stained glass windows, and it is desirable that the light turns on only when the doors are opened;
- Creating lighting at the bottom of different bedside tables or sofas, which guarantees the formation of an unusual effect, as there is a feeling that the furniture is floating above the floor;
- LED strip for the kitchen can be used on the ceiling, and it is desirable that a multi-level ceiling structure be formed, since such lighting looks really bright and attractive on it;
- Cornice lighting will highlight windows and curtains;
- It is possible, with the help of LEDs, to completely divide one space in the kitchen into several separate zones, which always looks interesting and unusual;
- Decorating doors, arches, paintings, mirrors, niches, bar counters or other elements on which you need to place a bright and unique emphasis.
The LED strip is hermetically sealed in silicone.
Original kitchen design with lighting. Also, the LED strip in the kitchen can be used for other purposes, so each owner of the room independently determines for what purpose the strip will be used.
It is important to take into account that the power supply is located close enough to each tape.
Power supply and cooling
A regular network contains a voltage of 220 V. You cannot turn on the backlight directly into the network, as it will immediately burn out. Diodes are capable of operating at direct current with voltages up to 24 V. This indicator is achieved using a switching power supply. It must generate power equal to the total power of the connected tapes.
Choose a power source with a 20% margin. For example, if the total power is 36 W, then a 45 W unit is suitable.
The power supply unit must be placed in a moisture-proof place, since if water gets into it, a fire may occur. Also, when choosing, pay attention to models with surge protection. This will increase the life of the backlight.
There are only 4 types of design:
- Sealed plastic power supply.
- Aluminum block body - there is protection against temperature changes.
- Open design with perforated housing. This type has a low price, but the device does not tolerate small amounts of moisture.
- Network source - used to power multiple tapes.
How to make tabletop lighting
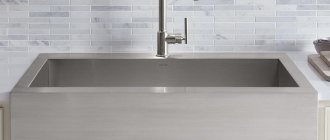
Most often, kitchen lighting is installed on countertops, as this allows you to effectively illuminate the most important work area in a given room.
Illumination of the work area in a white kitchen. Creating lighting for the kitchen in a modern style.
For countertops, it is best to choose a special tape that has an average level of protection against high humidity, and such products not only withstand exposure to moisture and dirt, but can also be cleaned of dirt by wet cleaning.
Lighting the room using LED lamps.
Installation of LED strip on countertops is carried out taking into account some recommendations of experienced specialists:
- The tape is attached to the tabletop using a special LED profile made of light and durable aluminum;
- It is in the profile that the wires are laid, so there are no unsightly elements of lighting connections on the tabletop, and at the same time they are reliably protected from high humidity, mechanical stress and other factors that may affect them during the use of the tabletop for its intended purpose;
- It is allowed to glue the tape directly to the tabletop, and it is considered optimal to use for this purpose a special tape equipped with a self-adhesive film on the reverse side;
- It is advisable to install the power supply away from the countertop, namely in a drawer, since it must be reliably protected from possible contact with water, and it is recommended that it be placed in a special protective moisture-resistant case;
- The dimensions of the elements must be thin enough so that they can be laid even in the most inaccessible and specific places on the tabletop;
- If you have the financial means, you can choose a backlight that changes colors when using the control panel;
- However, the optimal color directly for the work area is considered to be white backlight, as this allows you to carry out the cooking process with convenience.
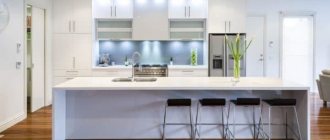
Lighting design for the kitchen work area.
Kitchen design with additional lighting. Thus, installing LED lighting on the countertop, which acts as the main work area, is the optimal solution for every kitchen.
Elements can be attached in different ways, but it is important to carry out the installation efficiently and reliably.
Why LEDs ↑
Everyone knows about the advantages of LED lighting compared to both traditional incandescent lamps and energy-saving lamps. This is extremely high efficiency and durability. It is also important that the LEDs light up at full power instantly, without requiring time to warm up, and their service life does not depend on the number of on-off switches. The only drawback is the relatively high cost. But the costs are justified: LED lighting in the kitchen will last for several decades, saving a lot of money due to low energy consumption.
If you already have a different type of kitchen lighting, do not rush to change it to a new one. Manufacturers produce LED lamps for almost any type of base and, most likely, you can only replace the lamp itself without changing anything in the lamp or limiting yourself to minor alterations.
Backlight technology
Additional lighting for the kitchen space.
The entire process of using LED strip to obtain beautiful lighting is divided into successive stages:
- Using a tape measure, you determine how long the tape should be so that you can create the backlight quickly and without stopping;
- According to special markings, the necessary sections of the tape are cut off, and it is important to ensure that the contacts are not cut;
- The contacts are exposed, to which 2 pieces of electrical cable are soldered, and then they are certainly insulated, for which electrical tape or other suitable materials are used;
- A tape is glued to the place where illumination is required, for which you must first remove the protective film from the reverse side;
- A power supply is installed in close proximity to the backlight;
- A tape is attached to the transformer;
- Excess wires are placed in special plastic boxes;
- All wires are connected correctly to each other;
- The switch is installed, after which the power supply is connected to it.
Additional lighting in the kitchen.
Thus, attaching LEDs is a fairly simple and straightforward procedure. An important point is the preliminary determination of the location of the tape in order to ensure high-quality and uniform lighting. It is also important to hide wires and other electrical components from the countertop so that they are not exposed to moisture in any way.
Kitchen space lighting, cabinet lighting.
Tools and materials for installing LED strips
You can do the installation of lighting under your kitchen unit yourself. To ensure safe use of the backlight and proper connection, please purchase the following materials and tools before installation:
- cutting tools (stationery knife, scissors);
- components for connecting a light source (soldering irons, connectors, dimmers);
- rosin with heat shrink tube;
- fastening elements, such as tape;
- LED strip;
- power supply;
- wires and cables;
- if necessary, a box (aluminum profile) in which the backlight is placed.
In addition, you will need a tool with which you can cut holes in the wood.
Basic recommendations for proper operation
Additional lighting for the kitchen in high-tech style.
To ensure truly correct and competent installation of LEDs, you should take into account some recommendations from experts. These include:
- The tape and power supply must have the same power, otherwise the LEDs may quickly lose their functionality;
- It is not advisable to use special connectors that guarantee quick connection of different contacts, so it is considered optimal to use a soldering iron that provides reliable results;
- The tape is cut only in those areas where there are markings applied by the manufacturer;
- When soldering, you must use rosin;
- The contacts must be isolated from each other, and if they touch in any areas, the tape will not work;
- Using a dimmer you can adjust the brightness of the lighting.
Pink LED strip in the kitchen.
Thus, the use of LEDs for the kitchen is the right solution for any home or apartment. A special tape is used for lighting, and it can have different colors, sizes and power. For independent work, it is important to understand the correct stages of fixing the tape, as well as take into account some of the recommendations of socialists. In this case, it is possible not only to illuminate important areas in the kitchen well, but also to decorate it in an original way.
Installation work
When carrying out installation work, take into account the type of lamp:
- To attach mortise or built-in elements, you must first mark the surface and then drill holes with a milling cutter. The diameter of the channel depends on the modification of the lighting device. The lampshade is inserted into the mounting socket and held in place by spring latches; the leads of the LED lamp are connected to the electrical network in accordance with a pre-designed circuit.
- To install overhead lamps, you need to determine the mounting points, and then secure the housings with 2-sided adhesive tape or screws (the method of fixation depends on the manufacturer of the lamp). Products can be equipped with a built-in battery or connected to an external network using a cable, for which a hole with a diameter of 5-8 mm is made in the panel.
- LED strips do not require drilling channels in furniture panels. The strip is attached to the factory adhesive layer or to pieces of 2-sided tape. To connect power, use contact pins located every 3 LEDs (the parameter is standardized). The user can install LED strips using an aluminum or plastic guide profile, pre-attached to furniture panels or walls with screws or glue.
During installation work, a multi-core copper cable is used, which is connected by soldering with tin-lead solder or using a metal tube and a special crimping tool.
To maintain polarity, the wire insulators have different colors. The electrical wiring junctions are protected with a layer of insulating tape or heat shrink tubing.
Connection rules
Installing an LED strip to illuminate a kitchen unit is an easy task for almost anyone. You can make beautiful stylish lighting with your own hands; you just need to follow a few simple rules:
- The polarity of the contacts must always be observed.
- Regardless of the type of LED strip, the power is connected through a suitable transformer. The maximum distance of the unit from the backlight should not exceed 10 m.
- An LED strip installed in the kitchen under cabinets will last longer if there are no twists or bends on it. If necessary, the product is cut at a convenient angle for soldering. The procedure is carried out carefully, and the conductive paths must be insulated with heat-shrinkable tubes.
- Using wires with the maximum cross-section and the fewest connections will reduce energy losses to a minimum.
- If the kitchen lighting has high power, it is recommended to use a profile box for its installation.
- Sections of tape longer than 5 m must be connected to each other in parallel.
- The power supply is located in places with good ventilation. This will protect the device from overheating.
If the lighting of kitchen cabinets blinds the eyes, it is necessary to fix the LEDs in a special box, then the main flow of light will fall down. The LED strip is cut strictly in areas specially designated for this procedure. Most manufacturers make appropriate signs on their products.
To connect any type of LED strip you need a transformer
The product will last longer if there are no twists or bends on it
If the backlight has high power, it is recommended to install it using a profile box
To protect the power supply from overheating, the device should be installed in a place with good ventilation.
What is needed to install LED backlighting
To connect such lighting yourself, you will need:
- LED coil;
- transformer (power supply);
- Dimmer;
- cable with a cross section of 0.74 mm.
For poorly protected LED strips, you will additionally have to purchase an aluminum profile.
Tools that will be useful are a soldering iron, solder and rosin, well-sharpened scissors and electrical tape.
As a rule, the back side of the tape is self-adhesive, but if you suddenly doubt the quality of such fastening, you can additionally use installation brackets. In this case, you will need a drill and screws.
Installation of LED strip under kitchen cabinets
Before installing the LED strip under the kitchen unit yourself, it is important to plan the location of the structural elements.
Typically, manufacturers produce diodes that emit light at an angle of 120 degrees. Wave stripes appear on the wall, which can ruin the entire kitchen design. To avoid this, turn on the lighting before installation and place it under the cabinet. And see where this wave will form. It is desirable to achieve a result in which this strip is projected into the corner between the wall and the working surface of the headset. Light sources must not be installed near the exhaust area.
Narrow light sources are mounted on the edge of the cabinet, since the light will not reach the wall surface. Optimal light distribution can be achieved using aluminum profiles protected with reflective film.
Do-it-yourself under-cabinet installation can be divided into 5 points:
- First, we make a hole in the back of the cabinet to hide the cable routing.
- Dry the bottom surface of the cabinet thoroughly. We install light emitters only on a clean surface.
- If the backlight has an adhesive layer, then simply apply it to the headset and press it tightly. If this layer is missing, use double-sided tape. To hide the tape, you can install a hanging profile painted in the color of the cabinet. Also, the backlight can be immediately placed in a profile housing, but to do this, we first connect it to the power terminals.
- Then comes the installation of the power supply with a switch. It is better to place it in places with low temperatures. We make a wiring arrangement, which we secure with tape or special clips.
- After connecting all the lighting elements, you need to check the wiring for a short circuit. This can be done using a tester. If there are no problems with the circuit, then you can connect it to the network.
Selection of cable cross-section
During installation, any cables with a cross-section from 0.5 to 2.5 mm 2 are suitable. To accurately select the cross-section, you should use the following formula before installation:
I is the current strength in the circuit; calculated by the formula: I = P/U, I = U/R, where P is the source power, U is the voltage, and R is the resistance;
p—resistivity; the value of this value is always constant, taken from reference books for different metals;
l — cable length in meters;
— a value characterizing the permissible voltage difference between the unit and the backlight.
Consider a table of power depending on the characteristics of the wire. The larger the cable, the less power is transferred to the backlight.
| Length, m | Output power, W | |||
| Section area, mm 2 | ||||
| 1,5 | 2,5 | 4 | 6 | |
| 50,0 | 50,0 | 50,0 | 50 | |
| 2 | 45,5 | 47,2 | 48,2 | 48,8 |
| 4 | 41,5 | 44,6 | 46,5 | 47,7 |
| 6 | 38,1 | 42,3 | 44,9 | 46,5 |
| 8 | 35,0 | 40,1 | 43,4 | 45,5 |
| 10 | 32,4 | 38,1 | 42,0 | 44,4 |