How to make shelves in a pantry with your own hands?
A utility room is necessary in every home, because many things, such as seasonal clothing, household appliances, canned goods and just various little things, need to be stored somewhere. Most apartments have small rooms for such purposes, but, as a rule, they have yet to be equipped. How to make shelves in a pantry with your own hands and adequately optimize a small space is a burning issue in many families.
How to best arrange shelves
The location of the rack in the pantry depends directly on the individual preferences of the owner of the house or apartment. The purpose of the product and the dimensions of the room allocated for storage also play a role. In tight spaces, too much clutter can not only make shelves difficult to access, but also make them too vulnerable to careless movement.
Distance between shelves in pantry
This is a parameter that depends on the purpose of the rack. Shelves for jars in the pantry, made by yourself, can be placed quite close to each other - about 30 cm for convenient use. It’s another matter when the storage space is used for large tools, household appliances and large items. In this case, the distance between the racks can be increased.
What's the best way to make shelves in a small pantry?
The most rational and convenient location for shelves in a pantry would be to either install a rack along the wall or a corner version of the product. Based on individual preferences and based on available materials, the home craftsman can choose a favorable location for the structure. A good option is DIY hanging shelves for your pantry, which will not only be an interesting solution, but will also significantly save space.
This design of the rack will free up the floor of the pantry and give the owner additional shelves for storage.
Layout
Calculating space is an important point that helps to draw up a plan for the rational placement of racks or shelves for further comfortable use. The compactness of mezzanines allows even a small room to be used with maximum practicality, and then it will be possible to store a large number of necessary and temporarily unnecessary things.
Some modern housing plans do not provide a storage room at all, but savvy owners manage to solve this problem in the most extraordinary ways. For example, they place racks in a niche, a closet or a dead end of a corridor, making partitions from plasterboard and providing original storage with doors. And for those who have this premises, all that remains is competent organization, taking into account the purpose of the shelves being built.
The purpose of the structures being installed is of great importance. Hanging structures are more suitable for books and collectibles. Boxes are placed down or on shelves of considerable depth.
There are several layout options:
- you can place mezzanines at the ends of the room;
- wide shelves are suitable when arranged in the letter “G”;
- if space allows, placing the racks in the letter “P” remains ideal - then there is a convenient passage in the middle.
For conservation, you need wide and strong racks made of wood or metal, stable and ready for heavy loads. If you plan to store valuable products, it is recommended to make shelves with glazing. It will reliably protect objects from dust and dirt. A wooden rack is pre-coated with stain, paint or varnish - this way it will be protected from rot, mold and other negative influences.
Types of storage structures
To choose the right type of design, you need to consider common options:
- traditional monolithic shelves without any additions or perforations - they are suitable for storing small household appliances and other items of medium weight;
- for heavy things they make devices with stiffening ribs;
- fragile, round and small objects are provided with shelves with sides;
- models with holes are necessary for natural ventilation and are used for storing seasonal clothing.
It is important to choose the right material:
- natural wood is safe, environmentally friendly, but susceptible to moisture and pollution, and therefore requires additional processing;
- Metal produces stable and durable structures suitable for high loads, but their main drawback is their tendency to corrosion, so it is better to choose galvanized steel products;
- polymer shelving is a good alternative to metal and wood; plastic is resistant to many external influences, but over time it can lose its original appearance and turn yellow.
Based on the expected load, you should think about the thickness of the boards in advance. The standard size for medium weight is 3 cm, although for lightweight items you can build a structure from plywood.
Different types of material require different fasteners, but, in any case, metal ones are the most durable and reliable. For long shelves, a sufficient number of fasteners must be used.
Preparatory stage
Due to the fact that metal shelves are more suitable for greenhouses and garages, the use of wood in a residential building will be more aesthetically pleasing.
Tools you will need:
- drill (perforator);
- hand saw for wood;
- hammer;
- screws, dowels and self-tapping screws;
- Phillips and straight screwdrivers;
- ruler or tape measure;
- building level;
- drills for concrete surfaces;
- connecting flanges;
- abrasive paper;
- varnish, paint, stain of a certain color.
Metal pipes, brackets and wood for shelves should also be prepared. The boards should be 25-30 mm thick, cut to length, sanded with a grinder or sandpaper. Bars with a cross section of 20x30 mm are cut according to the depth of the shelf.
Before installation work, you should clear the room of things, dust, dirt, in a word, carry out a thorough cleaning.
It is necessary to repair the pantry, perhaps re-glue the wallpaper or re-tile the walls. It is advisable to treat the room in advance with preparations against fungus, mold and other microbes. For such a small room, it makes sense to use light-colored coatings.
If possible, you can install a ceiling fan for ventilation, or make lattice or sliding doors to the utility room. It is better to illuminate such a room with fluorescent lamps.
Assembly of racks
First, using a level, mark the location of the shelves on the walls. The reliability and stability of the entire structure depends on their accuracy.
Work should be carried out in a certain order:
- The prepared bars are attached to the ends, back and sides of the room. Depending on the load, you will need 2-3 self-tapping screws.
- The boards are laid on top of the beams and secured with long self-tapping screws (40 mm).
- To strengthen the structure you will need metal pipes. They prevent the rack elements from moving and sagging. The size is determined by the height from the floor to the first shelf.
- The pipe is cut, placed between the floor and the shelf, then fastened with flanges, and the pipes are installed between the shelves. It is important that the metal supports are strictly vertical to ensure optimal stability.
To create a hanging shelf, you will need the same tools and boards, 25 cm wide and about 2 cm thick. It is better to choose pine or larch as wood for mezzanines in the pantry:
- To work, you need two boards 80 cm long and two 25 cm long. They are sanded with a grinder until completely level and smooth.
- Four boards are connected into a box, perforations are made for self-tapping screws, and furniture hooks are secured on the back side with screws.
- After this, the wood is stained, painted and covered with a layer of varnish. All layers must be completely dry before use.
When making and placing shelving, it is recommended to leave a sufficiently large distance between the floor and the first structural element, since bags, large boxes and other large items can be stored in the lower part of the utility room.
Shelves in the pantry help to save free space in the living room, hide unnecessary things, and, thanks to their practical placement, make it possible to quickly find the necessary items. In addition, self-made structures allow you not to spend the family budget on the services of professional builders.
For an example of a pantry and dressing room design, see the video below.
Features of accommodation
Depending on the layout of the apartment, the possibilities of reorganizing the space, different areas are allocated for the storage room:
- Between the hallway and the living room and with doors on both sides - this option was previously provided for in Khrushchev buildings, and the owner could leave the entrance on the convenient side or completely change its configuration.
- A dead end corridor, covered with plasterboard, with a door.
- Niche with sliding doors, equipped with storage systems.
- In a small room that can be used as a miniature office, there is a corner for sports.
- Mezzanines are not exactly a storage room, but they are suitable for storing unnecessary things. At a minimum, a storage function is provided.
- A storage room as part of a room is an idea that is usually acceptable for long and narrow rooms in a dead-end area.
- The corner of a square area is a triangular, oval or rectangular box, fenced off from the main room with plasterboard.
- Recessed and extended wardrobe, loggia or balcony.
- Place under the stairs - this option is relevant for two-level apartments or private houses.
In general, if you look hard enough, in almost any apartment you can find a few meters for arranging a storage room.
Pantry shelving - high-quality and beautiful furniture from the home workshop
You can place a lot of things on this rack
A shelving unit is an extremely useful thing in everyday life, and sometimes simply irreplaceable. This piece of furniture, which can be called the simplest, allows you to effectively use the space inside residential and utility rooms, and in some cases it is an excellent decor and even a zoning partition.
Today we will look at how shelving for a pantry is assembled - how to make a useful thing with your own hands that will make your owner happy.
Metal shelving for a pantry in an apartment
When a large number of things accumulate in an already small apartment, the lack of a specially equipped place to store them becomes a real problem for the owners. Acquired things, as a rule, accumulate in one place, forming a chaotic disorder, overlap each other, and then are safely lost. And when you need this or that thing, it is very difficult to find it. The sold racks for pantry in the apartment will solve the problem of storage and proper storage of personal belongings.
Wooden rack
Professionally assembled furniture
You can choose anything you want as the material for your shelving. By the way, metal pantry shelving can withstand an impressive load.
However, neither metal, nor composite materials, nor concrete, nor plastic can be compared with wooden products, due to the ease of working with the material and its beauty. Let’s not forget to mention that the price of such a solution will be lower and the work will take less time.
Metal shelving for the pantry looks a bit rough
Materials
The structure of the rack is very simple. It consists of vertical racks, the number of which is determined based on possible loads, horizontal jumpers and, in fact, shelves.
Wooden beam
- For racks and lintels, timber with a cross section of 45*45 mm or slightly larger is perfect. This thickness will be quite enough to withstand a lot of slender rows of twists.
- You can also use slats for jumpers that are half as thick - if you have a circular saw, they can be cut from the same beams.
Planed boards 20*95 mm
- You can use any sheet material as shelves, be it plywood, chipboard or MDF and other analogues. But if you want the rack to look good at the same time, it is better to purchase edged boards, the thickness of which is 20 centimeters.
- Such a solution will be even stronger.
Polyvinyl acetate wood glue
- Any self-respecting carpenter tries not to use metal fasteners in his work, but connects everything with wood glue and wooden elements, but this approach requires some experience and more time. We offer you a middle solution.
- Self-tapping screws will be used, but only in combination with adhesive joints.
Dowels of different sizes
- The main connections will be made using dowels. They are purchased ready-made in stores.
- Well, and, naturally, the galvanized screws that we have already mentioned.
We will not list the working tools separately - you will see everything as we describe the work.
Wood shelving production process
Racks are produced in the form of separate sections that must be mounted on the walls of the cellar. This rack can be made quite quickly and easily. You choose the width of the product yourself, based on the volume of the cans that will stand there.
To avoid sagging of the shelves, it is best to make them about 70 centimeters.
When installing and producing shelves, remember that there must be access to the wall part. This is done in order to dry it out in the summer. To produce vertical shelf supports, bars are used, the cross-section of which is 100x100 millimeters. Based on the height of the basement, determine how tall the shelving should be. Initially, horizontal transverse frames are produced. On the racks you need to mark at what height the shelves will be located. The thickness of your board should be about 40-50 millimeters. It is worth sawing off bars from it, the width of which will be from 6 centimeters. The length must correspond to the dimensions of the shelves. The grooves must be cut in the racks so that they are identical to the dimensions of the bars. As a result, the structure is assembled and secured. Then you need to put shelves on the timber frame. Previously, before the production process of the rack, it must be treated with an antiseptic.
Assembling the rack
A simple drawing of the product with dimensions will greatly simplify the work.
So, the rack itself will be assembled in the following sequence: first, the side racks with partitions are made, and then the shelves will be mounted on them. In order not to get confused about the sizes of the elements, be sure to make a preliminary drawing at least on a piece of cardboard.
Advice! Don’t forget to consult with your owner to clarify the height of the shelves, in case she wants to keep something specific there. But usually the shelves are made a little larger than a three-liter jar.
Side racks
The beams and boards most often have a length of 3 or 4 meters - buy this option so that when cut in half you get 2 racks at once.
Adjustment of racks to one size
- So, we take the purchased beam and cut off four absolutely identical pieces from it using a circular pendulum saw, which is also called a miter saw.
- Trimming helps to make the cuts strictly perpendicular, which is important for the stability of the rack. If this is not available, you can use a miter box and a hand saw.
Advice! To make the edges of the cut more even and smooth, the timber can be pre-wrapped with masking tape.
Sawing timber lengthwise
- We make jumpers from the remaining timber, dissolving it into two identical parts. For such work you will need a circular saw; if you don’t have one, then buy a ready-made solution right away.
Marking the slats
- Using a tape measure, we mark the resulting blanks, for example, 50 centimeters each - this value will correspond to the depth of our rack. We clearly draw the marks using a carpenter's square so that we can see the cut lines.
- Next, using the same pendulum saw, we cut the slats.
Marking the racks for the crossbars
- At the next stage, you need to mark the racks according to the height of the planned shelves.
- We take one of them, place it on a flat horizontal surface and draw a line at the required height. Then we apply a strip to it and, in order not to make a mistake in the measurements, we simply make an outline. We draw horizontal lines on the sides, indented from the edge to a slightly smaller thickness than the lintel.
- The design of the side post will be such that the lintels will be recessed into the beams - this will be more beautiful, and everything will hold much stronger.
- Next, we take all the other racks, lay them all side by side, resting their ends against something flat, and transfer the marks with a square to all the elements.
Grooves for jumpers
- We take a miter box, preferably a professional one, of course, and according to the markings we make cuts in the timber, without going beyond the horizontal line, repeating the manipulation the required number of times for all the grooves.
Grooving
- Next, the unnecessary part between the cuts is selected with a chisel and hammer. You need to work carefully so as not to go beyond the intended boundaries, and the resulting groove should have a clearly rectangular shape. If necessary, you can use a file or sandpaper to bring the geometry to perfection.
Connecting racks with jumpers
- We check how the rail fits into the prepared recess; if everything is in order, then we make a major fastening.
Drilling holes on the connection
- First of all, in the pre-assembled sidewalls, at the joints, we drill two holes. They are needed so that when tightening the screw, the wood does not crack.
Coat the joints with glue
- Then we remove the jumpers and apply a layer of glue on the bottom and sides. The groove also needs to be coated.
Fastening with self-tapping screws
- We return the jumper to its place and tightly tighten the connection points with self-tapping screws. In this case, the parts will be pulled towards each other, which will allow the glue to set properly.
- Remains of squeezed out glue must be immediately removed with a sponge soaked in water.
Pantry rack: finished side panel
As a result, we got these two absolutely identical ladders, which, if necessary, can be used exactly like this. But that’s not why we started assembling furniture. To slightly reduce this direct resemblance of the rack, you can decorate it using a hand router.
Milled counter corner
Installing shelves
We continue to make a shelving unit for the pantry with our own hands! The next step is to manufacture the shelves and assemble the entire structure into one whole.
- We make blanks for the shelves - we take the boards, mark them on a tape measure to the required length and cut them on the already familiar miter saw. Calculate the number of boards for the shelf so that when laying there are small gaps between them for better ventilation.
Pantry shelving: decorative edge
- To make the shelves look more attractive, the edges of the resulting blanks can also be processed with a router, well, at least those that will be at the top.
- Before starting assembly, we take a grinding machine and carefully process all the parts so that there are no burrs left.
First shelf board
- Those boards that will be installed at the edge are trimmed in such a way as to create a rectangular recess for the racks.
- Please note that the workpiece has a self-tapping screw screwed into a pre-drilled hole. We will use this solution as a temporary fixation. Subsequently, the screws will be unscrewed and replaced with dowels.
Shelving for storage rooms: the connection is also coated with glue
- We take the board and coat it with glue along with the place on the crossbar where it will lie. Afterwards the element is fixed using self-tapping screws.
- The manipulation is repeated with all boards.
- The structure is left to dry, after which we will make major, very strong connections on the dowels.
Masking tape limiter
- We take dowels - the 8x40 mm option will be enough, and a wood drill of the required diameter. We put electrical tape or masking tape on the drill, which will serve as guides when drilling.
- Next, we unscrew the screws and drill new, wider holes in their place.
Advice! Don't forget to blow the dust out of them.
- We fill the resulting holes with glue - not all at once, but as the dowels are installed. Lubricate the dowel itself with glue.
Dowel installation
- Well, and, in fact, we hammer in the dowel, removing the squeezed out glue with a damp sponge.
- That's it, the connection is ready, and after the glue has dried, you can bring it to perfection - sand it, putty.
Shelving in the pantry: the result of the work
In the photo above you can see the finished rack. Agree, he looks very interesting. In order for the product to last longer, it must be coated with protective impregnations, laid with oilcloth, or used liners for shelving.
So, we figured out how to make a shelving unit in a pantry. The procedure took a little time due to the use of glue, but the result was very high quality, able to withstand quite good loads without deflection. Be sure to also watch the video in this article, where the master shares another way to assemble such a structure.
A self-made shelf is the best option, ideal for storing specific items with certain parameters. Making shelves in a pantry with your own hands is quite possible, you just need to decide how it will look and choose a building material. This piece of furniture will allow you to rationally use the space of the room. If preserves are stored in the pantry, then you need a structure with wide, durable shelves on metal supports or a rack. Hanging shelves are suitable for arranging lighter items.
Pantry Design
Practicality, ergonomics and compliance with the interior of the apartment as a whole are the main requirements for the design of a storage room.
Thus, an industrial-urban pantry with a rough, simple finish and intricate lamps will fit perfectly into loft apartments. In a classic place, wood prevails. In Provence - pastel solutions, light shelves, floral print wallpaper.
Finishing
Before you begin the final finishing, make sure that ventilation, electrical wiring, sockets, switches are laid, and all surfaces are treated with products that protect against fungus / bacteria. You also need to level all surfaces so that the storage elements are installed evenly - without distortions.
- The walls are finished with plaster or plasterboard. The final layer of finishing can be any depending on the style of the interior: wallpaper, decorative panels, paint.
- The floor is treated with a self-leveling/cement screed. The final layer is laminate, linoleum, tile.
- The ceiling is usually painted with whitewash; decorative elements can be used as desired.
Important!
To decorate the pantry, regardless of its purpose, use the same conventional materials that you use to renovate your apartment. Priority goes to environmentally friendly, breathable, high-quality options.
Color spectrum
There are no specific recommendations for choosing the color of the pantry. In general, many people choose light colors, which visually expand the area and allow them to add light.
Storage systems
The main recommendation when thinking through is the maximum use of each square meter:
- What to use - drawers, shelves, boxes, containers, hangers, baskets, racks, jars, etc.
- A uniform style is a desirable, but optional condition. By choosing harmonious storage systems, you will get rid of the feeling of chaos in the pantry, even if the room is in perfect order.
- Keep in mind that it is not so easy to match shelving to specific walls - there is always a risk of leaving an empty corner that could be used more usefully when installing shelves.
- Design - U- or L-shaped. That is, along the entire perimeter of the room, except for the wall with the entrance, or only on two sides. It is better to choose the last option for a dressing room - then it is possible to install, for example, a mirror or a table for cosmetics on a free wall.
- Door - different options. This can be either a full-fledged door to match the style of other products in the apartment, or a screen, canvas, or sliding structure.
Types of designs: options for installing shelves with your own hands
Markings for installing shelves on the wall are made using a building level. The board is cut to the required length, the bars are cut to match the width of the shelf. The wood must be sanded and treated with stain. The board shelf is mounted using:
- boards;
- bars with a cross section of 20×30 mm;
- chrome pipe;
- edges;
- self-tapping screws (screws);
- drills;
- electric screwdriver;
- building level.
Installation of the product does not require special skills; it is performed in the following order:
- The bars are attached to two self-tapping screws.
- The treated boards are placed on bars and fastened with screws.
- Reinforce the shelf with a pipe using edges from the floor to the canopy.
The hanging product for the pantry is not difficult to assemble; for this you need:
- board 2 centimeters thick;
- screws;
- electric jigsaw with high-quality files;
- drill;
- Bulgarian;
- roulette;
- screwdriver
The boards are cut with a jigsaw, two pieces of each, in lengths of 80 cm and 25 cm. The parts are sanded and treated with stain, and given the desired color with varnish. Afterwards they are assembled into a rectangle shape. The finished hanging product is mounted on the wall.
Furniture made from pipes is affordable and has a simple design. The shelves themselves are placed on pipes. A simple figure is assembled from water, gas, and copper pipes. All parts for such a product are purchased depending on the desired dimensions. You will need:
- flanges;
- clamps for the pipe (metal clamp);
- stubs.
Furniture is assembled using the compression method. The pipe is fixed between the floor and ceiling of the pantry. They begin to assemble the shelf from below.
The pipe is cut to the required length, taking into account the width of the clamp. It is convenient to cut the holes for the pipe, if you put the shelves one on top of the other - this way you will definitely not be mistaken with the size. The assembly is as follows:
- Cut the boards to the required length, their ends should extend 10 cm beyond the pipes.
- The wood is sanded and treated (with stain, followed by varnish).
- Chrome-plated pipes are assembled.
- The flanges are attached to the wall according to pre-drawn markings.
- Fix the joints of the structure.
An excellent option is a self-assembled floor rack made of chrome pipes. This non-boring designer item will highlight the originality of the renovation in any apartment. To make such an item you will need the following:
- hacksaw for metal;
- screwdriver;
- roulette;
- chrome-plated pipes with a diameter of 22 mm, 3 meters each, 6 pieces;
- three-way corner clamps 8 pieces;
- self-tapping screws;
- sheets of plywood.
Advantages of simple designs
A handmade product is a source of pride for any owner. In addition, by making shelves yourself, you can achieve both beauty and the required functionality. Based on personal requests, the necessary structure is assembled, which helps to increase the free space in the apartment. After all, the space in the pantry is rationally used if there is a rack or shelves in it, while in a closet without shelves, where everything is piled up, it is simply impossible to find anything.
This fruit of inspiration will save space in an apartment or house: canned goods, empty jars, necessary tools, household supplies, and out-of-season items will be placed in an orderly manner on the shelves. This design will hide unpresentable household items from prying eyes, while at the same time allowing you to quickly and conveniently get what you need. So, by taking the risk of doing a little handicraft, you will “declutter” the apartment and at the same time save things you don’t need now from the sad part of being lost forever somewhere in the dusty depths of the pantry.
How to make shelves from a profile in a pantry
Making a rack using metal profiles is suitable for storage rooms, where the walls are easily subject to self-tapping screws.
Simple shelf design using metal profiles
There are several nuances in the execution of this version of the product. For ease of installation, it is fixed under the ceiling and near the floor; it requires fastening to the walls. If this can be done in a pantry room, then the rack will make the owner happy with its simplicity and conciseness. Step-by-step manufacturing instructions are below:
- Metal profiles three meters long will be placed on the wall as follows. A total of 8 supports for the shelves are required. If necessary, the dimensions of the diagram must be adjusted to the dimensions of the storage room.
- The dimensions shown in the diagram below can also be adjusted. At this stage, it is necessary to attach metal profiles to the wall, floor and ceiling of the storage room. The framework of the structure begins to emerge.
- Install additional perpendicular profiles on vertically fixed workpieces. They must be parallel to the wall ones. Thus, at this stage of work, the home craftsman needs to have three supports on the wall, two vertical ones from floor to ceiling, one from the beginning of the shelves to the ceiling, as well as three horizontal supports. The 8 profiles stated at the beginning of the instructions are used up - the shelving frame is ready.
- The next stage is creating shelves from plywood. Three blanks with a width of 500 mm are cut from a piece of 3000 mm. The quantity and sizes are selected individually.
- The final stage is the installation of plywood shelves on a structure made of metal profiles. Here you need to secure the bases with self-tapping screws and the rack is completely ready.
Quick and easy production will not ruin the home craftsman, but will provide additional storage space for tools, cans and other household items.
Materials and tools
In order to make shelves for the pantry, we will need:
- Bars of the required sizes;
- Boards or slabs for shelves;
- Building level;
- Drill-driver;
- Hammer;
- Hacksaw or other saw;
- Tape measure, pencil.
The materials most often used are wooden blocks measuring about 50*50 millimeters. Any boards will do - the main thing is that they are of sufficient length and can withstand the expected load. In addition to boards, you can use particle boards, plywood and other suitable materials - even plastic sheets or fiberboard (for small and light objects).
↑ back to contents
Planning the shelving
In order for a pantry to be equipped with shelving, it must have enough space. Clean it first and then plan your shelving placement.
Consider factors such as:
- The dimensions of the items that are supposed to be stored - for example, various boxes require more space than, for example, jars of canned cucumbers;
- The remaining amount of free space - if the racks take up too much space, then it will be uncomfortable for you to walk in the pantry;
- Gaps between individual sections - if they are too large, the shelves will sag under load, so they should be sufficient to ensure that the shelves hold the items placed on them well.
There are two options for shelving layouts:
- The first involves direct fastening of the side elements of the rack to the walls - the shelves go from wall to wall. Such racks are more stable and somewhat easier to manufacture, but moving them will be difficult - to do this you will have to completely remove them from the wall and disassemble them. In addition, the option is not suitable for long walls - shelves that are too long will sag too much. However, pantry shelving rarely needs to be moved - you only need to assemble the shelving once and it will last for a long time after that, so this option is likely to work.
- The second option involves making the rack independently of the wall, in the shape of the letter “P” - the rack will stand on the floor like a table or stool, and can be easily moved to another place. Such racks can have an unlimited length and are suitable for any room. Choose any option that suits you.
Placing shelves in the pantry in the shape of the letter “U”
After completing the planning, calculate the required amount of materials. Then you can start making the shelves. Read a separate article on how to make bookshelves with your own hands.
↑ back to contents
DIY shelf options: step-by-step instructions
You can save your family budget with the help of homemade shelves for your pantry and detailed master classes, which are given below.
How to make a wooden shelving unit for a pantry?
Before starting work, you need to measure the walls of the pantry and create a drawing of the desired structure. Next, prepare in advance the consumables necessary for the manufacture of functional shelves.
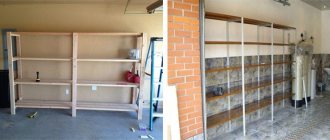
The photo shows a linear homemade wood shelving unit that occupies the entire wall of the pantry.
Tools and materials
- Planed timber for a vertical stand (8 pieces, about 2 m).
- Bar for horizontal supports (12 pieces, about 50 cm, depending on the depth of the rack).
- Boards or lining for shelves (the quantity depends on the depth of the shelves, the length depends on the length of the wall).
- 16 metal corner fasteners (corners).
- 45 screws (3.5x25).
- About 70 thin carnations.
- Wood impregnation and brush.
- Building level.
- Roulette.
- Hammer.
- Jigsaw.
- Screwdriver.
Step-by-step instruction
- First you need to prepare the material. Using a hacksaw or jigsaw, we cut the bars and lining in accordance with the dimensions of the future pantry rack.
We apply impregnation, carefully processing every detail. You need to dry for as long as indicated in the instructions on the can.
We fix the corners with screws at the level where the shelves will be located:
We fix the horizontal bars as follows (you should get 4 such structures):
We install the lining horizontally, nail it with thin nails:
We make the second shelf in the same way: screw the corners, fix the horizontal bars, attach the lining.
We lay the upper horizontal bars and fasten them.
The pantry shelves are ready. In this way you can make a rack of any height, depth and shape.
You can learn more about how to make shelves in a pantry from this video:
DIY wall shelves
The following describes the easiest and most economical way to make wall shelves in a small pantry. The amount of material for shelves depends on the size of the room and the number of floors.
The photo shows pantries in small apartments such as Khrushchev or Leningrad, equipped with simple shelves.
Tools and materials
To make shelves for your pantry with your own hands, you will need:
- Planed bars.
- Plywood, chipboard, boards or remains of old furniture.
- Self-tapping screws for fastening.
- Screwdriver.
- Thin nails.
- Hammer.
- Level.
- Jigsaw or hacksaw.
Step-by-step instruction
- We cut the timber and plywood in accordance with the area of the pantry. If desired, they can be painted or varnished. For the frame of one shelf you will need 1 long and 2 short bars, for the base - a plywood sheet or boards of the required size and thickness. We make markings on the walls and securely screw the bars.
We make markings for the next shelf.
We install a shelf in the pantry.
And this video talks about installing a wall shelf in a closet in two ways: using brackets for laminated chipboards and using standard brackets.
Shelves in the pantry from a profile
A good U-shaped shelving unit for a spacious pantry is made from metal profiles. Having understood the principle of operation, you can make shelves of any configuration, replace plywood with wood, paint the metal profile and create a shelving unit in the loft style.
The photo shows two types of shelves for the pantry, created with your own hands from metal profiles and wood.
Tools and materials
- Guide profiles 50x40.
- Guide profiles 50x50.
- Plywood or wooden boards.
- Roulette.
- Building level.
- Metal scissors.
- Jigsaw.
- Screwdriver.
- Dowel-nails.
- Self-tapping screws.
- Ladder.
Step-by-step instruction
- We make a drawing and calculate the amount of materials. We cut the profile into components according to size.
Mark horizontal lines. We attach 50x40 guide profiles to the walls using dowel nails.
We make the frame of the first shelf, put it on temporary supports from the profile.
Cutting a sheet of plywood with a jigsaw:
We secure the finished parts with self-tapping screws.
We replace the temporary stands with guides. The shelves for the walls in the pantry are ready.
This video clearly shows how to make shelves in a pantry from a profile yourself:
Shelving manufacturing technology
The technology depends on the rack option you choose.
Let's consider an option where the frame is rigidly fixed to the wall. First of all, beams are attached horizontally to the wall - a section of 50*50 is sufficient. The beams are fixed in pairs - on each pair there will be one tier of the rack. The distance between them will determine the height of the shelves. After that, shelves are laid on them and attached. This completes the process.
Now let's look at the design of a U-shaped rack.
"U-shaped" rack layout
To begin with, bars for the racks are selected - the cross-section is suitable 50*50, and the length can be taken 20-40 centimeters less than the height of the room - there, on top of the rack, it will be possible to arrange another shelf.
If necessary, beams are also installed in the middle so that the shelves rest on them and do not sag under load. The length of one span is selected for the required load. As a rule, one meter is enough.
Frame made of beams
Jumpers are installed on the side of the bars on which the shelves will rest. Their number depends on the desired number of shelves, and the distance between them determines the height of the shelves.
In principle, the assembly of the rack is almost complete - if you attach the shelves to the jumpers, you will get a fairly rigid structure. If necessary, you can strengthen it further. You can also make sides on the sides of the rack - in some cases this is more convenient.
Hanging shelves in the garage
Shelves for the rack can be made from ordinary wooden boards. If you plan to use chipboard, keep in mind that such boards are not very resistant to moisture.
It is better to place shelves with a greater height at the bottom - things that have large dimensions are more convenient to store in the lower part of the rack.
Frame for shelves on the balcony
The thickness of the shelves ranges from 10 mm to 30 or more - it depends on the weight and number of items that are supposed to be stored in the pantry.
After installing the frame, boards are mounted on it. If necessary, they are sanded and painted. The technology is similar to making a frame for a podium. This completes the production of the rack.
↑ back to contents
How to make a metal rack with your own hands
Before you start manufacturing, you need to imagine what such a structure will look like and what fasteners will be used.
Rack drawing
Next, take the necessary measurements and draw your idea on paper. It is possible to find a suitable drawing and assembly diagram on the Internet or draw it yourself. The design can be of any size and shape that will fit into a given pantry.
For fastening, it is better to choose metal fasteners, as they are very durable and can withstand any weight.
Necessary materials
When starting to select a material (metal, wood, plastic) for manufacturing and fastening materials, you need to know what will be stored on them, the expected weight, dimensions.
For the frame you should take a metal corner or pipes.
In addition, you will need connecting elements for assembling the frame, brackets, screws and self-tapping screws.
For manufacturing, you need to select a material, the thickness of which depends on the expected weight of the luggage (the greater the weight, the thicker the shelf fabric).
Tools
For assembly you will need the following tools:
- pencil;
- drill;
- screwdriver;
- building level;
- hacksaw for metal;
- roulette.
When starting assembly, it is better to wear special clothing so as not to get dirty or get injured.
Build process
If you decide to make a classic rack, then the assembly process looks like this:
- First, the frame is assembled and installed.
- The material for the shelves is cut to the required size, sanded and coated with stain or varnish.
- After the canvas has dried, the shelves and drawers are secured.
Classic rack
If the mounting method is hinged, then do the following:
- Using a building level, we make the necessary markings.
- We attach the brackets to the wall.
- We cut out the shelves, process them and let them dry.
- After drying, screw the shelves to the brackets.
Wall rack
The best shelf depth is 30 cm, and the distance between them is 0.5 m.
A utility room is necessary in every home, because many things, such as seasonal clothing, household appliances, canned goods and just various little things, need to be stored somewhere. Most apartments have small rooms for such purposes, but, as a rule, they have yet to be equipped. How to make shelves in a pantry with your own hands and adequately optimize a small space is a burning issue in many families.
Wall shelves for pantry
In addition to shelving, you can install removable shelves in the pantry.
To make such shelves, removable rectangular brackets are most often used - they can have a wide variety of designs, and it is better to choose those that best withstand the load and distribute it evenly over the surface of the pantry wall.
Both boards and particle boards are suitable for the shelf itself. You will need to make a shield of the required dimensions from the boards: the main part of the boards goes along, and two or three go across, fastening the main boards together. In this case, the legs of the brackets will pass between them. The slab can simply be cut to size.
Draw a strictly horizontal line on the wall - the brackets will be installed on it. Install the brackets using self-tapping screws or anchors. After attaching the brackets, install the shelf on them, securing with bolts or self-tapping screws.
At this point, the manufacture of the shelf can be considered completed. We have prepared a separate review about making a bar counter with your own hands.
Swivel round shelves are very easy to use
We looked at ways to make shelving and pantry shelves. As you can see, there is nothing particularly complicated about this, and after installing racks and shelves, you will be able to store items in the pantry in the most efficient and convenient way.
In the next article, read how to make a dressing room with your own hands.
Popular posts
- Chair for dressing table Chairs for dressing tables in Moscow - 189 Products Company from Moscow, delivery 29643 a In…
- Silicone sanitary sealant Silicone sanitary sealant white in Moscow - 1491 products Company from Moscow, delivery (tomorrow) 140...
- Shelf in the hallway Currently, there are a huge number of different options for shelves in the hallway, and this is directly ...
- Insulation of the floor in a wooden Insulation of the floor in a wooden house from below: materials and installation technology SHARE ON SOCIAL NETWORKS One of the common…
Production of metal shelving
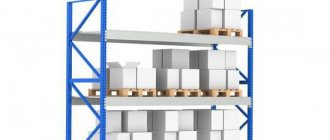
Metal racks are very compact and lightweight, but at the same time they are wear-resistant and durable.
If the rack is additionally galvanized, it will become more resistant to corrosion. To make a regular rack, the height of which will be 2 meters, the width - one and a half, and the depth - 40 centimeters, you will need the following elements:
- 4 two-meter stands in a vertical position;
- 4 one and a half meter pieces of corner for the front and back of the product;
- 4 half-meter side crossbars.
The entire process is performed on a flat surface, the pipes are laid horizontally. Then the assembly is carried out. The two-meter racks must be placed in a horizontal position, and then the front and rear parts of the frame must be placed between them. The segments must be the same length. To produce a rack, you first need to assemble a frame using corner fasteners, where the front and rear frames are installed. Afterwards, the prepared frames are attached to the vertical posts. An important point is the horizontal level of the frames. To avoid distortions, be sure to keep an eye on it. Finally, you are installing the shelves. They can be cut from plywood, steel sheet, chipboard and other materials. They are attached using self-tapping screws. After fixing the product to the wall using brackets, the attachment points need to be sealed for greater strength.