Basic floor preparation before painting
- The dry floor is varnished, primed and allowed to sit for three days, after which it is painted.
- Secondary painting is done after the first layer stops sticking. It is advisable to apply the paint with a roller along the length of the boards, achieving the smallest layer.
- The second layer should dry within a week, after which you need to wash the floor with hot water, this operation is repeated every day, achieving maximum removal of drying oil from the surface.
- A floor cleared of drying oil will be less susceptible to contamination and will be much easier to clean.
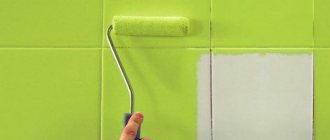
How do you wash a wooden floor after painting it with enamel?
Answer:
After painting with enamel, the floors cannot be washed.
I don’t know what kind of enamel you have and how long it will take to dry, but in any case, the drying should be complete (just read the terms on the container, it can be one day or five days, at normal temperature and humidity).
But when the enamel is completely dry then you can.
Nothing new has been invented in the technology of washing painted floors, and with such an abundance of modern materials, floors are not painted so often.
You'll need vinegar
and a bucket of water.
But here, be careful, the water needs to be almost hot (what temperature your hand can tolerate).
Add two tablespoons of vinegar to a bucket of water (10 liters).
Then mix.
The floor cloth should be soft.
The rag should be damp, but not too wet.
We go over the floors once with water and vinegar.
Pour the water out of the bucket and follow the same recipe again.
And then the floors are washed simply with warm water and a damp (not wet) cloth.
The method is simple, “old-fashioned”, but still works.
At one time, I made an unforgivable mistake when I decided to remove stains and stubborn dirt from recently enamel-painted wooden floors using liquid soap added to a bucket of warm water. The paint drips and stains hardly came off, but the floor itself became faded, and after two or three similar procedures, the enamel began to peel off from the surface.
Therefore, after secondary painting, I use exclusively a proven product - 70% acetic acid (1 tablespoon per 10 liters of water).
You should also remember:
- Do the first washing of the floor no earlier than after 2 weeks - let the enamel dry thoroughly and be absorbed into the wood;
- approximately every 2-3 square meters. m. change the solution;
- and most importantly, do not forget that an aggressive vinegar environment, despite such an insignificant concentration, can lead to corrosion of paint and wood, therefore, IMMEDIATELY after the surface has dried, wipe it with a slightly damp cloth.
The question is not as simple as it seems, and all because alchemists on the Internet do not even think about the fact that enamel paints come in different varieties and use the advice of their ancestors, as they say, for all occasions. So on the Internet they simply transferred the use of an acetic acid solution, which was previously quite often used for washing floors painted with oil paint.
So first you need to figure out what enamel paints are.
There are basically three types.
First. This is an alkyd enamel based on pentaphthalic. These are the most common paints and they dry very well, and in this case, indeed, after the first wipe of the floor with a damp cloth, you can use a diluted solution of acetic acid and this is 1-2 tablespoons per bucket of water, but you only need to wipe the floor with such a solution.
Second. It is better not to use acid solutions here for nitro enamels, but simply wipe them with a damp cloth.
And the last third type is polyurethane enamels.
And clean water is better here.
But in all cases, the best solution when first washing the floor is to use a weak solution of ammonia.
And the washing itself is carried out carefully by lightly wiping with flannel rags.
Freshly painted wood floors should be washed for the first time immediately after the last coat of paint has dried thoroughly. And the paint dries in 5-7 days.
But not fully understanding the word “ wash the floor ,” simply wipe the floor surface with a soft cloth soaked in hot water twice. Wring out the cloth well and treat the floor in small sections. You can add one tablespoon of vinegar to hot water, but it is better not to do this the first time, but wipe the floor with ordinary hot water. Every day for a week, enamel-painted floors must be wiped using this method, with the addition of vinegar.
This is a necessary procedure for caring for wooden floors painted with enamel or other paints.
In the future, the floors , without serious contamination, should be washed with warm water with the addition of ammonia or vinegar, with the calculation: per liter of water no more than one tablespoon of the selected product. To add shine to painted floors, you can add shine for wooden furniture to the solution: 2 liters of water, 60 ml tbsp vinegar, 1 tbsp. means for polishing wooden furniture.
It is not advisable painted floors with water and soap or soda, as the paint will quickly fade.
After you paint the floor, you need to wait the time that the manufacturer of this enamel advises the consumer for the floor paint to dry completely. So, when the number of hours necessary for the paint to dry has passed, do not rush to immediately “stomp” all over the room right in shoes
First, test in a corner of the painted threshold of the room with your hand to see if the painted surface is really completely dry.
If so, then fill a bucket for washing the floor with warm water, add a couple of tablespoons of vinegar (9%) and begin to wet the floor with a rag - attention (!) - from the threshold and further throughout the room, so as to step on the already wetted floor , and not dry, as traces may remain, albeit barely noticeable.
By the way, it is better to use a mop; it will eliminate as much as possible the need for unnecessary trampling all over the painted floor.
For subsequent floor cleaning, you do not need to use vinegar, just warm water and a soft cloth.
Complicated floor preparation before painting
If you want to achieve a perfectly smooth painted floor surface, then in this case you will have to complicate the preparation of the floor for painting.
- Initially, the floor is primed, after drying it is puttied with oil putty and this layer is dried.
- The leveled areas are sanded and putty again, and the oil putty should match the color of the floor.
- The dried layer is cleaned with fine-grained sandpaper and primed.
- The paint is applied to the prepared floor several times until the putty areas no longer appear.
DIY wood floor painting
A sloppily painted floor or an old coating with peeling paint spoils the appearance of the entire interior of the room. Therefore, if the owners have already taken up the renovation of the apartment, they cannot leave the floors without updating. One of the most common ways to refresh a floor to this day remains painting it, despite the emergence of numerous newfangled coatings.
DIY wood floor painting
However, it should be noted that such a seemingly simple process as painting a wooden floor with your own hands also takes on new forms. If previously the traditional color for this element of the house was brown in one shade or another, now many creative apartment owners go for bold experiments, using all the colors of the rainbow, sometimes creatively combining them with each other.
Other homeowners still prefer not to take risks and do not change old traditions. And adherents of ecological interiors, who strive to decorate their homes with natural materials while preserving their natural beauty, cover plank floors with transparent water-based varnishes or tinting oils.
However, no matter what method of transforming the floor surface is chosen, the wooden covering must be carefully prepared for the application of paints and varnishes.
For preparatory activities and directly for the paint application process, certain tools and materials will be required, the quality of which will directly affect the appearance of the finish coating.
Tools and materials for painting wood floors
Tools for work
So, the following painting and construction tools will be needed for work:
Basic tools: roller, brush, paint tray. The tray may have replaceable liners
- A paint tray is necessary for maximum ease of use when painting the main floor area with a roller. You should not try to replace the tray with improvised containers, since everything in its design has already been thought out for comfortable work - it will never tip over from an accidental push, and it has a bevel on one side - an inclined plane with a corrugated surface, which helps remove excess paint from the roller .
- The roller will help you carry out the work faster, as it immediately paints a fairly large area. In addition, it ensures the evenness of the applied layers. It is best to purchase a roller that has a long handle - then the work will be much easier and more convenient. When purchasing a roller, you need to take into account the length of the pile on the nozzle - it should be of medium length, otherwise the paint will lie unevenly.
- Brushes of different widths - you cannot do without them when painting the joints between the floor and baseboards, as well as places inaccessible to a roller.
Masking tape can be of different widths
- Painting tape will be needed if you plan to apply several shades of paint to the floor surface, as well as for sealing those areas of the floor, wall or baseboard that do not require such design, but there is a high risk of accidentally touching them with a brush during work. Painting tape is waterproof, so it becomes a reliable barrier to paints and varnishes of any type. When the tape is removed, the surfaces underneath are completely clean.
A spatula will be needed to remove old paint and to repair the surface.
- Rubber and metal spatulas will be needed to seal gaps between boards when repairing or preparing the floor, as well as to remove layers of old coating.
Protruding irregularities and knots can be cut off with a chisel
- A chisel becomes necessary for widening and clearing old putty from the cracks between the boards, as well as for cutting down protruding knots or other small irregularities protruding above the floor surface.
A sanding machine is necessary when preparing to paint large areas
- A scraping machine will be needed if the floor has an old varnish coating or if its surface has many extensive defects and requires leveling.
- A construction hair dryer with attachments will be needed when the plank floor has several layers of old paint coating. If the task is to make the floor smooth and aesthetically pleasing, then first you need to remove all these layers, and then move on to other preparatory measures.
Selecting materials
The materials for the work will require wood putty and primer, wooden slats for sealing wide cracks and, in fact, the paint itself. Very often, especially when using organic-based paints, an appropriate solvent will be required - to give the paint a dull consistency and to clean equipment and hands after completion of work.
Putties for repair work on wooden floors
Several types of putty are suitable for sealing cracks in the floor. Each of the compositions has certain properties that you need to know about when choosing a similar material for work.
Oil-adhesive putty
- Oil and oil-adhesive putties are made using glue, sifted chalk, drying oil and drier - a substance that helps the composition dry out quickly. However, despite the presence of the latter, this type of material dries much longer than other putties. True, after complete drying it is quite reliable and has a long service life.
Probably the most convenient one is acrylic putty.
- Acrylic putty is made from talc and barite or gypsum with the addition of ocher and zinc white. It fills cracks well, is easy to level and dries fairly quickly. This type of material is suitable not only for filling cracks, but also for leveling small depressions if the floor is being prepared for painting. When hardened, the material remains elastic, so if the boards are slightly deformed, the putty will not come out of the cracks, but will take the desired position.
In order for such putty to adhere reliably, the cracks must be cleaned, rinsed and dried before applying it.
- A homemade putty made from wood glue with the addition of fine sawdust is also good for plank floors. This crack sealing material dries quickly and is easy to apply and level. The service life of this material is quite long.
In addition to putty, to prepare the floor you will need drying oil to impregnate the boards or a wood primer - they are necessary to protect the material from pests, as well as for easy and even application of paint.
Wood floor paint
Having chosen the putty, you need to move on to an equally important procedure - selecting the required paint.
The choice of floor paints is quite wide
Today, construction stores offer a wide range of different products, and it is always possible to find the most suitable one. Therefore, when you go shopping, you need to be well prepared and know exactly what requirements the painting material must meet.
- First of all, you need to take into account the humidity in the room where the floor is located, which will be covered with the chosen paint.
- Secondly, the type of floor wood and the condition of the boards are taken into account.
- The third factor to keep in mind is the degree of load that will be placed on the floor covering, as the amount of traffic in different rooms can vary significantly. For example, in the hallway and kitchen the mechanical impact on the flooring is several times higher than in the bedroom or living room.
Most often, oil-based paint is used to paint floorboards, which over decades of use has proven to be particularly resistant to wear. It is also important that this is perhaps the most inexpensive option. However, do not forget about its main drawback - it takes a long time to dry.
Enamel composition is also quite often chosen - it is popular because it dries quickly and gives an even coating. Such paint is, of course, more expensive.
In addition to colorful compositions for the floor, impregnations and varnish on an alkyd and acrylic, water-soluble basis are used. But they are suitable for covering new or ideally cleaned wood that has a beautiful textured pattern and color.
If the area to be painted is large, then you cannot limit yourself to one can. By calculating the total floor, it will be possible to fairly accurately determine how much paint will be needed. Very often, on the factory packaging or in the instructions for use supplied with the paint, the manufacturer's recommended consumption per square meter of wooden floor is indicated. If there is no such information, then you can calculate the approximate required amount, taking into account the fact that an average of 200-250 grams are consumed per square meter. composition per layer.
If you plan to cover the floor in two layers, then, accordingly, you need to buy 1.7-1.8 times more paint than for one layer - the first coating takes more material than the subsequent ones.
It is worth paying attention to the batch number of the purchased paint - it must be the same. Compositions of the same article, produced at different times or on different lines, may differ in shade and tone. What will not be visually noticeable in the store may later appear on the painted floor surface.
Preparing a wooden floor for painting
Regardless of whether the old floor will be painted or a new one, just laid, preparatory measures are necessary in any case.
Preparing the old floor
If you are restoring an old floor that has been painted in several layers, you will have to seriously work to bring the boards almost to their original condition.
Such an old floor will require serious preparation
The first step is to dismantle the old skirting boards and only then proceed to further measures.
Next, an inspection of the fastening of the boards with nails to the sheathing (lags) is carried out. Over the years of use of the floor, the nails could rise above the level of its surface - they must be sunk into the wood, otherwise they will complicate the work on further cleaning the floor plane.
- If a thin layer of paint has been applied to the floor, it can be cleaned using a sanding machine - belt, eccentric or disk type, which can often be rented in specialized salon5 stores, or you can invite a specialist who has his own machine to perform such work. Using this cleaning method, you can not only get rid of the old coating and renew the floor, but also level it to a completely smooth surface.
Belt type hand sander
- If the old floor covering consists of numerous layers of paint, then it will first have to be removed, for example, using a hair dryer. After heating a certain area of the floor, the paint is removed with a spatula or a special scraper, which is usually included with the hairdryer.
Removing layers of old paint using a hair dryer
- When the paint has been cleaned off and the inspection shows that leveling the surface is not required, all that remains is to clean the surface using a hand sander.
- If an uneven floor appears, with uneven relief joints of the boards, then you cannot do without a large sanding machine.
- After the sanding process, all dust and debris from the surface must be carefully removed. You won’t be able to do this manually – you need a powerful (preferably a construction) vacuum cleaner.
- Next, all large and small gaps between the boards are sealed. Narrow holes are simply filled with putty material, which is leveled with the floor surface.
Filling thin gaps between boards
- Wide slots, if necessary, widen slightly upward. For them, slats are prepared, which are narrowed wedge-shaped towards the bottom along the entire length. Then their side surfaces are covered with a thin layer of putty or wood glue, and the slats are carefully driven into the openings of the cracks.
Sealing large cracks using slats - wedges
- The areas of the wedges protruding above the surface are smoothed off with a plane after the adhesive composition has dried.
- After all repaired areas have completely dried, another grinding of the surface is carried out, which will finally smooth out all the unevenness. Then, thorough cleaning and dust removal is carried out, and you can proceed to the next stage.
- The entire floor surface must be treated with hot drying oil or modern primer compositions. In this regard, it is, of course, more profitable to use ready-made modern impregnations, since they solve two problems at once - they work as an antiseptic and make the surface smooth, giving it good adhesive qualities, which will facilitate the subsequent application of paint. Any materials applied to the surface must be allowed to dry completely.
Video: preparing an old wooden floor for painting
Preparing the new floor
With a good installation of new floors, the boards usually fit perfectly together and no gaps should form, so this stage of work is immediately eliminated.
On a new floor, only a final sanding is usually sufficient.
However, in order for the floor surface to be perfectly smooth and look aesthetically pleasing, especially if you plan to cover the boards with transparent paints and varnishes, you must sand it using a hand sander or sanding machine.
The floor must be primed, and best of all - twice
Next, the flat surface is also covered with heated drying oil or an antiseptic primer, and let it dry thoroughly. It is recommended to prime the new plank coating in two layers, since the first of them will be almost completely absorbed into the wood, and the second will create an optimal surface for a brush and roller. In addition, high-quality priming will help save paint, because its liquid components will not be abundantly absorbed into the wood.
DIY wood floor painting
You can paint the floor in one color or use several shades, but, one way or another, the first layer, which covers the entire surface, is always monochromatic. Therefore, this is where you need to start the whole painting process.
- Preparing paint for work involves thoroughly mixing it until smooth, since clots and lumps will interfere with the even application of the material to the surface.
- During the work, the paint will definitely get on your hands and clothes, so you should provide a work suit, and put on rubberized gloves on your hands or coat them well with vegetable oil.
- Next, the paint is poured into the tray, then with a wide brush they begin to paint the floor along the walls, in the places where the baseboards will be installed.
- Having painted the entire floor around the perimeter, proceed to painting the entire floor area using a roller.
- After the first layer of paint has dried, baseboards are installed at the junctions of the floor and walls.
- If necessary, wooden skirting boards at the joints between each other are coated with putty, after which it should dry well. The putty areas are carefully sanded with sandpaper as they dry.
- Further, if wallpaper is already pasted on the walls or other decorative materials are installed, masking tape is attached to them, right along the baseboards. It is necessary to protect the walls from accidental paint.
- The baseboards are painted with a narrow brush and left to dry. When the first coat of paint dries, apply the second immediately.
- After repainting the baseboards, a second layer is applied to the entire floor area.
- When the paint has completely dried, provided that the floor was planned to be made one color, it is recommended to wash the entire surface with a weak soap solution - this will eliminate the residual stickiness of the freshly painted coating.
Video: the process of monochromatic painting of a wooden floor
At this point, you can stop painting and start arranging the room with furniture. But, if you show your imagination, you can continue the work by making the floor two- or even three-colored. Naturally, in order for everything to turn out aesthetically and accurately, it is necessary to create a sketch of the future “work” in advance. As an example, we can consider an option where three colors were used.
- As mentioned above, first the entire floor is painted with one color.
- Next, you need to separate the areas of the floor that will be painted a different color. This is done using masking tape of a certain width.
- The pasted strips will not only clearly highlight areas of paint with a different color, but will also protect areas that should not be touched.
Painting the area bounded by masking tape
- After the painted strips have dried, the masking tape is removed, leaving a clearly defined floor pattern, which is the result of using different tones of paint.
- But in this case, the designer decided not to stop there and complemented the floors with a thin white mesh. A similar one (or some other) can be obtained using a stencil, which can be purchased ready-made, or you can make it yourself by applying a design to a sheet of transparent film and cutting out the necessary contour areas.
Applying a stencil design
- To apply a small pattern, it is better to use quick-drying paint, preferably acrylic, but even with this, such a mesh will have to be applied in fragments with certain pauses, since in a hurry there is a chance of smearing the paint applied next to it.
The result is a very original painted floor covering
By performing a similar floor design (such as in the picture or developed independently), you can make even the most ordinary wooden floor exclusive and original, surprising everyone with your ingenuity.
There is no need to think that you cannot add a creative touch to the process of painting floors. By turning on your imagination and imagination, picking up a pencil and paper, you can come up with a real work of art, which you can then transfer to the floor of one of the rooms in your apartment.
Video: example of original floor painting in an apartment
With some effort and diligence, the job of painting the floor can be done independently. In this process, the most important thing is to properly prepare the surface and very carefully perform each of the stages of applying paint.
Professional floor preparation for painting
The third method involves high-quality floor painting.
- Preparing the floor for painting is carried out in stages, the surface is drying oil and putty, after drying it is cleaned and putty again.
- A primer is applied to the dried layer of putty and painted in three layers.
- In some cases, after the second leveling, gauze is pulled over the entire surface and embedded in the putty mixture.
- After stripping the second layer, apply a final layer of putty over the gauze.
- The dried layer is sanded, primed and painted three times.
Regardless of which method of painting the floor you use, the important point is to have a strong foundation; if this factor is neglected, then all the work will be in vain.
Due to the deflection of the floor slats, the putty and paint will peel off. In addition, only paint of the same type should be applied to the old coating, otherwise chemical reactions and peeling are possible.
If difficulties arise when repainting an oil coating with oil nitro enamel, then in this case the previous layer should be removed using special solutions. The old layer of paint must be removed to the base; ethyl alcohol or caustic soda are suitable for this purpose. To paint a floor with high quality, the approximate paint consumption can be 230g per square meter.
You can check whether the floor is dry or not by simply pressing your finger, after placing a piece of paper under it. Walk on freshly painted floors with caution. In order not to spoil the fresh coating, you can place pieces of plastic film under your feet. After the floor has dried, the film is carefully removed from the corner.
Water-based paint is usually applied with a brush, along the boards, it is necessary to prevent paint from coming into contact with adjacent floor slats to avoid drips. You can use a spray paint for painting.
When paint dries, it loses its former attractiveness, shine, color saturation fades; this fading process is typical for most paints.
To restore color saturation and shine, it is recommended to varnish the floor surface. You can use nitro varnishes for these purposes; they are durable and abrasion-resistant, but due to their health risks, they are less attractive than polyurethane varnishes.
Polyurethane varnish is initially ready for use; the only recommendation is to thoroughly mix the varnish. Apply 2-3 layers along the length of the floor slats, being careful not to fill the gaps between them.
A floor covered with high-quality paint in compliance with all technological requirements can last up to 5 years.
How to paint wood floors
Wood floors are the most common. There are a large number of their varieties: planks, parquet, cork, plywood, made of fiberboard and chipboard. Unpainted wooden floors look untidy, wear out quickly and are inconvenient to use.
Choosing paint coatings for wooden floors
Wood floors can be painted with oil paints, alkyd varnishes and enamels, protective alkyd or acrylic impregnations.
- Paints and enamels hide the wood texture and allow you to obtain a uniform color; In this way, plank floors and floors made of fiberboard and chipboard are treated.
- Varnishes allow you to obtain a glossy transparent surface; Parquet floors are usually varnished.
- Protective impregnations protect the wooden floor from destruction; they do not hide the wood texture and can give the wood a selected shade (for example, the color of stained wood).
When choosing paints and varnishes, pay attention to the information on the packaging. Typically, the manufacturer indicates on the label the type of paint or varnish, the surface for which this type of coating is intended, the approximate consumption per 1 square meter, the recommended number of layers, drying time, and also how this varnish or paint can be diluted.
By watching the following video, you will learn which paint is best to paint the floor:
Preparing the floor for painting
Most painting work is preceded by thorough surface preparation. The result of staining depends on the quality of its implementation.
Preparing the floor for painting consists of several stages:
- If there are remnants of previous paint on the surface of a wooden floor, it is better to clean them off with a spatula, sandpaper or a special sanding machine. If this is not done, the old paint will peel off from the wood, reducing the service life of the new coating; It can also show through the new paint layer, detracting from the appearance of the floor.
- If the surface of the wooden floor is uneven, it must be sanded.
- The floor surface is cleaned of dirt using detergents and, if possible, degreased with solvents.
- A new wooden floor should be treated with drying oil before painting - this will reduce paint consumption and increase the life of the floor.
- Using putty, you need to level the floor surface, cover up the gaps between the boards and holes. Instead of putty, you can use a mixture of glue and small sawdust. If you were unable to completely clear the surface of the old paint, you can tint the putty mixture with new paint - this will ensure that the floor surface has a uniform color.
- After the putty has completely dried, you can begin painting.
Painting wooden floors
To paint wood floors, you can use a medium paint brush, a lint-free foam roller, or a sprayer.
They begin work by painting hard-to-reach places with a brush: corners, baseboards and a 15-centimeter strip near them. It is better to paint the rest of the surface with a paint roller - this will allow you to get a more even surface without paint strokes. During painting, you need to stir the paint regularly to avoid streaks.
The average paint consumption is 180-250 grams per 1 m2, but basically you need to focus on the manufacturer’s recommendations indicated on the paint packaging. If the application is too thin, you may soon end up with worn-out stains on the floor. If the paint layer is very thick, the surface may become wrinkled, into which dirt will get clogged.
When painting the floor, one must not forget about ventilation, since most paints have an unpleasant odor and are toxic. In addition, good ventilation can reduce paint drying time. It is not recommended to open doors and windows wide, as dust and dirt may get on wet paint, and this will deteriorate the quality of the surface.
The paint is applied in 2 layers parallel to the direction of the boards. The second layer is applied only after the previous one has completely dried.
How to open up a wooden floor with varnish
Since the varnish coating is transparent, the wooden floor should be sanded. Sanding is the removal of old paintwork, which also eliminates dirt and damage to the floor surface. Sanding is carried out using a special grinding machine or sandpaper No. 40-120.
After sanding, the surface is completely cleaned of dust using a vacuum cleaner.
Varnish is applied using the same method and tools as painting. The only differences are that the varnish needs to be warmed up a little before use, and it takes longer to dry.
After watching this video, you will learn in more detail about sanding and varnishing a parquet wooden floor:
Quotes from Russian classics with the phrase “painted floor”
The meaning of the word "dyed"
PAINTED, oh, oh. 1. Painted, painted. Dyed fur.
Dyed cloth. Dyed hair. All meanings of the word "dyed"
The meaning of the word "gender"
GENDER1, -a (-y), preposition.
about the field, on the floor,
plural.
floors,
m.
The lower flooring in a room on which people walk.
Wooden floor.
Parquet floor. From floor to ceiling. Wash the floor. Fall to the floor. GENDER2, -a, pl.
sexes, -ov,
m.
A set of characteristics of an organism that ensure reproduction, by which males and females are distinguished, as well as one of two categories of living beings (men and women, males and females), distinguished by these characteristics.
Persons of both sexes.
Please indicate your gender and age on the form. All meanings of the word "gender"
The meaning of the word "pola"
POLA, -y, plural.
floors,
w.
One of the halves, the lower edge of each half of a garment that opens at the front (coat, jacket, etc.).
All meanings of the word "pola"
The meaning of the word "hollow"
HOLLOW, oh, oh. 1. Empty inside, not filled with anything. Hollow stem. Hollow horns.
All meanings of the word "hollow"
Sentences containing the phrase “painted floor”
- I remember their large apartment on the second floor of a low house, very bright, with clean painted floors
.
- There is a mountain of wool on the floor - grandma has already washed it, dried it and beat it with a long stick, and now it’s on red painted floor
She laid out a large cloth and began to evenly lay out the wool in clumps on it.
- On painted floor
no one knows by whom or when, an embroidered rug, long since stained and moth-eaten...
- (all offers)
Synonyms for the phrase “painted floor”
- plank floor
- wooden floor
- parquet floor
- clean floor
- floor tiles
- (more synonyms...)
Associations to the word “gender”
- parquet
- rags
- mop
- underground
- flooring
- (more associations...)
Associations to the word “gender”
- individual
- change
- representative
- the washing up
- boy
- (more associations...)
Associations to the word “hollow”
- cavity
- emptiness
- (more associations...)
Associations to the word "dyed"
- dyed hair
- painted floor boards
- seemed painted
- (full compatibility table...)
Associations to the word "gender"
- male
- battlefield
- representatives of the stronger sex
- the field disappeared
- sleep on the floor
- (full compatibility table...)
Associations to the word "gender"
- male
- battlefield
- representatives of the stronger sex
- the field disappeared
- sleep on the floor
- (full compatibility table...)
Associations to the word "hollow"
- hollow water
- hollow earth theory
- be hollow
- (full compatibility table...)
Morphology
- Analysis of the composition of the word “dyed”
- Analysis of the composition of the word “gender”
- Analysis of the composition of the word “gender”
- Analysis of the composition of the word “hollow”