A balcony in an apartment is always additional space and an opportunity to expand the area of your home. Often the compact size of a living room or bedroom is a serious problem for owners, which makes them think about remodeling. As one of the likely solutions, you can consider increasing the space due to the loggia.
Most often, for this purpose, the wall between the balcony and the room is simply dismantled, due to which there is much more space. However, such radical changes to the design of the apartment are not always practical or possible. So how can you acquire additional square meters in this case? The examples below will help answer this question.
Which extension method should I choose?
An extended balcony can have any size (within reasonable limits, of course) and any shape. For example, the “butterfly” technology involves extension along trusses attached to the facade on both sides at an angle of 45 degrees. However, two other methods of removal are considered the most popular at the moment - on the slab and on the windowsill. When expanding using these technologies, spacious and cozy remote balconies are obtained. Photos of structures mounted in different ways can be viewed in our gallery.
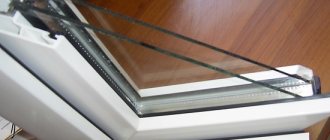
The method of expanding along the window sill is also called “kerchief”. In this case, the glazing is moved beyond the parapet. This method can expand the room by about 30 cm on each side. This is an easy-to-use and inexpensive method of removal, which involves installing the glazing on strong brackets attached to the parapet, or on a frame welded from the floor. The result is a fairly spacious remote balcony.
Extension along the window sill using steel brackets
The second method - carrying it out over the slab is much more complicated in execution, and therefore we will consider it in more detail.
Expansion along the slab
So, how to expand a balcony along a slab? This technique allows you to significantly increase the floor area. In this case, the work is carried out in several stages:
- The first step when expanding is to cut off the old parapet;
- Next you need to build up the frame of the supporting slab. To do this, channels are recessed into the wall above it and on both sides of the base (at least 25 cm), which are then connected to each other with steel corners. In this way you can make a fairly significant expansion of the base;
- A new parapet made of steel angle is being installed over the already installed frame;
- The area that is outside the old slab is riveted with tin or covered with any other suitable material.
- The new floor is covered with boards;
- The parapet is being finished;
- The frame is welded under the glazing.
General view of the frame when expanding along the base slab
Extending a balcony along the base of a slab is a procedure that usually requires obtaining permission from the relevant authorities. The fact is that an increase in length or width by more than 30 cm is equivalent to redevelopment.
Extension along the base of the slab
This method is often used on loggias since its structure is stronger than a balcony, and it is easier to equip the loggia as a living space.
Extending a balcony along the base of a slab is more complex and expensive. This method allows you to increase the balcony space more than in the previous version.
This extension will require obtaining permission for reconstruction.
How to enlarge a balcony along the base of a slab:
- The old railings are being dismantled.
- A metal frame is installed on the edges of the base plate. The parts are assembled together by welding. This will be the support of the external structure.
- The next step is to cover the lower part of the frame with metal sheets;
- Next, a new fence is installed along the entire perimeter of the remote structure. These works are performed strictly according to the level.
- The cladding is done from the outside.
- The next step is laying the floor.
- Glazing installation.
- Next, the floors and walls are insulated.
- Lastly, the interior decoration and arrangement of the premises is carried out.
It is worth noting that completing this work is not an easy task. It is better to seek help from specialists who will select durable and high-quality materials and complete all the work in a short time.
There is also a combined option when the removal along the window sill and along the floor is done simultaneously, which increases the area by 70 cm.
This design is heavy and carries a heavy load. For such a reconstruction, it is necessary to install supporting supports (for the first and second floors) or try to reduce the weight of structures and materials as much as possible.
Glazing of balconies during removal
The glazing of extended balconies and loggias, just like regular ones, can be “cold” or “warm”. In the first case, aluminum frames are used. In the second - PVC or wooden profiles.
How to glaze a balcony with floor extension
When expanding along the base, “warm” glazing is usually performed. That is, the premises can subsequently be used in winter. Since expanding balconies in this way involves installing a new parapet, as well as a frame above the slab, the resulting structure is distinguished by the highest degree of reliability, as well as the ability to withstand significant loads. The technology for installing PVC profiles on an expanded slab is no different from the method of installing them when equipping a regular balcony. The racks to which the profile is attached are also welded.
However, at the same time, increasing the balcony along the slab provides the opportunity to choose a more spectacular original design. For example, French glazing can be called very interesting. Due to the peculiarities of the profile installation scheme, this method is mainly used only when carried out along the slab. The fact is that when installing double-glazed windows using this method, several centimeters of the internal area are “eaten up”. Extending balconies allows you to create spectacular glazing without losing space.
Floor-to-ceiling glazing when extended along the load-bearing slab
The essence of the method is that PVC profiles (or any other) after removing the frame are installed to the entire height of the balcony. Of course, such a restructuring requires some experience in installing Euro windows. A double-glazed window with built-in blinds is installed at the bottom. During operation, they can be closed, thereby creating an opaque “parapet”. A variety of types of glass (tinted, frosted, stained glass, etc.) can be used in the design. Of course, if you have “direct” hands, you can arrange such a balcony with your own hands.
This design requires the welding of a durable metal frame onto which the glazing profiles are attached. The safety of the apartment owners will depend on its reliability. How many centimeters to remove is a question, in this case depending on whether the owners want to expand the floor or just cover the “eaten” centimeters. Of course, it is better to immediately make the takeaway thorough.
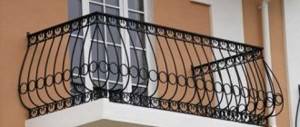
Making a new parapet may become an unnecessary procedure if the old one does not spoil the appearance of the balcony. In this case, you can not dismantle it, but simply carefully paint it. Or order a beautiful decorative one and place it in front of the glass. This way you will get a rather aesthetically pleasing French glazing of the balcony with an extension. The photo clearly demonstrates the effectiveness of this design:
Decorative forged parapet on the “French” balcony with extension
A characteristic feature of such glazing is, first of all, the absence of the need for insulation of the parapet. Basalt wool or polystyrene foam is laid only on the floor and ceiling. The double-glazed windows are sealed, and therefore the balcony will be “warm”. Finishing is also carried out only on the floor, part of the facade wall and the ceiling. If desired, you can arrange a balcony with a roof made of transparent material, for example, polycarbonate.
Glazing when expanding along the window sill
Balconies with sill extensions are usually equipped with lightweight aluminum frames. In this case, a very important step is the calculation of the frame. The drawing is carried out taking into account all the design features of the balcony itself, as well as the type of future glazing. Aluminum frames usually weigh much less than PVC or wooden frames, and therefore place less stress on the modified parapet.
Some apartment owners are interested in the question of whether it is possible to increase the balcony along the parapet by a very large distance. Experts do not recommend making the extension more than 40 cm in this case. With a greater distance, there is a risk of the structure collapsing after glazing. The frames are installed on a profile that runs along the outer contour of the frame.
Glazing using aluminum profile when expanding along the window sill
Glazing of balconies with extension (photo can be seen above) if heavy PVC or wooden profiles are used, requires the installation of additional fasteners. At the same time, racks made of angle steel are welded onto the corners of the external contour profile, as well as at the corners along the wall. A metal circuit is mounted on top. The posts located inside the balcony are securely attached to the wall with anchors.
Thus, it is better to carry out the removal of a balcony with PVC glazing or using wooden Euro-windows along a load-bearing slab. Moreover, the French method has become very popular recently. When installing “cold” glazing, it is worth making an extension along the window sill.
Combining a loggia with a room
Unfortunately, in most cases, it is impossible to completely combine a balcony with a living room. But if you are the owner of a loggia, then you can do this without much difficulty. But this option is already a redevelopment - a change in the window and door opening. So you will need to obtain the appropriate permits from the housing inspection.
Work on insulating such a loggia is generally no different from insulating an ordinary balcony. But the floor level, which on the loggia is usually lower than in the room, will have to be raised. The easiest way to do this is by dry screeding the floor or installing joists, between which the insulation will be laid.
Balcony extension
Expanding the balcony is a popular procedure today that allows you to increase the area of the room.
The owner of an apartment in Khrushchev may have a desire to expand the premises, since the area there is small, and the presence of a balcony is a good way to increase it. You can enlarge the room yourself or by turning to professionals for help.
Light work that does not require additional permission is carried out independently. For example, such a procedure as increasing the window sill with certain knowledge and skill is quite accessible to any person.
In old houses, even minor changes need to obtain permission from the relevant authorities. In the “Khrushchev”, by law it is allowed to increase the balcony on all sides by a maximum of 50 cm. There are cases when the increase was carried out over a greater distance. Without obtaining permission, you can expand by 15-30 cm along the base of the slab.
Professional consultation is required for any significant design changes. All stages of increasing the balcony floor and replacing the parapet must be carried out in high quality and with high-quality materials.
How much can you enlarge a balcony without permission?
Before you begin implementing a project to increase the area of your balcony, you need to make sure that all operations will be carried out legally. There are various options for increasing the balcony with or without approval. First of all, you need to decide how many centimeters the increase will be made.
The balcony can be increased by 15-30 cm without permission from the management organization
If you plan to increase the balcony by 15-30 cm with the installation of remote glazing, placement of an insulation package and cladding, then there will be no problems with increasing the area.
If, when enlarging the balcony, large loads are expected on the load-bearing structures of the walls, if additional structures are attached to the balcony slab: external frames or brackets that increase the dimensions of the slab, etc., then permission must be obtained to perform such operations.
Getting permission
In some cases, to reconstruct a balcony, you need to obtain permission from various organizations: design organization, BTI, Gorekspertiza, Ministry of Emergency Situations, fire inspectorate and others.
- If the house in which the balcony is being expanded is an architectural asset, its future appearance must be agreed upon with the relevant organizations.
- Installation of a concrete base is considered redevelopment. In the case of installation, you need to obtain permission regardless of the size of the balcony increase.
- In Khrushchev, permission must be obtained if the expansion is made by more than 50 cm.
- The balcony fencing is attached to the walls of the house, so the condition of old houses must be checked before reconstruction.
- In addition to the size of the balcony increase, you need to pay attention to the weight of additional structures. If large loads are expected on the walls of the house, then the procedure also needs to be agreed upon by various authorities.
- All checks before expanding the balcony are carried out for the sake of safety and comfort: your own and those around you.
Despite the fact that the balcony is part of the apartment, that is, personal property, it belongs to the common property of the house. Its changes affect the appearance of the house. Enlarging the concrete base can limit light access to neighbors below. Errors in work can lead to cracks in neighbors’ walls and other undesirable consequences.
Therefore, in addition to agreeing on all the requirements according to GOST, you need to discuss the project with your neighbors.
Extension along the window sill
Expansion can be done by increasing the outer window sill. In this case, the base of the balcony is not expanded, but an inclined structure is installed, which goes from the floor to the enlarged window sill.
The walls of the balcony can ultimately be not only inclined, but also rectangular or any other, that is, look like a ledge. This expansion creates the appearance of increased space, and at the same time the wide window sill becomes an additional place where you can put things, place pots of flowers, etc.
Extension along the window sill does not involve increasing the floor, so permission is only needed if the house is old and requires inspection.
Often such an expansion is made during glazing and cladding of the balcony as a design option and additional convenience.
- In addition to this visual expansion, you can add panoramic glazing, which will allow a lot of light into the room, and, therefore, the room will look larger.
- The base of the future window sill is created strictly according to the level.
- If the fence is metal, then the structure is welded to it, and the concrete fence is connected to the structure using anchors.
- After the structure is installed, the window sill is installed, covered, finished with selected materials and glazing, if planned.
Extension by floor
Extension along the floor is much more difficult to perform than along the window sill.
- Increasing the floor involves dismantling the concrete base, for which permission must be obtained.
- If dismantling is not carried out, but a future floor structure is installed on the base, not exceeding half a meter on each side of the base, then permission is not required.
- To begin work, the parapet or old structure is removed, and the concrete base is repaired or dismantled. A durable metal structure is installed on top or around it, which is attached to the concrete and walls of the house using anchors. A metal pipe is used for reinforcement.
- After the structure is installed, cladding, finishing and glazing are carried out.
Butterfly
Butterfly technology is another way to expand the room. Additional space is created by triangle-shaped blocks, which are located on both sides of the balcony.
This design can be created by expanding the window sill and floor.
- In one case, a solid structure is created by increasing the floor and adding two side window sills. The bases of the window sills are attached to the wall of the house and the main overall structure.
- In the second case, the floor is not increased, but window sills are added to the overall structure.
The “butterfly” technology, as well as the expansion along the floor, can include not only the free space around the house, but also the windows of other rooms. This choice depends on the internal layout and interior of the apartment. During the general redevelopment of the apartment, the lack of light can be compensated by increasing the window opening.
Corner designs
Corner design is a rarer option for expanding a balcony. It can be carried out by the owners of those apartments that are located in the corner parts of the house or in private houses.
An extension can be considered an increase in an already existing corner balcony by creating an additional part of the balcony using any of the first three methods.
Algorithm for obtaining approval documentation
next:
The balcony has been expanded quite a bit, but living has become more convenient!
1.
Order a balcony reconstruction project from a design organization that has the appropriate license.
2.
Coordinate the project with the organization that designed your house. As a rule, you will be required to approve this approval at Mosgorekspertiza (Second Brestskaya Street, 8). It is possible that you will have to pay for the expert’s work out of your own pocket.
3.
Submit the project along with documents confirming your ownership or lease, social tenancy for the apartment to which the balcony is adjacent. Attach to them a single housing document (issued by the district Unified Information and Settlement Center), a technical passport from the BTI, and an application for a permit.
4.
If your project does not raise fundamental objections, then it will be necessary to continue approval according to the register that will be proposed by the housing inspectorate. Surely it will include the Ministry of Emergency Situations (the main department for Moscow is located at Tverskaya street, building 8/2; tel. 624-89-53; the coordinating authorities of territorial divisions are, as a rule, in prefectures). Firefighters should check whether the alterations you have planned will not interfere with the evacuation of people in the event of a fire, etc.
If you live on the ground floor and are making a foundation to support the balcony, then coordination with gas and energy services will be required to ensure that you will not block access to their communications.
An artistically designed extension of the balcony will only decorate the building
If you live in a house of historical value, you will need approval from the Department of Cultural Heritage of Moscow (Pyatnitskaya St., 19).
In the event that the expansion of the balcony occurs as part of its connection to the residential premises of your apartment, then a number of additional approvals will be required, which are listed in more detail on our website.
5.
It must be remembered that, according to the current Housing Code, a balcony (loggia) is not part of the apartment. It is part of the common property, which is managed on behalf of all residents of the house.
That is, by reconstructing the balcony, you infringe on the rights of other residents of the house to manage this property. If at the same time they suffer any real damage (cracks in their residential and non-residential premises, a decrease in the light flux into the windows of their apartments, etc.), then the court will definitely side with them.
It is the neighbors' claims that are the main reason why the courts force the dismantling of all those structures through which you will be able to increase the area of the balcony or loggia. The most obvious examples of this are: a court decision in Chelyabinsk, which forced the dismantling of additional space and utility lines installed on the balcony following a complaint from a neighbor, whose apartment wall had cracks; a court decision in Vladivostok requiring the balcony to be restored to its original condition in connection with a complaint from a neighbor who complained about the deterioration of the lighting in her apartment.
Therefore, obtaining consent for the reconstruction of the balcony from all residents of the house is a mandatory condition for obtaining permission to increase the area of the balcony.
How to increase the balcony with your own hands
Article Photo Video
Often, a balcony in typical high-rise buildings raises questions about the purpose of its creation. Conceived by the designers as part of the exterior and interior comfort of the building, this element still requires improvement. For this purpose, the opportunity to increase the balcony area and thereby expand its functionality is used. In this way, the apartment owner can create additional space: an office, a recreation room, a greenhouse, etc.
Attention! Expansion of the balcony from the facade and ends by more than 0.3 m requires approval from the relevant authorities.
The idea of increasing the balcony with your own hands is quite feasible, especially if you have experience in welding and a smart assistant. Materials are selected depending on the point of removal, having previously created a project (drawing) of the future structure. Two structural methods of expanding the area are widespread: from the load-bearing slab (sole) and from the parapet (upper level of the railing). The first method is more labor-intensive, but allows you to get an additional 2 square meters. m area.
Advice! Before you begin to increase the area, it is worth familiarizing yourself with the safety precautions for welding and high-altitude work.
Design Features
Glazing a balcony in a Khrushchev-era building with a roof, and even in an insulated version, will require significant costs. Making a modern closed balcony in a Khrushchev-era building is much more difficult than inserting a window into a loggia.
Remote old structures sometimes cannot withstand heavy loads. It is necessary to insure yourself against such troubles. The load-bearing slab must not be overloaded until reinforcement has been completed.
The interfloor ceilings of Khrushchev-era buildings are rarely in good condition. Concrete will develop cracks over time. If there are cracks 1 cm deep, the concrete must be restored. Sometimes traces of rust are visible on the surface. They signal that the integrity of the reinforcement is also compromised.
Gutters for water drainage are not always in good condition. If they are not there, you need to make new ones. One more point: it is necessary to level the slope of the floor. The slabs were made with precipitation in mind, so there is always a slight tilt. It's noticeable right away.
Gutters for water drainage are not always in good condition. If they are not there, you need to make new ones. One more point: it is necessary to level the slope of the floor. The slabs were made with precipitation in mind, so there is always a slight tilt. It's noticeable right away.
Creating the necessary safety margin is the first stage of installation work. Do-it-yourself glazing of a balcony in a Khrushchev-era building begins with repair work: strengthening the concrete and railings. The strength of the slab will be increased by rolled steel reinforced at the bottom. Supports made of metal corners provide the necessary reserve of strength of the external structure.
The dimensions of the future “apartment veranda” are being thought through. Installing a balcony with a remote installation will require additional fastening structural elements.
If the apartment is on the fifth floor of the building, a canopy is placed over the stove. A balcony with a roof must withstand snow loads; for this you need a strong canopy and rigid supports. It is necessary to comply with SNiPs: the maximum design load should not exceed 100 kg per 1 m2, taking into account decoration, furniture, and the weight of residents. The recommended specific load is even less, no more than 65 kg.
When decorating a Khrushchev balcony, they think about attaching the required parts. These are window sills, protection from moisture in the form of awnings, and drainage is provided on the upper floors.
Step-by-step removal from the load-bearing slab
The method allows not only to enlarge the balcony in the Khrushchev-era building, but also to make a major overhaul of the load-bearing slab, the condition of which, as a rule, leaves much to be desired.
- Using a grinder and a hammer drill, the old railings, previously tied with a rope (to prevent falls), are dismantled.
- On both sides of the load-bearing slab, channels are mounted into the wall at the level of the length and width of the frame. To strengthen the sole, metal profiles are also hammered above it.
- The ends of the elements are connected with a steel angle along the load-bearing slab and at the ends of the driven beams.
Advice. If there are doubts about the reliability of the sole, then it is necessary to install additional supports. When increasing the balcony area on the second floor, they are installed in the ground, provided that they do not disturb anyone. If the balcony is on the ground floor, then, in agreement with the administration, it is possible to equip a cellar, the brick walls of which will be a reliable support. On the remaining floors, “heels” are additionally attached under the load-bearing slab.
- A new parapet is welded from steel strips.
- The floor is mounted - metal strips are welded to the frame, to which sheets of galvanized sheet are attached. If desired, lay polystyrene foam, mineral wool (any insulation material), then cover it with boards.
- Weld the frame for the glazing and the canopy.
- Install the canopy, which should protrude 0.3 m above the parapet.
- The balcony is glazed, the roof, walls and parapet are insulated. They produce external and internal finishing.
Glazing of a balcony in Khrushchev
The small size of balconies in old houses makes it a little difficult to manufacture window frames and install them.
Based on the purpose of the new balcony area and financial resources, you can choose one of the following types of balcony glazing in Khrushchev:
Glazing a balcony in a Khrushchev building is not a luxury, but a necessity
Aluminum window systems are light, durable and practical, but are suitable if the balcony is not combined with the living area, because... Windows are not able to retain heat during the cold period. Thanks to modern technologies, aluminum frames began to be produced with additional insulated inserts.
As a result, the weight of the profile does not increase much, but the thermal insulation becomes noticeable.
PVC systems are the most popular and affordable. Optimal price, high wear resistance to external environmental factors and excellent operating quality allow customers to make a choice in their favor. But before installing plastic windows in a Khrushchev-era building, you need to “weigh” everything, because PVC is a heavy material that not every structure can withstand, especially not a Soviet balcony. Experts recommend the installation of such windows in both residential and non-residential premises with two- or three-chamber double-glazed windows.
Wooden windows are the best, but expensive option. Due to its environmental friendliness, high thermoregulation and beautiful appearance, wood is inferior in wear resistance. Humidity and sudden changes in temperature over time can lead to deformation of wooden frames, their disintegration, resulting in disruption of the temperature regime in the premises.
An important role in arranging a Khrushchev balcony is the installation of windows
Wooden window systems are the preferred option for Khrushchev houses.
When choosing a natural type of system, you should choose frames in favor of oak or coniferous species. In addition, they are easy to install yourself, which will save the family money.
Panoramic or frameless glazing is rarely used due to low thermal insulation.
But such systems have many additional advantages.:
- Wide view;
- Light weight;
- Strength;
- Creation of additional balcony area;
- Saving on finishing and decor.
Step-by-step removal from the windowsill
The expansion of the balcony, starting from the window sill, is carried out using two methods - using a frame or brackets. The frame is welded if metal structures serve as the parapet. In this case, a preliminary calculation of the strength and weight of the structure, taking into account the glazing, is also necessary to avoid unnecessary load.
Extension from the parapet using a frame
- The supporting plate is reinforced with a metal profile - the sole is scalded with it. The old railings are cut off and the parapet bars are reinforced with spacers.
- Jumpers of the length by which the area is planned to be increased are welded onto the railing every 0.4 m (approximately).
- By welding a steel strip to the ends of the jumpers, they are combined into a circuit.
- Install external spacers connecting the load-bearing slab and the contour opposite the window sill.
- The frame for the glazing and the canopy are welded and installed.
- They carry out glazing, insulation, exterior and interior finishing.
Extension from the parapet using brackets
The method is used if the parapet is made of a concrete slab or brickwork.
- Steel brackets, welded independently from angle or steel strip, are attached to the parapet with anchors or bolts at an angle of 90°. If you plan to use summer glazing using a lightweight aluminum profile, then installing corners instead of brackets is acceptable.
- The brackets are combined with a steel profile, creating an external contour.
- Glazing and finishing works are being carried out.
Advice. To determine the evenness of the surface, it is advisable to use a long, 2-meter level - this will reduce the likelihood of problems occurring during further work (glazing).
The procedure for obtaining permits for the reconstruction of a balcony
Permission to glaze a balcony should be obtained before installation; if changes are made to the project during the design process, the glazing or balcony block will have to be dismantled.
Rice. 7 Consequences of a decision to illegally repair or expand a balcony
This procedure is not much different from obtaining a permit for redevelopment inside an apartment; the actions can be divided into the following stages:
1.Drawing up a project
Typically, glazing is carried out by hired specialists from specialized glass installation companies, so there is no need to draw up drawings yourself or ask the residents of a house with permitted balcony glazing for them - they can be obtained from the company with which the contract for the work has been drawn up.
It should be taken into account that organizations with an SRO certificate are allowed to work on external glazing.
Obtaining a house plan from BTI
You need to get a floor plan of the house from the technical inventory bureau; if you don’t have a technical passport, you can get a copy from the BTI. The technical passport contains all the information necessary for the work (apartment plan indicating dimensions, year the house was built, etc.).
Project organization
This structure issues a conclusion on the constructive feasibility of installing balcony glazing while ensuring the appropriate safety standards.
Rice. 8. Permitted work on the balcony that increases its area
APU
Architectural planning control is the main obstacle to the intended glazing project. Obstacles may arise in the implementation of the color scheme of the finishing material and frame if they differ from the main color of the facade. Questions may arise about the relief of the balcony cladding, the configuration of the window sashes; the greatest objections are caused by the newfangled remote glazing.
Frameless way to increase a balcony from a load-bearing slab
This method is less labor-intensive than a frame method, and is ideal for independently enlarging a balcony in a Khrushchev-era building.
- The railings, parapet, and old screed are dismantled down to the reinforcement at the top and bottom of the slab.
- The base is primed. Using a rust remover attachment on a drill or screwdriver, the fittings are cleaned. After re-priming, the reinforcement is degreased with a solvent.
- Formwork for conventional or self-leveling screed is created on the load-bearing slab. The recesses on the bottom of the slab are sealed with finishing glue (you can also seal the slab from above, on a neighbor’s balcony).
- An enlarged base of the required length and width is cut out of OSB sheets 2.5 cm thick, as well as a roof, which are mounted to slabs with a layer of hydrobarrier film using anchor bolts. If desired, you can also make the sides of the balcony from OSB boards.
- Glazing, exterior and interior finishing work is being carried out.
Advice. Sheets of oriented strand board should be painted with water-based paint before installation to protect them from moisture. For facade finishing, you can use siding, corrugated board and other finishing materials.
Not everyone wants to use additional meters to organize a greenhouse, recreation area, etc. - some will prefer to enlarge the room by adding a balcony. In this case, partial or complete dismantling of the dividing wall and installation of a heating system will be required.
Attention. Any redevelopment requires the creation and approval of a project and obtaining permits. If only the window and balcony door were dismantled, and the window sill wall was left, then permission will still be required to move the heating radiator. Therefore, legitimizing alterations cannot be avoided, even “retroactively.”
It is also a good idea to enlarge the kitchen with a balcony - given that the kitchen space in Khrushchev-era apartment buildings is on average 6 square meters. m. Regardless of which room the balcony is combined with, it is worth considering a number of rules:
- before demolishing the window sill wall, the balcony must be glazed and insulated;
- the threshold between the balcony and the living space must not be dismantled if it holds the load-bearing slab;
- if the wall between the room and the balcony is load-bearing, then the upper lintel and side walls cannot be dismantled;
- You should not lay a warm water floor on the attached balcony - it is better to replace it with an electric one.
- Tinting of balconies and loggias
- Differences between a balcony and a loggia
- Beautiful fire escape on the balcony
- The balcony door does not close: reasons, solutions
Discuss the article on the forum We recommend
Popular posts
- Chair for dressing table Chairs for dressing tables in Moscow - 189 Products Company from Moscow, delivery 29643 a In…
- Silicone sanitary sealant Silicone sanitary sealant white in Moscow - 1491 products Company from Moscow, delivery (tomorrow) 140...
- Shelf in the hallway Currently, there are a huge number of different options for shelves in the hallway, and this is directly ...
- Insulation of the floor in a wooden Insulation of the floor in a wooden house from below: materials and installation technology SHARE ON SOCIAL NETWORKS One of the common…
Why LOGICPIR Balcony?
What materials can be used to insulate a balcony?
- Fibrous - very warm, are light bulky materials, quite soft. Requires installation of sheathing. They crumble during work and require the use of PPE (examples: mineral wool, glass wool).
- Sprayed - applied by spraying special substances onto the surface to be insulated. They are difficult to operate, require the use of expensive equipment and cost a lot of money (for example, sprayed polyurethane foam).
- Reflective type - foil-coated materials that reflect heat into rooms (for example, foil-coated basalt wool, foil-coated polyethylene foam, PIR boards).
- Slabs are dense, regular geometric slabs. They are easy to use, do not crumble, and retain heat well (examples: regular and extruded polystyrene foam, DFIP, wood concrete insulation, PIR boards).
Each material has a set of advantages and disadvantages. There is no ideal insulation option, but we are inclined to use slab materials on an inorganic basis: they meet almost all of the requirements listed above.
The best option for insulating a balcony is PIR boards. They are made of polyisocyanurate - hence the prefix “PIR” in the name of the insulation (this is what this thermosetting polymer material is called). This material is quite rigid and consists of a mass of small closed cells. In composition and a number of its properties it resembles polyurethane foam.
Another feature of PIR boards is the presence of facing material. That is, each slab is not just made of polyisocyanurate, but also has a special technological coating. This can be paper, aluminum laminate (for floor screed), fiberglass and foil. The best cladding option for insulating material to be used on the balcony is aluminum laminate or foil. Foil is a wonderful vapor barrier. It is thin but very effective and is an ideal sealed barrier to thermal energy. A separate layer of vapor barrier material is not needed if there is such a coating on the insulation slab - just carefully seal all the joints between the slabs with metallized tape.
PIR boards LOGICPIR TECHNONICOL
For insulation of balconies and loggias, we recommend LOGICPIR PIR boards. This is a modern and energy-efficient insulation, very thin and durable, with an outer foil layer. Its advantages are as follows.
- Excellent heat retention - the thermal conductivity coefficient is only 0.022 W/m*K. A special puzzle-shaped end edge will create a continuous thermal insulation layer.
- Lightweight - one PIR board weighs about 0.5 kg, which means that such insulation does not place additional load on supporting structures and is convenient to work with. A package of 12 4 cm thick slabs weighs about 9 kg.
- It does not absorb moisture, does not accumulate it, which means it will not lose its properties due to getting wet.
- Does not spread flame, has self-extinguishing properties.
- Easy to install: it is light in weight, easy to cut if necessary, does not crumble and does not require the use of protective equipment during operation. There are also special markings on the surface of the slabs that make cutting the material easier. All insulation work can be done independently, without involving specialists - another cost saving item.
- Durable - service life more than 50 years.
- It is safe for health, as it does not release any harmful substances into the environment.
- Withstands a significant temperature range without loss of characteristics (from -65 to +110 °C).
- Very thin, which means it will not take up free space on the balcony.
- Dense - for its installation you do not need to pre-make a lathing, since the density of the material is 150 kPa.
LOGICPIR PIR boards have a foil layer.
One of the main advantages of the LOGICPIR PIR board is the presence of a foil layer on both sides of the insulation. That is, the material does not need to lay an additional layer of vapor barrier during installation - it itself plays the role of a vapor barrier layer and will not allow condensation to form on the building structures of the balcony and inside the insulation. This means that mold and mildew will not appear on the balcony, the insulation itself will not become damp and will not lose its properties due to getting wet.
The foil also reflects the heat coming to it, that is, it redirects it in the opposite direction, into the room: thermal energy simply cannot pass through the foil layer and will be stored in the house. Thus, the use of LOGICPIR PIR boards is not only a way to insulate a balcony or loggia, but also an opportunity to save on space heating costs.
On a note! According to GOST R 56734-2015, the material is LOGICPIR Balcony - full-fledged reflective thermal insulation.
PIR boards from several manufacturers are currently available on the market. But it is the LOGICPIR Balcony PIR boards that are designed specifically for internal insulation of balconies and loggias.
Installation of LOGICPIR slabs Balcony
Using an example, we will show how easy it is to insulate a balcony using LOGICPIR Balcony PIR boards. To do this, you will need the insulation boards themselves, LOGICPIR adhesive foam, plastic disc fasteners, metallized tape, guides for finishing, material for finishing sheathing (for example, plasterboard), wooden blocks and slabs such as CSP, OSB for creating the base sheathing or cement-sand mixture for making cement screed.
Step 1. Prepare the insulated surfaces. Be sure to remove old finishing materials, debris, and mold if there is any on the walls. Let's assume that our balcony is already glazed, but if the glazing work has not been completed, then it needs to be done before the preparatory stage. It is also recommended to treat concrete surfaces with products that prevent the development of mold.
Prepare insulated surfaces
Step 2: Level the subfloor if the elevation changes are too great. This can be done using a wooden sheathing with variable height bars or by making a screed: cement-sand or dry from gypsum fiber board, DSP, OSB. Each method has its pros and cons, but the easiest way is to do the last option: the work is done quickly at any time of the year, there is no extra dirt, and there is no need to wait for the screed to dry.
Level the subfloor
Step 3. Now you can insulate the balcony. Start with the walls: fix LOGICPIR PIR boards using disc fasteners, starting from the bottom of the wall. Fastener consumption - 2 units per slab. Install the fasteners closer to the central part of the slab.
Fix LOGICPIR PIR boards using disc fasteners
Step 4. Align the joints of the already fixed and the next slab and fix the last one to the wall. In this way, sequentially cover all the walls, if necessary, cutting the LOGICPIR slabs to the required dimensions with a construction knife.
Cover all walls with slabs
On a note! Plastic facade fasteners can be replaced with mounting foam or special adhesive foam LOGICPIR, but this method can only be used in the warm season. By the way, do not forget to foam all the cracks between the slabs and insulated surfaces to increase thermal insulation, using LOGICPIR foam adhesive.
Step 5. Glue the joints between the PIR boards with aluminum tape. Then a sealed vapor-tight layer is formed.
Glue the joints between PIR boards with aluminum tape
Step 6. Lay the thermal insulation boards on the previously prepared base, aligning the joints in the same way as in the instructions above, gluing them with tape. Do not use additional fasteners on the base. Cover the ceiling as well as the walls, using plastic fasteners.
Insulate the base
Step 7. Now you can begin finishing the balcony. The sheathing for plasterboard, wall panels, and lining is attached to the surfaces directly through the thermal insulation boards.
Important! Insulating a balcony, like its glazing, does not require coordination with utility services and housing inspections. The main thing is to calculate the load on the balcony slab in advance and compare it with the permissible one. And remember - it is prohibited to demolish the wall between the balcony and the apartment without approval! If you want to attach the balcony to the room completely, without partitions, then you will have to collect the relevant documents, prepare a project and approve it with the housing inspection. Otherwise, the redevelopment will be considered illegal and will entail a fine.