Design options for plasterboard ceilings
There are different designs for plasterboard ceilings to suit different spaces. The initial stage of apartment renovation is drawing up a plan. Often, many spend hours on the Internet searching for interesting and original solutions before going to the store for building materials or picking up tools.
Even if a specific room design has been chosen, many amendments can be made during the renovation process, so it is often difficult to immediately imagine what the final version will be like. It is also not easy to choose the design of plasterboard ceilings for rooms.
Plasterboard ceilings are made in the following cases:
- If it has irregularities (displacement of reinforced concrete slabs relative to each other).
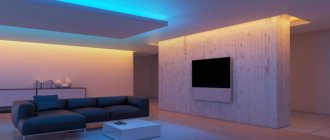
- If you need to create unique lighting in a room, which, for example, may consist of point light sources and a regular chandelier.
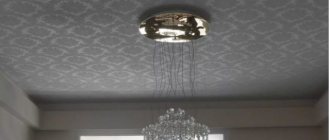
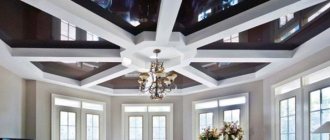
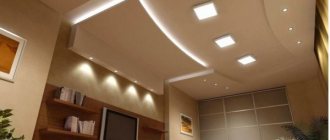
- To obtain a unique decorative ceiling consisting of two or more tiers (levels). In this case, the unique design of a multi-level plasterboard ceiling is welcome.
- In case of zonal division of a room or premises.
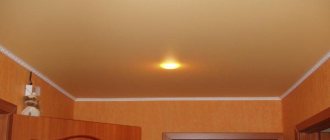
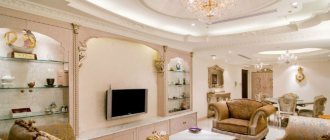
One of the simplest options for decorating the ceiling of a room is a single-level plasterboard ceiling. This is an excellent option for rooms with low ceilings. The design of a single-level plasterboard ceiling does not provide for an abundance of solutions, but if you use a ceiling plinth around its perimeter to hide the LED lamps, you can get a ceiling no worse than a unique multi-level one.
Lighting plays a big role in the design of plasterboard ceilings, since correctly installed lighting elements allow you to look at the interior differently, expressing its peculiarity and individuality. The options are very diverse and can include either single spotlights or a chandelier, or a combination of both.
An abundance of different design options for plasterboard ceilings is presented in the photo galleries below. Perhaps you will like one of them and become the basis for the ceiling in any room of the apartment. But first you need to know how they are installed.
Plasterboard and suspended ceilings - combinations and installation methods
In harmony of all planes
The combination design: suspended ceilings and plasterboard has gone through the stage of experimentation and taken its rightful place in modern construction. Practice has shown complete compatibility of various materials, which does not cause any difficulties in how the suspended ceiling is attached to plasterboard. In terms of structure, installation, aesthetic appeal and other indicators, each type has its own undeniable advantages. Combined together, two different technologies have become incredibly popular and in demand among true connoisseurs of beauty and unusual design solutions.
How tension fabric and drywall are combined together: options, advantages, design, room preparation
Both systems have a number of specific advantages, such as:
- Drywall and suspended ceilings together have no restrictions in the choice of premises, have a long service life, and a long time without repair work.
- They provide additional sound and heat insulation, hide defects in floors and technical communications.
- When combining a stretch ceiling with plasterboard, it is possible to construct any shape (arches, vaults, waves, other complex shapes and curved surfaces), due to the flexibility of the material.
- A wide range of colors and a variety of textures of stretch fabrics give the room comfort and coziness. In combination with built-in or open lighting of varying intensity, an infinite number of variations in the organization of absolutely any structure arises.
- It becomes possible to create multi-level systems, zoning a room, visually adding height to a room, and expanding its volume.
- Simple installation of additional devices (audio systems and stereo speakers) into a suspended ceiling with plasterboard will help achieve stunning acoustic effects.
- In one design it is possible to combine different colors of canvases combined into one composition. Various finishing methods are used on one plasterboard ceiling (for example, wallpaper and decorative plaster).
- Photo printing looks good. Islands, “circle within a circle”, “figure within a figure” compositions are constructed. The lighting uses chandeliers and spotlights of different intensities, located at different levels, tension and plasterboard.
Original design with painting
Suspended ceiling with plasterboard and its design
The installation of a suspended ceiling with plasterboard is preceded by a detailed development of a design project, which takes into account:
- features of the base plane;
- position of attachment points;
- location of lighting fixtures;
- heating pipes;
- electrical cable laying diagrams;
- alarms;
- ventilation ducts;
- air conditioners;
- chimneys and other communications;
- calculation, purchase and delivery of building and consumable materials necessary for the construction and their price are carried out.
Advice: Saving on cheap, low-quality building materials always entails negative consequences.
Stretch ceilings with plasterboard: preparatory work before installation
So:
- If you have a secondary market premises and are undergoing major renovations, then before installation, as much as possible, the premises are cleared of furniture and interior items, especially those that are sensitive to high temperatures.
- It is recommended to remove old paint, whitewash, plaster, and wallpaper from the ceiling in both new and old rooms; the surface is pre-treated with a primer.
- During further operation, this will eliminate the appearance of dust in the room and give the ceiling hydro- and vapor-protective properties.
- Since suspended ceilings with plasterboard are installed together, i.e. combined multi-level ones, installation should begin with installing a profile frame and covering it with sheets of plasterboard. At a subsequent stage, a fastening strip for the tension web will be mounted to them. To install a plasterboard structure, markings and clear instructions are required.
Plasterboard and suspended ceilings: installation stages
Horizon marks are marked at corners on mating walls using a laser level or hydraulic level. The horizontal control line is marked along the marks with a painter's chalk cord. Also, on the ceiling and walls, using a marker, pencil or chalk, using a tape measure, square, laser level or templates according to the project drawing, the configuration of future load-bearing structures is marked, see photo.
Marking the ceiling for the suspension system
How tensile structures are made in combination with drywall
Metal frame structure:
- Along the control lines, the starting UD profiles are attached to a 6/40 mm dowel-nail using a puncher. The first nail is 10 centimeters from the edge of the profile on each side.
- Subsequent ones - every 40 centimeters, and the edges and middle of the plasterboard should be located on the main guides.
- The main guide CD profiles are attached to the starting profile at a distance of 60 cm using metal screws. Two hardware on each side,
- The main guides are fixed to the U-shaped suspension with a screwdriver.
- The hangers are pre-attached to the ceiling every 60-70 cm on dowel-nails (40 mm) using a hammer drill.
- During work, using a construction nylon cord stretched under the profiles, the horizontalness of the structure is constantly checked.
- To give the structure strength and the necessary rigidity, transverse profiles (stiffeners) are attached between the guide profiles at a distance of 40 cm.
- The metal profile is cut to size using metal scissors and attached with hardware to the main guides using cross connections (crabs).
- An additional embedded profile is installed at the intended junction of the tension material and the drywall.
- After installation of the gypsum board and finishing work, the suspended ceiling fastening strip will be mounted to it.
Metal profile according to gypsum plasterboard
For reference: The strength and reliability of the metal structure depends on the quality of work performed at this stage, which, in turn, affects the quality and reliability of suspended and plasterboard ceilings, as well as the design of suspended ceilings with plasterboard.
Installation of plasterboard construction
Drywall is easy to process and quite simple to install, however, maximum accuracy and accuracy of the work phase will allow minimizing subsequent finishing operations:
- The standard size of ceiling plasterboard is 2500*1200*9.5 mm. When installing entire sheets on the ceiling, the help of auxiliary workers is not excluded. This will ensure greater installation accuracy and reduce the risk of damaging the gypsum board when lifting.
- Beforehand, to ensure greater hydro and vapor barrier, it is recommended to treat all sheets with a primer on the reverse (inner) side.
- To make the junctions of adjacent sheets less noticeable, they are placed along the direction of the natural light source (window).
- To reduce the possibility of deformation due to temperature changes or exposure to humidity, a gap of at least 5 mm must be left between the sheets and the walls.
- The standard gypsum board fastening system provides for transverse fastening to the main guide profiles.
- The gypsum board is attached to the frame using metal screws 25 mm long using a screwdriver.
- The optimal distance between two adjacent screws is 20-30 cm. The head of the screw is recessed into the drywall by 2-3 mm. To do this, it is rational to use an attached bit with a lampshade.
- A nozzle of this type fixes the depth of the self-tapping screw in the gypsum board without damaging the paper.
- In the sewn-on sheets of plasterboard, using a special nozzle (ballerina), holes are made for lighting elements, communication lines and other technological holes required for the project.
- In a combination of plasterboard and stretch ceiling, when used in conditions of high humidity (bathrooms, swimming pools, bathhouses, gazebos), moisture-resistant gypsum board with a thickness of 12.5 mm is used.
Drywall installation technology
Advice: It should be taken into account that with an increase in weight due to the use of moisture-resistant plasterboard boards, the load on the metal structure increases. It should be strengthened first.
- When making complex structures (arches, waves, domed vaults and other curved shapes), arched plasterboard with a thickness of 6.5 mm is used. Arched plasterboards are not designed for heavy loads.
Combination of stretch fabric and plasterboard: finishing operations and fastening systems
A professionally installed plasterboard ceiling does not require plaster. Painting work should begin by priming the plasterboard systems. After final drying, the joints, gaps, drywall joints, and places where screws are sunk are puttied using painting spatulas with gypsum putties.
Joints, gaps and corners of complex structures are additionally strengthened with a special sticky reinforcing mesh. Complex non-linear corners are covered with a special arched corner. After this, the plasterboard surface is sanded and primed for painting or wallpapering. A plasterboard ceiling with a tension ceiling is combined as follows:
- Compared to plasterboard structures, the installation of suspended ceilings is much faster.
- The canvas does not require any finishing. It is advisable to carry out installation upon completion of all finishing work in the room.
- To avoid damage, during installation, double-glazed windows are covered with plastic film using masking tape.
- The level of the plane of contact of the stretch ceiling sheet to the plasterboard is initially calculated in the project, taking into account the length of the base of the built-in lamps, the presence or absence of a chandelier and other technological indicators.
- Using a screwdriver and self-tapping screws every 10 cm (more often at joints), the fastening aluminum (or plastic) profile of the stretch ceiling is mounted to the plasterboard structure so that the fixation plane coincides with the embedded CD profile of the plasterboard structure.
Plasterboard and suspended ceilings: methods of fastening
Plasterboard ceilings and tension material are installed in three ways:
- French;
- harpoon;
- Dutch harpoonless;
- cam fastening of the blade.
Requiring maximum precision, the “French version” is considered the most reliable and practical . Before drywall and stretch vinyl coverings are attached, the room is heated to 40 degrees with a heat gun. Fastening is done in diagonally opposite corners, while the film is heated to 60-70 degrees. The harpoon is driven with a spatula into a special groove in the profile until it snaps into place.
- At the same temperature conditions, suspended and plasterboard ceilings are installed using other methods. The canvas is stretched and fixed in the profile with special wedges or a bead using the harpoon-free method of tensioning the ceiling.
- The cam method is used on straight sections of the ceiling. Fastening to the profile is done using a special tape that provides tension on the canvas.
- After the room has cooled, the stretched vinyl sheets are mounted on the gypsum board, the sheet is first smoothed and stretched, and the excess material is cut off with a construction knife. Lighting fixtures are installed in the planned locations.
Methods of fastening a stretch ceiling
Fabric stretch ceilings and plasterboard systems are installed as follows:
- Fabric tension materials do not require high temperatures during installation.
- Installation is carried out from the middle of the profile gradually to the corners and from all sides simultaneously.
- The corners of the fabric fabric are fixed into the profile last.
- Use a hair dryer to smooth out possible wrinkles. Excess fabric is removed with a construction knife.
If the work is carried out correctly and accuracy in calculations and markings, thanks to the external aesthetics and positive characteristics of both systems, the ceiling structure will serve you for a long time.
Installation of plasterboard ceilings
For this, an aluminum profile is used, to which the sheets are attached with screws. The metal frame made of profiles is a lattice consisting of longitudinal and transverse elements. The connection of frame elements is made using special structures called “crabs” and screws. The end result should be a strong lattice that can support a fairly large mass.
The profile should be aligned using a level and a strong thread, which is pulled according to the markings. The gap between the slab ceiling and the suspended frame remains small, but can be increased depending on the lighting elements installed later.
Installation is carried out in the following order:
- marking the walls, tensioning the thread according to the level;
- preparation of frame elements and their installation;
- fastening sheets to the frame using screws;
- eliminating gaps at the joints of sheets;
- covering the ceiling with putty over its entire area;
- surface leveling;
- finishing using paints and varnishes.
To create a multi-level ceiling, it is necessary to mount a new frame on top of the already created level. New sheets of drywall will be attached to it. The process may seem complicated and time-consuming, but in fact even a non-professional builder can cope with this task.
Questions about installation technology
Any finishing work must be carried out after a complete study of the correct installation procedure, the characteristic features of the material and other important aspects.
Which drywall to choose
There are several types of drywall, from which you will need to choose based on operating conditions, room temperature and humidity conditions.
Types of plasterboard sheets
- Gray drywall. This type can be used in rooms where the humidity is at a normal level.
- Pink or light purple. Intended for areas of premises with high temperatures. They have the abbreviation GKLO and should be used if there is a stove or fireplace nearby.
- Green color means the material is moisture resistant. It is suitable for the kitchen or bathroom.
- Dark gray or blue. They are recommended for use in the kitchen because it combines fire resistance and moisture resistance.
- GKLA is used to make arched structures. The thickness of the plastic sheets is 6-7 mm.
How is drywall fastened?
GKL sheets can be used to decorate both walls and ceilings. That's why the technologies are different.
Metal profiles
In both cases, an aluminum profile or wooden blocks are used, which must be mounted on the ceilings at a distance of 35-45 cm from each other, and on the walls at a distance of 60 cm.
It is worth noting that, in addition to more material for plasterboard ceilings, you also need hanging profiles to attach horizontal ones to them.
Installation tools
Finishing work with plasterboard sheets requires absolute precision. Therefore, you need to use special tools to control the surface level and devices for marking attachment points.
- Building level.
- Square.
- Pencil.
- Roulette.
Determining the location of the fastenings is not enough; you will need to make holes in it, so you will need a hammer drill for stone walls. In addition, you will also need
- plane for wooden blocks;
- metal scissors;
- drywall cutter;
- screwdriver
Using these tools, it will be possible to securely attach the gypsum board to the surface.
What to cover first: walls or ceiling
Often the question arises about what is done first: walls or ceilings made of plasterboard sheets. Some recommend covering the walls first, others the ceiling first. It all depends on a certain procedure and method of attaching the frame to the surfaces.
But the best thing to do first is to attach the ceiling frame to the walls. If you initially seal the walls, this will not be possible.
Hallway 37 photos
The hallway is the room that guests see first. It creates a first impression and it’s bad if it wasn’t the best. All design elements are important here: furniture, various accessories, beautiful floors, walls and, of course, the ceiling.
Depending on the dimensions and height of the room, you can choose a unique design for plasterboard ceilings in the hallway, consisting of one, two or more levels. Only the imagination of the ceiling designer is the limit for choosing a specific style. Well, and the financial capabilities of the owner of the premises.
Those who have a small hallway and a low ceiling should try to visually enlarge the room and make it comfortable and cozy for guests. A single-level ceiling is most suitable. Although it may seem quite simple, it gives good room for original solutions.
The design of single-level ceilings in the hallway can be improved with the use of ceiling plinths. If desired, you can make a suspended gypsum structure, but it will be more practical and easier to use a plinth.
This ceiling in the hallway has the following advantages:
- made from environmentally friendly materials;
- easy to clean thanks to the water-based coating;
- allows you to hide electrical wiring lines, of which there are usually a lot in hallways.
To visually enlarge the hallway and make it more illuminated, it is recommended to choose light-colored coatings. If a chandelier is to be installed, which can be very useful in the corridor, it is necessary to provide an embedded part in the metal frame of the ceiling. The order of arrangement of point light sources is any, depending on the design idea. The design of plasterboard ceilings in the hallway, photos of which can be seen above, can be different and can be chosen to suit the taste of the owner of the house or apartment.
Installation of guide profiles
First, the PN frame profiles of the first ceiling level are installed. Holes are drilled at the base of the profiles: first at a distance of 10-15 cm from the edge, then after 60-70 cm. Through these holes, the places for drilling holes in the wall are marked. Using a hammer drill or electric drill, holes are made in the wall with a diameter of 8 mm, and dowels are inserted into them. Guide profiles are secured to the dowels with screws. This way the profiles are fixed around the entire perimeter of the room. Before attaching the profile, a sealing tape with an adhesive layer is glued to the outer surface of its base.
Profiles of the second level are attached according to the corresponding markings in the same way as the first level. With an angular arrangement of the second level, the PN profile is set only to the length and width of the platform.
When the second ceiling level is centrally located, guide profiles are not installed.
How to make two-level plasterboard ceilings without hiring builders? Let's understand the technology and you will see how simple it is. And as a bonus, I will write out a step-by-step algorithm, following which you can arrange beautiful ceilings in your house or apartment
Bedroom 52 photos
A person spends most of the time he spends in the bedroom sleeping, so the design of the ceiling in this room is of no small importance. When falling asleep and waking up, the first thing a person often sees is the ceiling. The use of plasterboard sheets to create a ceiling in the bedroom is the most optimal solution.
Since the ceiling in such rooms is usually high, it is possible to implement a plasterboard ceiling design in a multi-level bedroom. The arrangement technology has long been developed and there are many ready-made solutions; choosing materials of the required shape will not be difficult. All that remains is to install them.
You should choose the right color for the coating, which can act both calmingly, cause joy, relax, and promote aggression (in the case of red or its shades). Therefore, the correct choice of color is very important for the design of any elements of the bedroom interior and especially its ceiling.
You can see what a plasterboard ceiling in a bedroom looks like in the photo in the gallery above. In many cases, the design of ceilings is unique and very unusual, but their installation is somewhat more complicated.
Types of design solutions for combined ceilings.
The most common design, the creation of which combines materials, is a plasterboard box around the perimeter of the room. The tension structure is placed in the center of this box. There are many variations for this ceiling when creating an interior design. The desired result is achieved by placing hidden or obvious lighting at different ceiling levels. As an option, a base in the form of a circle or ellipse with a suspended ceiling in the center. Based on this design, designers can give the ceiling the appearance of a starry night sky or the sky on a sunny day.
view album in new window
In the photo: Bedroom interior in an apartment in the style of modern classics
Tablet-shaped design - this design is the opposite of the previous one. On the contrary, a round form of plasterboard is installed in the center of the ceiling, and the rest of the space around the perimeter of the room is covered with canvas. In the center, on a plasterboard base, you can mount a beautiful chandelier to illuminate the room.
view album in new window
In the photo: Living room interior in a classic style apartment
More complex are designs with curves and unusual shapes. It is extremely difficult to stretch the fabric over such structures; this requires precise measurements and highly qualified performers who are proficient in the use of complex installation technologies. In addition, it should be remembered that drywall is not a material with good flexibility and its bends have permissible limits.
view album in new window
In the photo: Living room interior in a classic style apartment
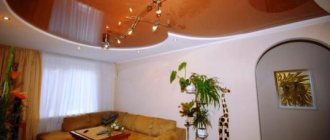
Living room 51 photos
A typical, boring living room ceiling that may be uneven due to misaligned tiles can be corrected by using plasterboard. The design of plasterboard ceilings in the living room can be of various types:
- use of a single-level design;
- creating a multi-level ceiling;
- combination with tension.
Using the latter option will give a unique look to the living room and surprise visitors with a bright and original design. The main thing here is not to overdo it, since the living room is intended for receiving guests and relaxing. The flashy colors of the ceiling design in the hall can spoil the impression of the entire room. To see options for a successful design of plasterboard ceilings in the living room, take a look at the photo above.
Bathroom 24 photos
The main reason why many will refuse the option of a plasterboard ceiling in the bathroom is the likelihood of flooding by neighbors. However, since this material is often used to level walls in such rooms, the risk of repair is basically the same.
The unique design of plasterboard ceilings in the bathroom will visually enlarge the space and give a cozy look to the room. It will allow you to hide elements of pipes and electrical wiring and it is very convenient to install lamps in it.
Light warm colors, greenish and yellow shades are most suitable for the bathroom. When combining white and black, you can set a strict style for the room. The plasterboard ceiling in the bathroom, the photo of which can be seen above, is single-level or multi-level. For the bathroom, the first option using a ceiling plinth is preferable.
Children's room 26 photos
The room in which a child sleeps, studies and plays must be safe. Drywall will not harm the health of children and adults.
The design of the plasterboard ceiling of a children's room plays a special role in dividing the room into study and relaxation areas. It should have good lighting, so a multi-level ceiling with a large number of lamps will be very useful. It is not recommended to install a chandelier in the center of the room, since it can be broken during games.
Most often, recently, the ceiling is made in the form of a starry sky. It looks attractive and has an educational function for the child. There are other options for fancy shapes that will interest your children. A variety of ceiling design options in the nursery can be seen on our website in the photo gallery.
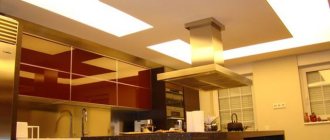
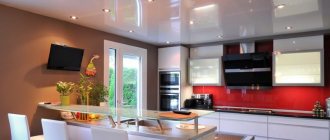
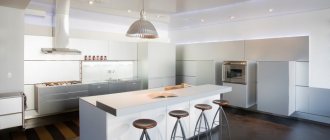
Kitchen 45 photos
As in many other rooms, plasterboard ceilings here make it possible to hide all utilities and unevenness of the main ceiling slabs. The special design of the plasterboard ceiling in the kitchen can emphasize the division of this room into zones.
For a kitchen with a small area, a single-level ceiling is preferable to visually increase the space. This does not mean that it will look simple and inconspicuous. You can paint it with unique patterns, stick wallpaper that contains the same pattern as on the walls, etc. A multi-level design is more suitable for kitchens with a high standard ceiling.
For the kitchen, ceiling options with bizarrely shaped second-tier boxes are often chosen. Geometrically correct shapes will help emphasize the strict style of the room. Sometimes the zoning of the kitchen is emphasized with the help of an arrangement of boxes that corresponds to the arrangement of furniture on the floor. Any design is limited by budget and imagination.
How to install plasterboard sheets with your own hands
Installation of ceiling structure
Installation of gypsum boards is divided into two stages.
The first stage is marking. Horizontal lines are made to mark the ceilings in order to identify the correct level, taking into account the fact that not all ceilings are absolutely level.
To start marking, you need to determine the lowest point of the ceiling in the room. To determine this, you can use a tape measure and measure the height from the floor in each corner of the room.
The lowest point will be the starting point for installing the plasterboard ceiling. It will be necessary to make markings for hanging elements. The distance from the profile to the ceiling surface should be about 40 cm. The type and size of the profile is selected depending on the type of room.
Along the perimeter of the side walls on the ceiling you need to mark marks every 40 cm to create parallel lines. Then connect these marks with each other, and you get a kind of cellular structure.
After that, the first line needs to be divided in steps of half a meter. The second line is divided in the same way, but do this taking into account that the first division is not half a meter, but a quarter meter. The third line is similar to the first, the fourth - the second, and so on. The end result is a diagram like a chessboard, along which the hanging profiles will be attached.
Strips for fastening guides
After the markings are completed, you need to make a frame on the ceiling from metal profiles. The profiles are attached to the ceiling in the initially prepared holes using dowels.
Horizontal profiles are attached to the strips in special holes. Therefore, there is no need to make additional holes with a drill. It is necessary to check the strength of the structure at each stage. The guide profiles are fixed in the same way on the walls along the marked line to give greater strength to the frame structure.
Completed frame for plasterboard ceilings
Once the frame is ready, you can begin installing the sheets. To do this, you can take them ready-made or cut them to the desired size, taking into account that there should be at least 6-7 cm from the edge of the sheet to the attachment point.
It is more practical to work together; it will be very difficult to cope alone. Here you need to hold the sheet tightly and at the same time screw it onto the screws to the profiles. Therefore, the 1st holds, the 2nd fixes.
Also, do not forget about the holes for lighting fixtures. They need to be calculated and done in advance below. Another tip for fixing with self-tapping screws: you need to make marks for fastenings when the sheet is at the bottom.
Wall installation
Installation of walls with plasterboard sheets has the same features as on the ceiling, with the exception of the distance of the sheets from the existing surface. Here you need to maintain at least 50 cm, and the marking lines should be drawn with a distance of 0.6 m, not 0.4 m.
This option with less use of profiles is explained by the fact that for vertical structures the impact of gravitational forces on fastening elements is less. The arrangement, just like on the ceiling frame, has a checkered structure.
Work on lining walls with plasterboard will go easier and faster. There is no need to put in a lot of effort to keep the sheets suspended. The operating procedure is the same, so you need to note some characteristic features.
The walls are also often not very smooth, so by leveling them, treasured square meters will be stolen. This is one of the disadvantages of using plasterboard coatings. Therefore, you can first prepare the surface for attaching the frame.
How does the marking process work? You need to measure the length of the wall, taking into account the minimum use of extra square meters. Therefore, when taking measurements, the tape measure should be evenly stretched, but may touch protruding parts of the wall.
Marks are placed on perpendicular walls. Other walls are marked in the same way. To avoid confusion which marks belong on the wall, you can use different colored pencils. You also need to ensure that the lines are strictly level.
Once the marks are made, you can begin marking the locations for the planks. Here, unlike the ceiling, they need to be installed at a distance of 50-60 cm from each other. This distance will be quite enough to create a durable structure.
The planks are attached to the marked places in the walls with a screwdriver or using a hammer drill. If the walls are made of cinder block structures, then the force of a screwdriver will be enough to fix it; if these are walls made of a slab, then you must first make holes in it, insert dowels there and then attach the plank to them.
You can learn more about preparing the frame from the video
After this, guide profiles are attached to the planks, as in the case of the ceiling. After which you can begin installing the drywall sheets. To simplify the installation process, it is best to divide a large sheet into several parts. This will be much easier than trying to attach a 2 meter long sheet. All actions are similar: you first need to make marks where to fasten, one holds it, the second tightens the screws.
It is possible to insulate walls under gypsum boards