Home craftsmen often have to assemble furniture with their own hands. This happens both when purchasing ready-made interior items and when making cabinets, cabinets, tables, and the like on your own. At the same time, correct fastening of the guides on a wide variety of drawers becomes a real stumbling block. Despite the apparent simplicity of this work, installation errors can lead to dire consequences. In the process of further use of the furniture, serious difficulties may arise. Therefore, it is important to immediately determine the type of guides themselves and the method of their installation.
Types of guides
At the moment, there are 2 main types of guides that are installed on a drawer. These are roller and ball systems. There are also other designs: hidden, with closers, telescopic, and so on. But they don’t install them with their own hands. This installation is carried out in a factory setting.
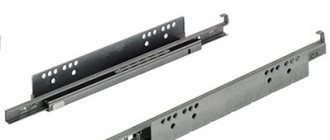
Roller guides usually consist of 2 strips with perforations for fasteners. Plastic wheels are attached to the ends of the structures. Thanks to them, the drawers slide out.
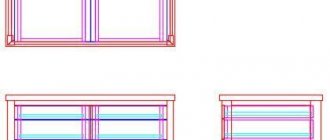
Figure 1. Types of guides.
Such systems have a number of significant disadvantages:
- When in use, the drawers make an unpleasant sound.
- The wheels are unreliable and quickly become unusable.
- If there is a strong pull, the box may fall out of its intended slot.
But such guides also have advantages. They are cheap and easy to install.
Ball systems are also called full extension guides. This is a telescopic design that allows you to extend the drawer the entire length of the bar. Inside the system there are metal balls that ensure smooth and almost silent movement.
The main difference between roller and ball systems is that the first one consists of 2 profiles independent from each other, and the second one is one-piece. In the first case, 1 strip is attached directly to the wall of the box, and the 2nd – to the furniture. The rollers are disassembled only during installation. And when assembled they look like a solid structure. It is this feature that ensures the reliability of the fastenings: the storage space does not fall out even with a strong tug. The appearance of different guides is shown in Fig. 1.
At the moment, you can find guides of different sizes in stores. This allows you to select a ready-made design for interior items of any type and depth. As a rule, roller systems are placed on boxes that are not expected to bear heavy loads. They can be found in linen and clothing closets, kitchen modules (for example, for storing cutlery), and hallways. Ball structures are placed on linen drawers of beds and furniture intended for children's rooms.
Return to contents
Legrabox boxes
The most modern and expensive systems of guides for drawers, occupying a high position in the list of all furniture components. The reinforced design stably withstands loads of up to 60 kg. The matte stainless steel surface emphasizes the rigor and sophistication of the stylish design of the legrabox.
Installation of this type of system requires pinpoint precision in drilling facades and side walls, and absolutely verified calculations in the manufacture of chipboard parts. It is also necessary to correctly and accurately mill the bottom.
Manufacturers of furniture fittings offer other ways to use guides. For example, fastening retractable baskets, nets, containers for various purposes.
Installation of roller elements
Figure 2. Scheme of fastening roller guides.
Whatever type of drawer mounting you choose, you will need the following tools:
- drill with a thin wood drill bit;
- screwdriver with travel limiter;
- a set of screwdrivers with various blades (flat and Phillips).
Also, don't forget to have your measuring tools ready. You will need a tape measure or a long ruler and a square.
All necessary marks can be made with a simple pencil or colored chalk. The installation diagram of roller guides is shown in Fig. 2.
The process of installing guide systems on drawers occurs in 3 stages:
- Marking furniture walls and storage areas.
- Installing the bar on the drawer.
- Installing strips on furniture.
Figure 3. Diagram of the ball guides.
If you follow this sequence, you will be able to avoid possible mistakes.
The guide can be installed anywhere. But usually they are mounted strictly in the middle of the wall (this makes it easier to determine the location of the structure on the furniture) or flush with the top or bottom of the box. But roller systems are most often installed on the bottom edge.
It is wiser not only to mark the places for screwing in self-tapping screws, but also to drill them. This will ensure that the screw does not split the wood. You need to determine the location of the fasteners immediately both on the drawer and on the wall of the furniture.
The master should remember that the thickness of this type of guides is 1.25 cm. Accordingly, the width of the drawer should be 2.5 cm narrower than the internal width of the furniture (both sides are taken into account). Otherwise, the retractable structure will not fit into the housing. For freer movement, add 1-2 mm to this gap.
The length of the screws is selected based on the wall thickness.
The head of the fastener must firmly fix the guide, but not rise above the bar. In this case, the sting should not penetrate through the wall. First, the guides are fixed on the drawer, and then on the furniture. After which the storage system is placed in its designated place.
This is the most common type of loop. And since we are talking about updating the kitchen set, we will consider the option of installing a hinge with a built-in closer.
There is nothing complicated about installing a furniture hinge. But immediately before installation, you need to have an idea of how this is done, so as not to spoil the new facade.
Let's start installing the drawer fronts.
There are many ways to install drawer fronts. Furniture makers came up with them not because they have nothing else to do, but because there are situations when something is not available in production, and then they have to be sophisticated in solving this or that problem. After all, the work still needs to be done. I will tell you about the simplest and most convenient way to install a drawer front. After all, you have nowhere to rush, and if you don’t have something in stock, you can always safely go to the market or hardware store and buy it. After all, the main thing for us is quality. Right?
So, for normal, comfortable installation of drawer fronts, you will need double-sided tape. It is advisable to be thinner, because it will become a kind of layer between the front wall of the box and the facade being installed. Basically, you take tape, measure out two pieces no longer than the length of the front wall of the drawer, and stick these two pieces on the top and bottom outer sides of the front wall of the drawer. Next, take your front, aim it and stick it to double-sided tape, thereby fixing it on the front wall of the box. Next, glue all the other drawer fronts in exactly the same way.
Once you are sure that everything is in order, that the facades are aligned smoothly and beautifully, you can begin screwing them on. To do this, you need to press the facade tightly against the front wall of the drawer, and using a screwdriver, screw in the “thirty” to the end, thereby finally fixing our drawer facade.
Alternatively, you can carefully pre-drill holes in the façade using a drill with a 2mm diameter. To do this, we unscrew the thirty from the front walls of the box and, again, pressing the front to the front wall of the box, we drill shallow holes in it from the back side through the already drilled holes in the front wall of the box. This will make it easier for you to fix the facade with a screw.
Adjusting the hinges
After we have installed the hinges and hung the facades, we need to adjust the gaps so that the doors do not cling to each other.
The design of the hinges with a closer allows for horizontal, height and depth adjustments.
First, you need to visually determine the unevenness of the facade in relation to the body and whether the gap is even in relation to the adjacent door.
"Vertical adjustment"
We loosen the hinge screws, align the door and tighten it again. (Fig.1)
Ball Guide Installation Instructions
When installing ball drawer slides, you must separate the inside of the guide from the outside. To do this, you need to find a plastic tab on the inside of the guide and pull out the narrow part.
According to preliminary markings, it is necessary to screw the outer part of the guide to the rack, and the inner part to the side wall of the box. Assemble the product, insert drawers, hang facades. The installation for the drawers is complete.
What about drawers with closers? Installation of guides for drawers with closers is carried out in the same way. Everything is quite simple here. Installation of Boyard ball guides for drawers or systems from other manufacturers occurs in the same way.
Home craftsmen often have to assemble furniture with their own hands. This happens both when purchasing ready-made interior items and when making cabinets, cabinets, tables, and the like on your own. At the same time, correct fastening of the guides on a wide variety of drawers becomes a real stumbling block. Despite the apparent simplicity of this work, installation errors can lead to dire consequences. In the process of further use of the furniture, serious difficulties may arise. Therefore, it is important to immediately determine the type of guides themselves and the method of their installation.
How to install a façade on a metabox
Next, we place the guide on this line so that the hole coincides with the 37 mm mark in the photo and prick it with an awl. We wrap the screws into the pinned holes and proceed directly to assembling the box itself. I usually screw the back wall to the bottom by a couple of confirms.
We mark and drill the corresponding holes. Considering that such boxes are most often used in kitchens, I treat the ends with silicone sealant.
Using short self-tapping screws, screw the side walls to the bottom and back wall. It turns out to be a box like this, without a front for now. We install it in the box that we assembled a little earlier; at this point I will also not focus on it. Let's move on to installing the facade.
PROMEBELclub - Forum for furniture makers: managers of furniture enterprises, constructors, designers, craftsmen, technologists and everyone related to the furniture business. Programs for furniture design, design, for complex automation of a furniture enterprise.
First, as usual, the additive scheme. Now let's move on to how I did it. And I danced from the horizon level since I initially applied the metabox “by eye.”
Metabox options
Each metabox supports the following parameters:
id(string) ID of the metabox. If missing, it will be created from title using the sanitize_title() function. title(string) (required) The title of the metabox. post_types(string/array) The type or types of posts for which to display the metabox. If there is only one type of post, then transmit it as a string, if there are several, in an array. Be sure to write with a small letter, as in slug. Default: post style(string)
In what style to show the metabox:
- default - in WP style - a container with a white background.
- seamless - container without a white background. Default: default
context(string)
Where the metabox will be displayed. Possible values:
- normal - under the content editor. Default value.
- advanced - under the normal section.
- side - on the right in the sidebar.
- form_top at the top of the post editing form, above its title. Added in version 4.13.0.
- after_title - under the post title, below the link to the post. Added in version 4.13.0.
- after_editor - after the content editor, but before the normal section, thereby the metabox seems to stick to the content editor. Added in version 4.13.0.
- before_permalink - before the link to the post. Added in version 4.13.0.
menu priority(string) The priority of the block to display above or below other blocks: high or low.
Default: default autosave(true/false) Immediately save field values, without saving the record. true - yes, false - no. Default: false media_modal(true/false) Whether or not to add meta fields to the modal window when viewing or editing an attachment. Works when attachment is specified in post_types. Default: false fields(array) An array describing the metafields that the metabox will contain.
In this parameter you need to specify an array with nested arrays. Each nested array will describe a separate metafield. For example, creating a single text field would look like this:
array( array( 'id' => 'name', 'type' => 'text', 'name' => 'Full name', 'desc' => 'Format: {First name} {Last name} {Middle name}', ), )
- id is used as a meta key (meta_key) under which the value will be stored in the meta fields table (wp_postmeta).
- type specifies the type of the field.
- For a description of other general field parameters, see below, in the description of the fields parameters.
Use an underscore _ at the beginning of the field ID to hide fields in the default form for displaying custom fields in the admin panel.
menu validation(array)
Meta Box can check the value entered in the field. This check can be used to, for example, make a field mandatory, check the length of a password, check the format of a phone number, etc.
To enable verification, you need to add the validation parameter, which in turn has two more parameters:
- rules — rules for checking each field. The rules for each field are described as a nested array.
- messages — texts of error messages. Same format as rules.
For example, let's add two validation rules for the field_id field: it is required to be filled in and the minimum input length is 7 characters.
'validation' => array( 'rules' => array( 'field_id' => array( 'required' => true, 'minlength' => 7, // other rules ), // rules for other fields ), / / error messages for required and minlength checks 'messages' => array( 'field_id' => array( 'required' => 'Password is required!', 'minlength' => 'Password must be at least 7 characters long.', ), // messages for other fields ) ),
The validation module works using the jQuery Validation Plugin. The plugin comes complete with a useful set of validation methods and an API for writing your own methods. Error messages are in English by default, but have translations into Russian (and 36 other languages).
List of all possible validation rules:
| Name | Description |
| required | Required field. |
| minlength | Minimum number of characters to enter. |
| maxlength | Maximum number of characters to enter. |
| rangelength | The specified range of number of characters. Array. |
| min | Minimum value. |
| max | Maximum value. |
| range | Specified range of values. Array. |
| Check by email. | |
| url | Link check. |
| date | Date check. |
| dateISO | Check date in ISO format. |
| number | Check for decimal number. |
| digits | Requires only numbers. |
| creditcard | Requires a credit card number. |
| equalTo | Requires an element to be the same as another. The value must be the identifier of another field. |
| remote | Requests remote data to check the field's validity. The value can be a link to a resource where a request will be sent to receive validation data, or an object with customized request settings, see jQuery.ajax. The request to the server is made through jQuery.ajax and receives the key-value (field name and its value) in the form of GET parameters. The response is returned as JSON and must be true if the field value is valid, otherwise false, undefined or NULL. |
Read more about parameters in the jQuery Validation Plugin documentation.
menu default_hidden(boolean)
By default, the metabox is hidden (true) or not (false). The display of the metabox can be toggled using the checkbox in “Screen Settings” (top right corner).
If the user is not new and he already has data about which metaboxes are shown and which are hidden (i.e. he has checked the box in the screen settings at least once during his entire time using the site), then this option will not have any effect... By default: false