Types of fastenings
To attach the shelf to the wall, you can use:
- exposed (visible) fasteners;
- hidden fasteners that are invisible to the average person.
Exposed Fasteners
Open fasteners include:
- brackets of various configurations and sizes. It is recommended to use such a shelf fixing element only if it fully matches the design of the room;
- metal corners. Devices are the simplest, most common and reliable elements. Can be installed in rooms with any finish;
- loops. They are also a common option. Easy to install and reliable;
- holders. Used advantageously as fastenings for glass shelves. Can be of different shapes, colors and different sizes.
Hidden fasteners
Fixation with hidden fastening is carried out using:
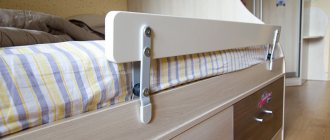
- hidden. A special structure is installed inside the shelf, which rests on a bolt screwed into the wall. From the front side, neither the hinge's retaining hole nor the bolt are visible;
- metal rods that are attached to the wall and “recessed” inside the shelf.
Mounting methods
Hidden fastening of shelves to the wall can be done in different ways. They differ in price, final appearance, and fittings for fixation.
Invisible mount
This option is good because the fittings will remain disguised. As a result, the design will be neat, since the fasteners will not be visible. This method is suitable for concrete and brick walls. It is not recommended to use invisible fastening on thin partitions.
Brackets
Although with this method it is impossible to completely hide the fittings, they will not spoil the overall picture. If you want to purchase a budget option, then you can opt for metal and plastic brackets. Also, the stores sell not only standard, but also decorative elements that will decorate your home.
Glass holders
The design with such a hidden shelf mount looks stylish and impressive. Inside these holders there are rubber or silicone gaskets that fix the glass and do not harm it. They are always located at the bottom of the shelf.
Loops and corners
This method is the most popular, since such a mount looks compact and almost invisible. Hinges and corners are suitable for any interior style and are also designed for heavy weight.
Installation of fasteners
Installation of fastening the shelf to the wall with your own hands is carried out according to the following algorithm:
- choice of fastenings;
- preparation of instruments;
- fixing the shelf to the wall.
Selection of fasteners
When choosing fasteners, consider the following parameters:
- the material from which the wall is made. You can hang shelves on brick and concrete walls in any way. For plasterboard walls, it is recommended to select stronger fasteners;
If the wall is sheathed with plasterboard or other finishing material, then the shelf should be attached exclusively to wooden blocks, other devices holding the sheathing or the main wall.
- the material from which the shelf is made. Massive fasteners are not suitable for glass shelves, as they make the structure too heavy. For metal shelves, external fasteners are best, and for wooden shelves, internal fasteners are best;
- thickness and other overall dimensions. For massive shelves, it is recommended to select similar types of fastenings: large brackets, hidden metal rods, and so on. For light, thin shelves intended for storing souvenirs, cosmetics, and so on, it is advisable to use small corners.
Additionally, it is worth considering the number of fasteners. If brackets, corners or hinges are used, their number cannot be less than 2 pieces, located on each side of the shelf. If the shelf length is more than 1 - 1.5 m, it is recommended to increase the number of fasteners.
Preparing tools
To complete the installation work, you will need to prepare the following list of tools:
- ruler, tape measure and marker for marking;
- building level for leveling in a horizontal position;
- drill. If installation is being carried out on a brick or concrete wall, then it is recommended to use a hammer drill instead of a drill;
- screwdriver or screwdriver, hammer;
- dowels, screws and other fasteners.
Shelf fastening
The instructions for attaching the shelf are as follows:
- At the first stage, it is necessary to determine the place where the shelf will be hung and mark the location of the fastening elements. When applying markings, it is important to take into account the horizontal level of the piece of furniture, since otherwise it will be impossible to put anything on the shelf;
- hole preparation. Before attaching the elements fixing the shelf, it is recommended to pre-drill the holes, even when attaching to a wooden wall;
Preparing the holes will allow you to eliminate even the slightest deviation from the given level and hang the shelf as straight as possible.
- installation of dowels. If the shelf is hung on a brick or concrete wall, then before fixing it with self-tapping screws, it is necessary to install plastic dowels, which allow for a stronger adhesion of the fastening element to the wall. Dowels can simply be hammered into the holes;
- fixing the selected mount to the wall using self-tapping screws of a suitable length;
- fastening the shelf to the bracket. If fixation is carried out using hidden metal rods, then before fastening it is necessary to drill holes in the shelf of appropriate size and length;
- checking the correctness of the work. At this stage, it is necessary to check the reliability of the shelf fastening, applying the maximum permissible force to the piece of furniture (for example, you can lean your elbows or hang slightly on the shelf) and the horizontal installation using a building level.
How to install a shelf with hidden fastenings, watch the video.
To secure the shelf, you can use other completely different objects, for example, thick leather belts. Unusual types of fastenings will add individuality to the interior of the room.
The hidden shelf is a decorative accent that creates the illusion. The shelf seems to “float” on the wall. By adding such furniture to the interior of your living room, bathroom, kitchen, bedroom, you can solve the problems of storing books, necessary accessories or souvenirs. Such furniture is often required to decorate children's rooms, which have a lot of tiny cars, dolls or other toys. “Floating” shelves are cheap, beautiful, keep everything safe on them, and it takes little time to make such furniture.
Types of fastenings
Hidden
The choice of hidden shelves is usually determined by the style of the room. Since this method is quite labor-intensive, preference is given only in cases of urgent need. This type of installation creates a feeling of lightness of the structure, expanding the space of the room. It is often used as an interior element in minimalist, ethnic Asian (Japanese, Chinese, Thai), modern, and high-tech styles.
Hidden hinges
They can be used for wooden shelves, laminated chipboard, plywood. The hinges are attached to the back of the shelf with self-tapping screws according to the markings. If this is a home-made product, then it is better to make indentations (cuts) in the places where the hinges are attached, according to the size and thickness of the fastening fittings, so that the hinges are flush with the edge of the product and tightly adjacent to the wall. Now you can hang it on the wall using screws screwed into it in advance.
Cantilever mount
In this section, we need to consider several types of mounting parts:
Metal rods
Now there is a large selection of console mounts on the market; ready-made shelves of various sizes can be selected with them. The design includes a hidden shelf holder for a wooden shelf and a bracket for attaching the shelf holder to the wall.
This method provides for the presence of holes in the shelf into which metal rods of furniture fittings will be inserted, and the rod should be 2-5 cm shorter than the product itself.
At home, you can construct such a cantilever mount yourself, using pieces of reinforcement and threaded rods complete with drive-in anchors as metal rods. And in the shelf itself, you need to drill holes in the size corresponding to the rods, observing the rule that they should be at least 2-5 cm shorter than the width of the product. In this case, the thickness of the rods ranges from 10 to 18 mm, depending on the weight of the future filling.
Wooden blocks
This method of fastening involves installing a frame made of wooden blocks, most often of square or rectangular cross-section, on the wall, and then stringing a shelf on them, which is a hollow structure (box). For reliability, the parts are secured with self-tapping screws; additional elements can be attached with glue.
Brackets, fasteners, corners
When choosing fastening with brackets, you must keep in mind that the fastening elements will always be visible. And this method may well become a decorative element in the interior.
After all, there is a wide variety of shapes, styles, and materials for making brackets. And therefore, shelves on brackets are used in interiors of classic, rustic, modern, modern, shabby chic, loft and other styles.
The choice in favor of such fasteners can be made not only because of their decorative appeal, they can provide reliability under significant loads - up to 30-50 kg.
Models and designs of brackets, materials for their manufacture and materials for shelves for which they can be used are quite diverse. Therefore, it will not be possible to give general recommendations on how to attach them.
But recommendations for installing shelves on brackets on the wall will be given below.
Types of fastenings
The inconspicuous fastening that supports the shelf has a wide range of varieties:
- Alcoves and niches are a convenient place to mount shelves because they can easily be mounted on three walls at once.
- The hidden bracket with two slots is convenient because it can be used anywhere.
- Invisible fasteners made of durable metal with alloy steel connecting screws create tension between the posts. This gives them impressive support ability. If a longer shelf is needed, additional supports are added. Invisible fasteners can be used to create heavy-duty floating shelves.
Rustic Bathroom Shelves
If it's time to modernize your interior, shelves with hidden fastenings in the Provence style are the perfect decor. She creates exclusively her own, unique home comfort. And at the same time it seems to be floating in the air! Its artsy yet simple appearance will brighten up the bathroom and any nook that needs storage space.
This shelf model installs as a floating shelf and is reinforced for added strength, making it a great storage option for collectibles, photos, keepsakes and glassware. The design is inexpensive and requires very few materials.
Tools:
- level,
- measuring tape,
- saw,
- drill.
Consumables:
- tree,
- screws,
- optional finish.
Advice. You should avoid last-minute shopping trips; it is better to prepare materials in advance.
Creation algorithm
- To make hidden shelves with your own hands, first draw a sketch; this will help you understand the design and find out what type and size of wood is needed. The step also includes measuring the width of the space from wall to wall.
- The next step is to create a special frame. You can use liquid nails to glue the frame together first, and then use screws and angle iron to hold all the pieces together.
- Next, the boards are painted or painted, which will then be fixed to the frame. You can use the same paint or varnish that has already been used on other furniture. It's nice that today there are varnishes available that will make wood look old in a matter of minutes and highlight its texture, such a finish is great for a rustic style.
- The desired height of future shelves is measured and the support frames are attached to the wall. Before drilling, the wall is checked using a detector for the presence of wires and pipes.
- Next, you need to make sure that the invisible shelf is level. After all, it is quite difficult to find beautiful boards that are quite straight. If it turns out that the boards are uneven, proceed to step 6.
- Spacers are added to level the shelf. This step is repeated for the top and bottom boards.
- Then the top board is glued to the frame using liquid nails.
- The bottom board is much more difficult to fix with liquid nails, so it is better to secure it with screws.
- The front part of the shelf is glued last.
Attention! The walls of the room are painted before attaching the shelves. Instead of boards, you can use MDF.
Hidden shelves from old drawers
These shelves are made from 2-8 drawers, not necessarily matching in color, shape or size.
- The drawers are cleaned and unnecessary parts are removed. Surfaces are sanded.
- Then the protruding edges of the cladding are cut off so that the entire side of the bottom fits tightly against the wall.
- The inside of the drawers is painted to match the color of the wall. This will create the illusion of floating shelves.
- Next, the boxes are laid out on the floor to find beautiful compositions to determine the places where they will be attached. The composition you like is photographed; this photograph will replace the sketch.
- According to the plan, wooden supports are mounted on the wall. Make sure they are level.
- The boxes are placed on supports and secured with screws (the screws are painted over if they need to be hidden).
Decorative handles or accessories can be added if desired. Another idea is to attach decorative “note paper” to the inside of drawer-turned-shelves.
Shelves-tubes for toys
- The buckets are cleaned, the labels are removed, and the top is cut off (use a hand or electric saw).
- Future shelves are painted on the outside with plastic paint.
- Then two holes are made for the screws.
- The structure is fixed on the wall.
And, voila, the furniture is ready! This DIY shelf is an economical idea for creating storage space for small items.
Designers use a lot of techniques and create a unique and unique environment in modern apartments. And one of the very significant interior items can be called wall shelves. This furniture is presented in a wide range on the market. You can store books, dishes, various figurines, jewelry and other small items on it. Moreover, such furniture is used not only in apartments and private houses, but also in office rooms. And that is why we decided to talk about shelves with a hidden type of fastening and the dismantling of such products.
Features of hidden fasteners for shelves
The choice of this mounting option is often determined by the style in which the room is decorated. This installation method is a rather labor-intensive process, which is why it is chosen only when there is a serious need for it. This type of installation helps to create a feeling of lightness of the structure and visually increase the space in the room.
This installation option is usually used in minimalism and hi-tech style. By giving it preference, you can hide all the fasteners, as a result of which the installed structure will acquire an elegant appearance.
Important! It is not recommended to attach shelves in this way to plasterboard partitions whose thickness is less than 1 cm.
How to remove shelves with hidden fastenings
All work on dismantling a furniture product installed using the presented method can be done by any consumer himself. At the same time, he will not need to have special knowledge and skills. You just need to stock up on special tools and follow the special instructions that will be presented in the material below. And if there is a fear of violating the integrity of the structure or causing visible damage to it, it is best to entrust this work to specialists.
What tools will you need?
To perform the work you will need a minimum set of tools, namely:
- hammer;
- pliers;
- screwdriver;
- screwdriver
Removing shelves with hidden fastenings: step-by-step guide
Installing a shelf using a hidden fastening method involves drilling holes in the wall, installing metal rods in them and then placing the product on them. Accordingly, the dismantling algorithm will look as follows.
- First, you will need to dismantle the shelf itself by removing them from the iron rods.
- Afterwards, you need to remove the metal sticks using pliers.
Important! When installing the holes for placing sticks, it is recommended to fill them with resin, which is why during dismantling you may need not only pliers, but also a hammer to loosen the part.
- Afterwards you will need to remove the hanging bracket using a screwdriver or screwdriver.
- If the shelf is not planned to be installed in this place in the future, you will simply need to seal the remaining holes to give the wall an attractive appearance.
Now, when dismantling shelves with hidden fastenings, you will not damage the wall, and you will remove the products with precision and care.
There is nothing better than shelves for organizing space in rooms, as well as for decorating the interior. Comfortable, functional, original in shape, they help to conveniently arrange a lot of things and give the rooms a more comfortable look. Making shelves on the wall with your own hands is not at all difficult, and you can use a wide variety of materials - wood, fiberboard, glass, pieces of tin, plywood.
| Types of Wall Shelves | Description |
| Classic | This type of shelves is the most common due to its simplicity, aesthetic appearance and ease of installation. They represent a huge flight of fancy: from simple square to creative asymmetrical shapes |
| Corner | This type of wall shelves differs in the method of fastening - it is carried out on adjacent adjacent walls. Most often they are installed in utility rooms and bathrooms. |
| Hanging | This original way of creating a shelf involves attaching a simple structure to the ceiling using cables or vertical posts. |
| Floor-standing | This wall shelf is a floor support design. This type of product is especially relevant in hallways, as well as large rooms, where you don’t have to think about wasting space. |
| Open and closed shelves on the wall | Wall shelves can be designed, for example, with or without glass |
Features of fastening shelves depending on the type of wall
Concrete wall
The nuance of working in a room with concrete walls is the choice of drilling tool and drill bit. This should be a hammer drill and a special concrete drill made of hard alloys. The size of the drill, its diameter and length, is selected depending on the specific fastening hardware.
Plasterboard wall
If you plan to hang a shelf on a plasterboard wall that will serve a decorative role (for souvenirs, figurines or vases), then you can safely use a TNF/-W butterfly dowel to mount it.
To secure it in drywall, you need to drill a hole of the appropriate size and drive a dowel into it. When a self-tapping screw is screwed into such a dowel, it opens on its own, forming a reliable stop in the plasterboard sheet, and a special cuff on the dowel does not allow it to rotate. Fastening a light shelf made of glass, thin plywood or other lightweight material in this way will be quite reliable.
To install heavier shelves, more labor-intensive work will have to be done. At the stage of constructing plasterboard partitions, in the places where the shelves are planned to be attached, it is necessary to install additional transverse aluminum profiles or bars of the appropriate cross-section. It is in them that holes will be drilled through the drywall, dowels will be installed and brackets will be attached.
If such additional structures were not provided for at the stage of constructing plasterboard walls, then a solution can be found. Already on the outside of the plasterboard partition, you can attach a transverse bar to the vertical profiles located inside the plasterboard partition (in this case, their location must be known or determined, for example, by tapping or more technologically advanced methods). But in this case, the main task will be to make the bar invisible - for example, by hanging one long or several shelves in a row along the entire length of the bar. Or make it a decorative element.
Only part of the widespread methods and most common methods of attaching shelves in rooms has been described here. In addition to them, everyone’s imagination and experience can suggest other devices, designs and design solutions.
Even in the largest apartment, rational storage organization makes life much easier for the owners. When utensils, furnishings, books and electrical appliances are in their place, they are very easy to find. But if there are a lot of things, then in addition to ordinary cabinets and cabinets, shelves will be a real salvation.
A correctly chosen shelf will decorate the interior and give it a complete look. It is worth taking care not only of the aesthetics of the product, but also of the technical parameters. Any shelf must be securely fixed to the wall and withstand the weight of the objects placed on it. All this is ensured by the selection of special fastening elements - brackets for the shelf.
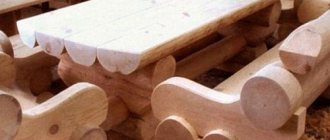
Making a simple wooden shelf
Wood is the most convenient material to work with. Wooden shelves come in simple, complex shapes, open and closed, vertical, horizontal and corner. Taking the basic option as a basis, you can assemble a shelf from several modules and give it the most incredible look. In order for the product to serve for a long time, you should choose the right wood: the boards must be perfectly flat, completely dry, without cracks, voids or traces of mold.
During the assembly process you will need:
- hacksaw;
- drill;
- building level;
- pencil and ruler;
- boards 16 mm thick;
- stain;
- wood varnish;
- sander;
- screws, brackets, dowels.
The example used is a simple rectangular shelf 250mm wide, 300mm high and 1100mm long.
Step 1. Marking
The boards are laid flat on the table and the measurements are transferred from the drawing. The height of the side walls should be 268 mm, since they will be located between the top and bottom: wall height + board thickness x 2 = 300 mm.
Step 2. Cutting the boards
If the markings exactly match the diagram, you can start cutting. It is best to use a jigsaw for this, then the cuts will be perfectly smooth and neat. You should end up with 2 long pieces and 2 short ones.
Step 3. Processing of blanks
Before starting assembly, each workpiece must be sanded, stained and varnished. If you plan to simply paint a shelf, the blanks are processed - this increases their service life and makes the paint apply more evenly.
Step 4. Assembling the product
The bottom board is laid flat on a flat surface. From the ends of the workpiece, retreat 8 mm and draw 2 straight lines parallel to the cuts. Now on these lines you need to mark two points at a distance of 5 cm from the edge, and drill holes there for the screws. The same is done with the top blank. When all the holes are ready, install the side blanks on the bottom board and tighten the screws. Place a second board on top and also fix the side walls with self-tapping screws.
Brackets are attached to the ends of the side walls, holes are drilled in the wall for dowels, self-tapping screws are inserted and tightened so that they protrude by about 5 mm. The dowels must be positioned strictly horizontally, so before drilling, mark a line using a level. Now all that remains is to attach the brackets to the fasteners and hang the shelf. If desired, the back wall of the product can be filled with a piece of plywood, and glass can be inserted in front.
To make such a simple shelf more original, you can replace one side wall with a stump of a thick branch. To do this, choose an even branch with a diameter of about 7-8 cm with smooth, clean bark, saw off a piece 28 cm long, and cut off all the side shoots. The chock is treated with a primer, dried and varnished. There is no need to remove the bark. After the varnish has dried, the workpiece is inserted between the upper and lower boards and screwed tightly with self-tapping screws.
Based on this drawing, you can make various variations of wall shelves. For example, reduce the length to 400 mm and make 3-4 blocks at once. Then install them on top of each other in a checkerboard pattern and secure them together using metal plates. Or simply mount them on the wall separately, placing them at a short distance from each other.
Often, to save space, shelves are made corner, and they can be mounted both in the inner and outer corners.
The blanks are made according to the scheme described above, only the upper and lower boards consist of two elements, with the ends cut at an angle. The process of making such a shelf is quite simple:
- the halves of the top board are coated at the ends with glue and clamped with clamps;
- repeat the same actions with the bottom board;
- when the glue dries, all workpieces are covered with stain or primed;
- Attachment lines are marked on the upper and lower workpieces and holes are drilled;
- insert the side walls and secure them with self-tapping screws.
| Wall shelf materials | Advantages and disadvantages |
| Wood: plywood, chipboard, MDF and others | This material is relatively easy to work with, it looks beautiful, natural and impressive, its service life is quite long, especially if pre-processed |
| Plastic | This material is the most versatile; it can imitate both wood and stone, while eliminating their shortcomings |
| Metal | Such wall shelves will be very strong, reliable and durable, but they will hardly fit into a classic interior. In addition, corrosion can also be a problem, so metal products will require special processing and conditions |
| Glass | Transparent wall shelves will create an atmosphere of lightness and comfort in your home. Of course, it will be quite difficult to make a glass structure with your own hands, but if you nevertheless decide to do all the work yourself, then you will have to work with glass for quite a long time and very carefully, especially if various cutouts are planned in the shelf design |
How to assemble a metal shelf rack yourself MS
Good day
In this article we will tell you in as much detail as possible about the assembly of the MS metal rack
Shelving has long helped us to place huge volumes of documents in offices and accounting departments; with the help of racks we organize places for storing medical cards in clinics; in the premises of various archives without shelving it would not be possible to store such a volume of various documentation. If you decide to buy a rack, then this article will be very useful to you, as the racks are delivered disassembled. After reading this material, you can easily assemble a metal rack with your own hands, without the help of third parties.
From the tool we need:
- a screwdriver (not necessary, but desirable, there are 80 bolts and nuts in this rack, and if you can easily tighten them with your hands, then it’s better to do the tightening with a special attachment for the nut and a screwdriver)
If you don’t have a screwdriver, a 10mm socket wrench or a socket head with a ratchet will do;
- pliers or pliers (most nuts are tightened without turning if you hold them lightly with your finger);
- a pencil or dark marker (we will use it to mark the racks where the shelf is attached);
— roulette;
- square (for leveling the rack). It is possible without the help of a square, as in our case, we will resort to the help of walls and a free corner in the room.
Having prepared all the tools necessary for assembling a metal rack, we begin assembly.
It is most convenient to assemble a metal rack in a bright room with a free area approximately equal to twice the area of the rack lying on the side. In general, the more space, the better and more comfortable. It is very convenient if there is a free corner in the room; it will help us in the future for the correct and even placement of the rack for drawing connections.
Having placed everything at the assembly site, remove the packaging and arrange the shelves and racks in finished form without transport packaging
Having placed everything, we take the racks and put the thrust bearings on their ends by hand, it will take some effort and a certain dexterity, only with your hands, without using heavy impact equipment)). After the plastic has sat down, you can lightly tap it on the floor to ensure it shrinks completely.
Now that you can clearly see where the top and bottom of the shelving rack are, we mark the places where the shelves are attached to the rack and mark them with a marker or pencil; it is easier to erase the pencil later and not leave any marks. We do this so that during the assembly process we do not have to calculate the mounting location using the holes. Having calculated the required distance on one rack, we transfer the marks to the remaining racks laid parallel
Next, we install the corners of the amplifier on the rack posts, as shown in the photo, securing each of them at one point. On each rack we bolt 4 corners, two at the top and two at the bottom. We don’t tighten the connections, we just tighten them, it’s okay if the corners don’t stay in one position, the main thing is to secure them as shown in the picture. For reference, we put the lower part of the rack in a footrest
We installed the corners at the bottom with a small gap so that wet cleaning could be done under the rack
The racks of our rack assembled in this way are ready for further work. If there are a lot of racks, then such a step-by-step implementation will significantly reduce the time for assembling the racks
Next, we take one rack and a shelf and begin to assemble it, installing the shelf on the end, attaching the first bolts to it, fastening it only by attaching nuts, to the depth of the nut or a little more
the free part of the rack, the top, at this time may be on the floor or some kind of stand. Having made a corner, we substitute the shelves and fasten them with 1 or two bolts
We marked the location on the rack where to mount the shelf in advance at the initial stage, with a pencil or marker
Marked in black in the photo for clarity.
Next, install the remaining shelves in a similar manner, including the top one. Hold it so that the structure does not fall or bend.
Having installed the shelves, we put on the second rack and fasten it in the same way as the first
The view of the upper fastening unit is shown in the photo
On the inside, when fastening, it is more convenient to place the nut on the pin and screw the bolt directly into it, rather than having the nut hit the bolt that is installed in place.
the nut is clearly visible in the hole in the stand
Having attached both racks, we lay our rack on the side surface and place a third rack, fasten it in the same way as the previous two
The places where the shelves are attached are clearly visible thanks to our markings.
Having secured the rack, we place our rack on the side edge and install the fourth rack
We secure the stand with nuts and place the rack on the side surface, resting it against the wall and against the racks on the side (in our case). If this is not possible, level it with a square and begin stretching the structure
We do this with a screwdriver, the tightening torque and speed are shown in the photo
Consistently starting from the corner we stretch the connections, then we stretch the places where the shelves are attached
Having pulled out the available connections, carefully move the rack and place it on its edge. We extend previously inaccessible places for attaching shelves and rack posts
Next, lay the rack on the next side and tighten the remaining nuts.
Now all connections are tightened, you can place the structure vertically. The rack should stand level, without any distortions.
Good luck with your assembly, we will be very glad if this article helped you understand the process of assembling the rack.
(you can leave a review of the article in the Reviews section. If you have any questions, we will be happy to answer them).
All racks are available in our warehouse
Thank you for your attention
Original shelves for books
Shelves of non-standard shape are in increasing demand, so if you wish, you can try to assemble something original. For example, a bookshelf in the form of a simplified labyrinth is used.
To make it you will need:
- edged board 20 mm thick;
- wood glue;
- clamps;
- roulette;
- hacksaw;
- miter box;
- Sander;
- stain;
- furniture screws, self-tapping screws;
- decorative shelf holders.
If you have everything you need, you can start making the shelf.
Step 1. Marking
On the prepared boards, mark the cut lines with a pencil under a ruler. Measurements should be taken very carefully, since all horizontal parts have different lengths.
Step 2. Trimming the blanks
The ends of each workpiece are cut at an angle of 45 or 90 degrees. The diagram shows the first option, so you will need a miter box for sawing. It is very important to correctly install the miter box on the board so that the cuts are symmetrical. If the ends are cut off incorrectly, you will not be able to fold the shelf.
Step 3. Assembling the structure
The ends of the parts are smeared with glue, pressed tightly and additionally secured with slotted furniture screws. Ordinary self-tapping screws are not suitable here. Each joint will require at least 2 screws. Both parts of the shelf are applied to the wall, leveled and the attachment points are marked with a pencil. After this, holes are drilled for the dowels, brackets are screwed to the shelf with self-tapping screws and the structure is hung on the wall. Instead of brackets, decorative pelican shelf holders are often used.
Useful video
March 18, 2014. Read 27406 times
Today, even the most modern and fashionable designer does not take advantage of the opportunity to use practical and stylish shelves when decorating the interior. They will not only become an integral part of the future decor, but will also serve as an excellent stand for books (mount for bookshelves), for photos and decorative items.
There are two types of shelf mounting available:
We will look at the first method in more detail, since with the standard design it is difficult to achieve a combination of the future interior with the target design.
- Preparation for fastening
- Detailed mounting instructions with photos
Let's consider the process of preparing the fastening
- First of all, you will need to assess how reliable the wall is where our shelf will be mounted. If it is a brick wall, then it should be at least 25 cm thick, and if you have a concrete wall, then from 10 cm, which will allow you to place not only decorative elements on the shelves.
1 – fastening element;
2 – holes for installation;
3 – metal rod;
4 – hinged bracket;
2. After this, we move on to determining the thickness of the future shelf.
To do this, you must know exactly what will be placed on the shelf so that there is no deflection or deformation. You can check this simply by taking a board of approximate thickness and placing a weight on it.
- If the interior concept requires thicker boards, then in this case everything should be used according to the recommendations of your designer or the chosen style.
- You will need to take into account the mounting features, since the thickness of the shelf cannot be less than 3 cm. If books are placed, it is better to use a thickness of 4.5 to 6 cm.
- The future shelf will need to be thoroughly dried and soaked before processing.
Hanging shelf with straps
If you need a decorative shelf for small items, the following option is perfect - a board suspended on straps.
To make a shelf you will need:
- 2 edged boards 300x750 mm, 30 mm thick;
- 4 leather belts, 75 cm long;
- 4 long screws with plastic dowels;
- 4 short screws;
- building level;
- ruler;
- sharp knife;
- drill.
Step 1: Preparing the belts
The cuts of the belts must be perfectly even, so if necessary they are trimmed with a knife. Fold each belt in half, press the ends to the table, step back 2 cm from the edge and drill a neat through hole with a drill. The same is done with the remaining three.
Step 2. Attaching the straps to the wall
Using a level, two points are determined on the wall at a distance of 60 cm. Holes are drilled and plastic dowels are inserted. The belt folded in half is applied to one of the holes and secured with a long screw - you get a large loop on the wall. Another such loop is attached nearby.
Step 3. Installing the shelf
A sanded board is inserted into the loops and aligned horizontally. To prevent the shelf from moving, the parts of the belts adjacent to the wall near the board itself are screwed with short self-tapping screws. Now another shelf is hung under this shelf, exactly repeating the steps described above. The result is a light and neat two-tier shelf. If desired, you can add another 1-2 tiers.
To make the shelves described above, you can use not only wood, but also plywood, as well as laminated chipboard sheets. The last option is used most often, since laminated chipboard is lightweight, high strength, practicality and durability. When assembling shelves from this material, all sections must be covered with a melamine edge to match the color of the sheet.
How to hang a shelf on a plasterboard wall
When starting to work with a plasterboard wall, you should remember that all plaster partitions are attached to a metal frame, which means that it is better to choose a place for a shelf where a screw can be screwed into the metal. Finding a profile is as easy as shelling pears - use a magnet.
Using a magnet to determine where the metal frame is located.
We suggest you familiarize yourself with Antiseptic for walls against mold: how to reliably get rid of
To work with drywall, you need to take special screws that do not destroy the plaster when screwed in. Screw it into the profile using a screwdriver. You will most likely need to apply a little force.
Screws for plasterboard walls.
Important note: Drywall screws may look unsightly, but should only be used. If you need to put a more presentable screw in this place in the future, then unscrew the black one and replace it with a metal one when the hole is already drilled. Remember that the metal profiles are located at a distance of 60 cm from each other, so if possible, pay attention to the shelves of the appropriate size.
We screw the screw into the metal frame.
If there is no way to drill the wall only in those places where the metal profiles are located, then use a butterfly dowel. In this case, drill a hole in the right place, insert and hammer a dowel into the hole (previously holding the “wings” so that they straighten out on the other side of the wall), and screw a screw into it.
The butterfly dowel is indispensable for plasterboard walls.
The butterfly dowel is driven randomly into the wall.
Screw in a plasterboard wall.
A shelf is a functional and simply irreplaceable thing in the house, which saves a lot of space and allows you to effectively organize space. Ideas from 20 original shelves that you can install yourself will tell you how, with just one element, you can easily and quickly completely transform your interior!
Making a glass shelf
Glass shelves fit harmoniously into any interior, and the installation process does not take much time. To work you will need:
- strained glass;
- hammer;
- electric drill;
- building level;
- aluminum profile;
- dowels;
- adhesive tape;
- ruler;
- pencil.
Not everyone knows how to cut glass correctly, and therefore it is better to order the cutting of blanks in a workshop. There they will also grind and polish the edges so that when installing the shelf you will not cut yourself on sharp edges. You can do everything else yourself.
Step 1. Marking for fasteners
The section of the wall where the shelf will hang should be as large as possible. Using a building level, draw a horizontal line on the wall with a pencil. The locations of the fasteners are marked on the line and holes are drilled.
Step 2. Installing profiles
An aluminum profile is applied to the wall surface and the alignment of the fastening marks is checked. Then insert dowels into the holes, attach the profile with one screw and level it horizontally. After this, tighten the remaining screws.
Instead of a drill, insert a bracket screw Screw in the bracket screw Leave the bracket screw protruding from the wall Check the position Place the shelves
Step 3. Attaching the shelf
The rear edge of the glass shelf is covered with adhesive tape. You can use separate spacers made of tape, placing them where the glass will touch the screw heads. The shelf is inserted into the profile, the edges of the profile are covered with protective caps. If two shelves touch on the sides, their edges are fastened with metal fittings.
If you have free time and a desire to experiment, you can create very unusual shelves for the wall from scrap materials. For example, a corner shelf made of plastic pipes looks original. To make it you will need sections of sewer pipes and corner bends. The shelf is attached to the wall with screws and dowels.
Old suitcases and briefcases also make great wall shelves. To do this, they are cut to half their height, covered with plywood at the back and secured to the wall with screws or on brackets.
Drawers from unnecessary bedside tables are quite suitable for making shelves. To give them an elegant look, the boxes should be carefully sanded, primed and painted in bright colors. Then they are leaned against the surface with the back wall, the attachment points are marked and holes are drilled for them. Even one such shelf looks very original, and a composition of 2-3 drawers will become a real decoration.
Video - DIY wall shelves
Interesting wooden shelf. Master Class
You will need:
- Rope;
- Board at least 2 cm thick;
- 2 corners (mounts) for shelves;
- Steel washers;
- Lighter;
- Drill;
- Saw.
As has been said more than once in our blog, methods for attaching shelves can be very diverse based on the load on the shelf, design solutions and its purpose. However, often the interior of a room implies minimalism, and in this case, external fastening may be unnecessary. Hidden fastening becomes preferable.
How to choose a fixation type?
This is not an easy task, since when choosing a method for attaching shelves, several factors must be taken into account. And they are the ones who will influence the final decision.
- The thickness of the wall itself on which the shelf is fixed . This is one of the main factors to consider when choosing a mounting option. The fact is that it is not always possible to use, for example, a hidden pin fastening. It is better to avoid it if the wall is made of soft materials such as plasterboard. The thickness of the partition should not be less than 10.5 cm if it is made of concrete, and less than 25 cm if it is made of brick. If the wall does not meet these parameters, then it is better to choose another fixation option. In relation to drywall, a shelf can be hung using a hidden fastener only if the wall thickness is at least 10 cm, and only light souvenirs and nothing heavy or giving a serious load will stand on the shelf.
Stages of attaching a shelf to a hidden mount
1. Assessing the strength of the wall/partition on which the shelf will be installed.
The thickness of a concrete partition from 100 mm or a brick partition of 250 mm is a condition under which a shelf can be installed without additional load-bearing structures, without fear of consequences. With thinner walls or partitions, as well as with plasterboard and cinder block walls up to 100 mm, it is theoretically possible to install a shelf with hidden fastening, but only for decorative purposes with a very small load on the shelf.
2. Selection of a shelf with optimal thickness and depth.
This must be done to ensure that its functionality is fully realized and that the load weight is suitable for its capabilities. For example, the thickness of a book shelf should be from 45 to 60 mm.
3. Selection of fasteners.
If the fasteners are not supplied with the shelf, select them based on the type of wall on which you will hang the shelf.
Fastening process: step-by-step instructions
How to attach a shelf to a wall? Before you start installing the shelf, you need to remember that the holes in the shelf on the back side are made 5 mm lower, and also make sure that the holes on the shelf and on the wall completely coincide.
The first thing you will find out is the length and width of the shelf.
When positioning the shelf, align it with the fasteners.
To hang a shelf on a brick or concrete wall, you need to make markings using a level. Use a hammer drill to make the required holes. We carry out the work carefully, avoiding chips on the wall. We make sure that the drill and hardware are the same size. Then we attach the fastening elements and check with a building level. If necessary, we make adjustments.
Depending on the load, the required number of pins will be required.
Using bolts and nuts, self-tapping screws or self-tapping screws, secure the shelf.
Upon completion of all stages of work, we attach the shelf. If you did not make it yourself, but purchased it in a store, then all the necessary fastening elements are included. When positioning the shelf, align it with the fasteners. We make sure that there are no gaps between the shelf and the wall. Next, mark all the holes with a pencil. Using bolts and nuts, self-tapping screws or self-tapping screws, secure the shelf.
They are inserted into the wall half the length of the hole and fixed with glue.
If you did not make it yourself, but purchased it in a store, then all the necessary fastening elements are included.
If necessary, we make adjustments.