We are planning the arrangement of the future furniture set
So, first of all, we need to decide how and where we will install a set of furniture for our boy, so that he can most effectively:
- rest;
- study;
- develop physically, etc.
How to arrange furniture in a room is a complex question that requires careful thought at the initial stages.
Where to put the table
So, first of all, let's look at where to put the table. Here are the basic rules to follow when choosing a place for this piece of furniture.
The table must be installed at the point in the room where the child will be as far away from the play area or entertainment area (with TV, etc.)
1. The place for study and other work of the student must be completely isolated from the following areas of the room:
- bedroom;
- game.
This is especially important in relation to the play area, since in the case of close proximity to the place for work and rest, the child will be constantly distracted, and the quality of his work will suffer endlessly.
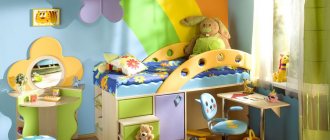
Proper zoning of space in a boy’s room
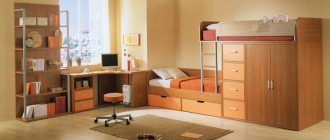
2. The second rule that must be followed involves placing the student’s study or work table directly next to the window. This type of desk setup will help achieve the following positive effects:
- saving electricity costs;
- effectively maintaining the health of the child’s visual system;
- relief of the mental stress that a child experiences during hard work.
If your child writes with his left hand, then it is important that the right side of the desk is closer to the window. If he is right-handed, then in the same way we move the left side of the table closer to the window.
This room is furnished with a small amount of furniture, however, the main condition for placing the table in front of the window is fulfilled
If for some reason you cannot place the table directly in front of the window, position it accordingly closer to it:
- right side for a left-handed child;
- left side for a right-handed child.
3. If you have two children the same age, the same age, etc., living in the same room, you can organize a workspace for them as follows.
Table 1. How to organize a workspace for children of the same age
| Method of placing tables | Description |
According to a single-row layout | This is a scheme in which both tables are next to each other in the same row, and the passage between them is not divided by anything, or is divided, for example, by a bedside table |
According to parallel layout | This scheme is used when tables can only be placed opposite each other. Then the work areas are located parallel to each other, and the children sit face to face or face to back to each other |
According to the L-shaped layout | When placed using this method, the following can be used in a set of furniture for boys:
|
Where to put the bed
So, now it is necessary to consider several rules regarding how and where a boy’s bed should be placed.
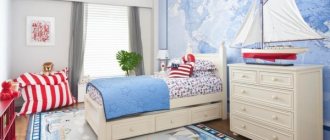
1. It is forbidden to place a bed opposite the entrance to the room, as this will deprive your child of:
- feelings of privacy;
- mental security.
Do not place the bed opposite the entrance to the room
In addition, this is very impractical, since the first thing the child comes home from school will want to throw a dirty backpack and outerwear on the bed.
2. You cannot place the bed opposite a wall on which there is a mirror, as impressionable children, when they are asleep, may be frightened when they unexpectedly see their reflection on the wall.
Do not place the bed to the right of the entrance on the same wall
3. You cannot place the bed on the same wall as the door, since, according to psychologists, the inability to see the door creates subconscious nervous tension, not only in adults, but also in children.
The door should not face the bed
4. It is better to install the bed, for example, opposite the work area, so that the child can calmly lie down to rest after hard work, but also so that the bed does not attract him while working.
Where to put cabinets for clothes, books and other items
Cabinets for clothes and books are best located next to the work area in the child's room. This is necessary in order to:
- items that fell out were not moved under the bed or stored on it;
- the child could calmly take the item he needed without getting up from the computer chair;
- the choice of clothes was carried out with concentration, without unnecessary distractions.
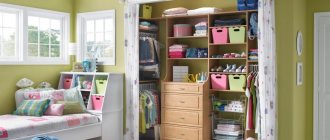
The children's room must be equipped with spacious cabinets for storing various items
Actually, it is advisable that the furniture set for your boy include the following cabinets:
- for various accessories and books;
- for clothes.
An ordinary wooden bookcase is suitable as a bookcase. There is no need to spend money on purchasing such furniture, since you can make a shelving unit from wood with your own hands, without having any carpentry skills. You will find detailed instructions in a special article.
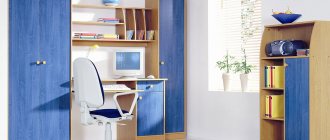
Instead of several cabinets, you can use a single wall where everything you need fits
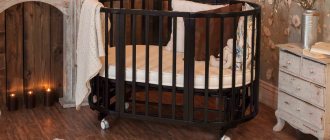
Prices for a children's room with a loft bed
Black Children's room with loft bed
However, it is possible that the cabinets will be combined into a single wall, divided into zones.
Photos of cabinets for a children's room
Instructions: how to choose the right table for a child
When choosing which set of furniture to buy for your child, more attention should be paid to the parameters of the piece of furniture, which in the future will influence how the child will develop mentally and physically the most. It's about choosing the right desk. We will discuss further in the instructions what steps you need to follow to choose the right product.
Step No. 1 - determine the height of the tabletop
So, first of all, we need to determine the ideal tabletop height for your child. This is done as follows:
- using a centimeter tape, it is necessary to measure the child’s height, but not to the top of the head, but to the chest;
- subtract 2-3 centimeters from the resulting figure.
First of all, you should clearly determine the height of the tabletop
The result will be something like this:
- children 120 centimeters tall should sit at a table whose height is about 52 centimeters;
- children with a height of 150 centimeters sit at a table whose tabletop is at a height of 61 centimeters;
- Upon reaching a height of one and a half meters, the child will be able to move to a table whose tabletop height is standard (they also say “adult”) - 75 centimeters from the floor.
The boy’s height should be measured not from the top of the head, but from the chest, since this is the easiest way to find out the required height of the tabletop
Pay attention to an interesting tip: as you understand, children grow very quickly, and in order not to find yourself in a situation in which your child struggles right at the adult table, or in which you buy him a desk every six months or a year, it is better to immediately buy a table for the boy -transformer.
It is best to immediately purchase a transforming table for your child, so as not to spend money on updating the workspace every six months
Step No. 2 – determine the correct width of the table for the child
So, now you need to determine the width of the future table that you are choosing for your child.
Width is very important for the child's comfort
So, according to the standards determined by orthopedic doctors, the width of the tabletop should be at least 60 centimeters. However, given that today children study primarily on computers, it is recommended to purchase a product that is slightly wider so that you can fit on one line:
- computer;
- keyboard;
- notebook for notes.
In addition, the child's elbows should also be placed comfortably on the table.
Minimum table width, indicated in millimeters
Take a measuring tape with you to the store, or ask the salesperson to show you a document that indicates the width (depth) of the countertop.
Step No. 3 - determining the length of the table
The minimum length of the table for one child should be 60 centimeters. However, such a small table is only suitable for primary school children.
The minimum length of the table should also be determined based on the age of the child and his growth rate
For older children, it is necessary to select tables that are much longer, at least 80 centimeters. Accordingly, if you have two children, then the total length of the table should be:
- 120 centimeters;
- 160 centimeters, etc.
The child should have room to turn around when sitting at the table, therefore, it is better to immediately choose a desk that is longer
Please note: as we said above, children now actively use computers for studying. Often they need to print out, for example, abstracts, so you can also install a printer on the table. The more additional equipment must be installed, the longer the table must be. So, you can buy double furniture for one child, so that he can simply put all the necessary equipment aside after finishing the work.
How should a child sit at a comfortable table?
At the same time, the length can be measured not only at a straight table, but also at an L-shaped one. Attention is drawn specifically to the overall length of the product, and not the length of its individual segments.
Prices for desks and tables
Desks and tables
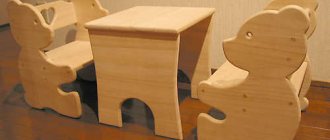
How to make a baby growing chair for a child with your own hands
To avoid having to buy your boy a chair as he grows and develops, you can make a universal device for him with your own hands, called a growing chair. Let's see exactly how a growing chair is made in the instructions below.
How to make a growing chair for a child?
Step No. 1 – selection of materials and tools
So, we will need to make our chair:
- sheets of plywood 22 millimeters thick (for the seat, stands and legs);
- hex bolts (6x70; 6x50);
- countersunk nuts for furniture (10x20; 10x12);
- two pillows for back and seat;
- limiter;
- primer;
- dye;
- any decorative elements.
Thick sheets of plywood
You will also need to prepare some tools with which the work will be done. This is about:
- Whatman paper for drawings;
- pencil;
- measuring tape;
- jigsaw;
- hot glue;
- milling cutter;
- copy cutters;
- sandpaper;
- tassels.
Step No. 2 – designing a chair on paper
The parameters of the chair will be determined individually, since all children are unique, and their body is equally unique. It will be necessary to create a drawing of the chair, taking into account the child’s body parameters. However, if you have no experience, you can do the following:
- use the drawing provided by us;
- refer to GOST No. 19301.2-94, which will help you determine the necessary parameters of a chair for a child, based on his age, height and other characteristics.
Drawing of a children's growing chair
Regardless of whether you downloaded the drawing or not, the pattern will need to be made on a prepared Whatman paper in full size. Remember: a chair has a right and a left side, so the details of the chair should be mirrored.
Another version of the drawing of a children's growing chair
Step No. 3 – cut out the parts from plywood
The pattern we have drawn must be attached to sheets of plywood, and its outlines must be transferred to the chipboard. Afterwards, it will be necessary to cut out all the parts alternately, while leaving an overlap of several millimeters at the edges of each segment.
It is best to use an electric jigsaw for cutting parts.
Prices for popular models of jigsaws
Jigsaw
Remember: there will be two chair legs, but to make them you will need four identical parts. Cut them alternately, and then trim each one, overlapping each other, to achieve perfectly smooth edges.
Step No. 4 – processing the details
So, now take 4 parts of the legs and glue them together with hot glue.
After the parts have dried, take a router and make holes on the inside of the knife with the following parameters:
- 10 millimeters deep;
- 24 millimeters wide.
Using a router, you need to make the main grooves
Prices for a linear series of milling cutters
Prices for a linear series of milling cutters
Fraser
In the middle of the prepared groove it is necessary to drill through the holes into which the following will be inserted:
- sitting;
- footrest.
These holes must be made at equal distances from each other.
Step No. 5 – make runners
You will need 4 sliders, each of which must correspond to the size of the child’s foot:
- approximately 20 millimeters in height;
- 24 millimeters wide.
Runners are also made of plywood
All sharp edges of this segment are ground off, and a groove is drilled in the center, into which a strip of the required thickness is glued. Afterwards the part is sent for drying.
Step No. 6 – cut out the back and footrest
Next, according to the individual parameters you previously clarified, the seat and footrest are cut out. The back can be made solid, or several slats can be adapted for it.
The footrest and seat should be as comfortable as possible for the child
Step #7 - Shutdown
So, the parts we make are connected to each other, and then the finished product is coated:
- special paint;
- varnish to protect the paint from peeling.
However, if desired, you can not use paint, but simply cover the chair with stain in order to preserve the natural grain of the wood.
We connect the finished parts together