Bench made of concrete slabs and boards with backrest
By looking at the drawings of the bench, you can find out the features of its structure. You can make such a design with your own hands relatively easily, quickly and without high financial costs.
Making a bench with a backrest with your own hands is described in great detail in step-by-step instructions.
- Take boards fifteen centimeters wide and 3.8 centimeters thick. They are sawn in such a way as to produce five boards two meters long, four boards sixty-five centimeters long and two boards seventeen and a half centimeters long. In addition, we need concrete slabs, the thickness of which is five centimeters, and the length and width of fifty centimeters each. You will need twelve such slabs.
- To prepare the materials for assembly, holes should be drilled. For two-meter boards, the distance from the end is ten centimeters and forty centimeters. Dots are placed in these places in the middle of the board. The board is also marked at the other end. Using an 18mm drill, holes are drilled in these places. The procedure is repeated for all boards of this length.
- Next, concrete slabs are marked They retreat from the top edge by seven and a half centimeters, and from the right and left by ten. Points are placed at the intersection points and holes are drilled using a concrete drill.
Assembly: initial stage
After the preparatory work, it’s time to process the wood. In order for a hand-made bench with a back to serve for a long time and decorate the area, the materials must be pre-treated.
The wood is coated with antiseptic compounds and allowed to dry. After this you can start assembling the back.
On one of the two-meter boards, fifty centimeters are measured from the edges. The edges of the concrete slabs will be located at this level. From this mark another fifteen centimeters are measured towards the center of the board. This is where the first boards will be attached. From the resulting marks we measure seventeen and a half centimeters - the gap between the back boards. Next, we measure fifteen centimeters for two more boards. There should be a gap of five centimeters between them. All this can be seen in the drawing.
Wood glue is applied to fifteen centimeter sections. They are attached to boards, the length of which is sixty-five centimeters. Additionally, they are secured with self-tapping screws.
On top, between the boards of the back, pieces of seventeen and a half centimeters are glued. To ensure that the parts stick together well, they are clamped and held until the glue sets. After gluing is completed, the back is covered with an antiseptic.
All wooden parts can be varnished . This will give them additional stability and attractiveness.
Assembly of the main part
It is better to assemble the main part of the bench from both sides. Concrete slabs are placed between the boards, and M16 threaded rods fifty-five centimeters long are inserted into the drilled holes. You will need four of them.
The rods are fastened with M16 nuts and washers. They are twisted simultaneously from different sides to make the bench level.
Simple DIY bench
You can make benches for your garden with your own hands quite quickly if you follow the instructions. Let's consider four options for such garden structures.
The drawings of the bench show in detail all its features. Making such a bench with your own hands is quite simple. The only difficult element is the concave seat.
The number of parts and their dimensions are indicated in the table.
Making a bench with your own hands from wood begins with the preparation of the necessary parts. Boards and beams are cut into pieces of the required length.
Making seat supports will be somewhat more difficult. You will need to mark the blanks. Two points are marked along the edges at a distance of seven and a half centimeters from the bottom side, and in the center a point at a distance of four and a half centimeters. They are connected using a flexible plastic ruler and cut out with a jigsaw . The sections are processed with sandpaper.
Seat supports are attached to the two upper drawers. One on each edge and one in the middle. Next, screw in the supports, spaced from the outer ones by the width of the leg. All connections are made with self-tapping screws.
boards are attached to the resulting base . It is advisable to deepen the screw caps.
Then the legs . They are attached to the seat supports. The lower drawers help secure the legs.
The finished product is coated with an antiseptic and varnish.
Assembling the couch
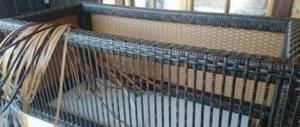
In our case, the short drawers are attached between the long ones, so we drill them into the end for the confirmations (diameter 5 mm). In the long ones we mark and also drill for confirmations, but in a plane (diameter 8 mm). We place one short drawer at a distance of 400 mm from the part of the box where the headboard will be.
The following figure shows exactly how to attach the legs. To do this, we purchased 4x60 self-tapping screws, for which we drill in the drawers with a diameter of 5 mm, and in the legs - 2.5 mm (so that the wood does not crack).
Attaching the couch legs
Along the entire perimeter of the box (except for the head compartment), we screw the corners to secure the main bed. In the version with gas shock absorbers, we install them too, according to the instructions included in the kit.
We screw the stock to the corners on the box, retreating 50 mm from the foot and on the sides. It is more convenient to first attach butterfly loops to the headboard, and then, in a lowered, horizontal state, “slide” them under the bed and secure them completely. We fasten the counter part of the gas lifts - our couch is ready!
We have already looked at the question “how to make a couch yourself?”, but I would like to draw your attention to the universal principle used in this design: you can assemble any furniture in exactly the same way.
Make the legs shorter and the drawers wider - get a single bed. Attach the appropriate mechanism to the box and it will turn into a wardrobe bed. There is always time to think and do a specific thing that is right for you - if your head and hands are in place and in working order.
A massage table is professional furniture for a massage therapist. The comfort of the client and the master himself depends on the quality of this item. Due to its narrow specialization, such a table will not be cheap, so many masters are thinking about how to make a massage table with their own hands.
On the Internet you can find various schemes of expensive and budget options. In this article, I will show you how to build your own folding table without using complicated tools at home.
Simple bench No. 2
To make such a garden bench with your own hands, you will need concrete flower beds and boards. Flower girls are required to create the base of the bench. Use two with a rectangular base and two cubic ones.
To make the base stable, the flower boxes must be glued or connected from the inside with staples secured with self-tapping screws. The container is filled with a layer of drainage and soil. This increases their stability.
The seat for the bench is made of boards. To do this, they are cut into pieces of the required length. These blanks are laid so that there is a distance of half a centimeter between them. Then they are connected using transverse strips. The planks are placed in three places: at the edges and in the middle. Corners are attached to the slats. With their help, the seat will be secured to the flower girls.
DIY bench with backrest
Prepare the bench parts shown in the figure. They are treated with antiseptics before joining.
Then the parts are assembled into supports. The corners are first rounded and chamfered. First, parts A and B are connected with a bolt, and then B, C and D are also connected using a bolt.
The inclination of the backrest is determined by part D, after which it is connected to part A. Similarly, but in a mirror image, another support is made.
After this, the back and seat are assembled. To do this, the supports are placed so that there is a distance of one meter and twenty centimeters between them. First, the front and rear strips are screwed to the supports, then all the rest, and finally the stops are screwed in.
At the last stage, the back of this bench is screwed on.
Bench No. 4 Another version of a simple do-it-yourself bench. Its length is one hundred twenty centimeters. The height from the ground to the seat is fifty centimeters, the height of the backrest is also fifty centimeters.
The base is made of boards , the thickness of which is five centimeters and the width from ten to twelve. One of the legs continues and serves as a support for the back. The supports are connected using the “half-tree” method and secured with bolts.
The basis for the seat is a block secured with self-tapping screws. The short supports on the back of the bench are connected with a collet to increase stability. The seat and back are covered with boards of less thickness. The surface is painted or varnished.
The process of making a simple sofa for the kitchen with your own hands
After preparing a drawing of a kitchen corner or sofa, as well as all the necessary materials, you can begin to work.
Conventionally, assembling a sofa for the kitchen can be divided into four main stages:
- Assembling the sofa frame. This is the most important step. Its strength and durability depend on how well it is made. The main parts of the frame will be three wooden frames. Two are for forming the seat, one is for the back. The frames are assembled from timber and fastened with self-tapping screws. To give them additional strength, stiffeners are installed from the same timber, and the corners are further strengthened using furniture steel corners. The size of the frames depends on the size of the sofa itself.
- After completing the assembly of the frames, they begin to form the seat. To do this, two frames are connected to each other using pieces of timber up to 200 mm long. There should be at least 8 such stands for a seat length of 2 m. They are connected using self-tapping screws. When tightening the latter, you must be careful not to split the timber. To do this, make a rough run with a drill with a diameter smaller than the diameter of the self-tapping screw. Then a self-tapping screw is screwed into the hole. In this case, the timber will not split. A sheet of plywood is laid on the surface of the seat. It is nailed to the base using nails. It is on the plywood that the foam rubber for covering the sofa will be laid.
- After the seat frame is finished, the side posts are screwed to it. They will also serve as handrails. The rear pillars are connected to each other by a beam, which will act as a support (support bar) for the backrest. The front and rear posts on each side of the sofa are connected to each other, forming handrails.
- The last step is to install the backrest. A sheet of plywood is stuffed onto its frame, as well as onto the seat, and the entire structure is put in place. Using fasteners and corners, the backrest is attached to the seat and support bar.
DIY pallet bench
Making a bench with your own hands from pallets is not difficult if you use your imagination. To do this you will need three or four of these wooden structures. Some will need to be sawed to obtain additional parts. The simplest DIY bench design is made from pallets, when two pallets are attached perpendicular to each other, creating a back and seat.
To prevent the design from becoming too bulky, it is better to cut the pallets to the required size. The elements are fastened with self-tapping screws. Add side parts to enhance strength and make legs. All this can be seen in the photo.
Since the material of the pallets is untreated and rough, it will need to be pre -grinded . This will allow you to avoid splinters.
The manufacture of a bench with your own hands from pallets is completed by coating it with varnish or paint.
The secret to the success of an antique item
Nowadays, a bench with drawers is quite rare. Today it is a piece of old wooden decor. That is, an outdated model. Please note: Modern furniture is simpler in appearance, although it may have a more complex design than before. Although for many art connoisseurs, the classic style and technical options from the past still remain valuable.
Antique furniture is attractive for its quality and many additional useful functions.
The bench with boxes has the following functional features:
- Built-in closed boxes are a great place to store things.
- A bench is used to seat more people than a chair.
- The entire wooden structure can be used as a table or nightstand.
This aesthetic type of furniture fits perfectly into any room. A wooden structure can be decorated with fabric, mosaic decor, ceramics, etc. Or just store things on this furniture.
Bench puzzle
You can make such a bench with your own hands if you have a wide board and cuttings for shovels. Curly seats are cut out of the board in the form of puzzle pieces. Legs made from cuttings for shovels are attached to them. The result is separate stools that quickly assemble into one long bench. All manufacturing stages are discussed in detail in step-by-step photos.
Choosing the design of the future sofa
Before you start making a sofa with your own hands, you need to clearly understand what needs to be done. Shape, color, functional tasks must be determined at the preparation stage. Of course, not everyone has the design skills to choose the right shape and color, but everyone can choose the model they like best and make the same one, fortunately there are quite a lot of them in various furniture magazines.
The color of the kitchen sofa should match the overall color scheme of the entire room. The design and its dimensions are selected depending on the available space and the location of the future product in the kitchen. There is no point in making a large and, at first glance, very comfortable sofa for the kitchen of 6 m2, if because of it the room will not be very comfortable. When making furniture with your own hands, you need to choose less complex models. This way you can save on material and manufacturing time. As a rule, the simple model is the strongest and most durable. If you have no experience, you should not take on complex corner or folding structures; you need to start small.
Benches from unnecessary chairs: two DIY options
First option
To create such a bench for your garden with your own hands, you will need four old chairs.
From the first two chairs, remove parts from the front side of the seat.
For the remaining ones are sawed off slightly below the seat structure.
The old varnish or paint removed from the resulting parts To do this, a special agent is applied to the parts that dissolves paint coatings. Then the softened layer can be removed with a spatula.
Holes for dowels drilled in the racks Holes are required on the front and end sides.
The dowels are lubricated with glue and inserted into the drilled holes.
Once the dowels are glued, you can assemble the base of the bench. To make the structure durable, the parts are fastened with self-tapping screws. The surface of the structure is sanded.
To sit on the bench, choose a board that is suitable in size and saw off the excess.
If several narrower boards are used, they are glued together with wood glue. For a tight connection, they are clamped with clamps and wait for the glue to dry.
The finished seat is also glued to the base with wood glue. Heavy objects are placed on the board and clamped together with the base with clamps.
When the glue has dried, cover the seat with masking tape and paint the remaining structural elements with wood paint.
The tape is removed and the seat is treated with stain . Finally, the entire bench is varnished.
Second option
To make a second garden bench with your own hands from old furniture you will need two chairs. It is better if the back and hind legs are not separated.
For two identical chairs, are removed except the back legs and back.
Take bars five centimeters wide and three centimeters thick. Cut two parts equal in length to the width of the chairs, and two pieces of the same length as the finished bench. A rectangle is assembled from these four parts. It is secured to the backs of chairs with self-tapping screws.
Another frame is assembled in the same way. Several transverse strips are attached to it. This design is attached under the seat, makes the bench more reliable and acts as a shelf.
If the chairs have an old coating , then remove it with sandpaper. After this, the surface is puttied with a special compound or coated with a primer. When the layer has dried, it must be sanded with fine-grained sandpaper. Finally, the structure is coated with paint.
The seat for a garden bench is made with your own hands from chipboard or plywood . A rectangle is cut out of the selected material, which is half a centimeter larger than the base on each side. Then cut out a piece of foam rubber with the same dimensions. A rectangle is cut out from upholstery fabric. It should be five centimeters larger than the seat on each side.
Foam rubber is placed on a sheet of plywood and covered with fabric on top. The fabric is fastened from the inside out with a furniture stapler .
The seat is attached to the base with a piano hinge.
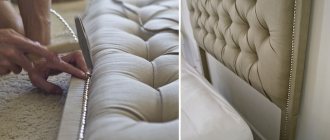
DIY kitchen sofa upholstery
After the sofa frame is ready, it needs to be sheathed. This is done using high-density foam rubber. You can make upholstery in two ways:
- Make removable covers for pillows, inside which pieces of foam rubber are installed. In this case, the soft part of the sofa will be removable. You can remove the pillows at any time if necessary. This option will cost a little more, since you will still have to upholster the frame of the sofa, so the consumption of upholstery fabric will be much greater. In this case, you will have to sew the covers yourself or order them from a studio, which will entail additional costs.
- Make the upholstery non-removable. To do this, the sofa is re-disassembled and each part is upholstered separately. First, the seat is upholstered. To do this, foam rubber is laid on its surface. To prevent it from slipping, it is glued using “88” glue. Once the glue has dried, you can begin upholstery. To do this, a piece of fabric or leatherette is cut out. It should be large enough to cover the top of the seat, the sides and have an overlap to secure the fabric at the back.
The fabric is laid out on a flat surface, and the seat is placed face down in the middle of the segment (so that the size of the overlap on each side is the same). Then they carefully bend one side and attach it to the frame using a stapler. The step of the staples should be no more than 15-20 mm, in this case the fabric will hold tightly. Since the “seam” will be on the wrong side, you don’t have to save paper clips. As soon as the first side is secured, the second is stretched and also nailed with a stapler. Then the side sections of the fabric are folded. In this case, it is important to carefully form the corner of the fabric so that there are no visible wrinkles on it. Just as with the main sides, one side is nailed first, then the other is tensioned and nailed. The back is upholstered in a similar way.
After upholstering all the elements, the sofa is assembled again.
Not only foam rubber can be used as a substrate. In many cases, foam rubber or holofiber are used. The latter has fairly good elasticity, despite its relatively small thickness. In addition, its service life is longer than that of foam rubber. However, the cost of holofiber is much higher.
Bench-swing
To make such a bench for your garden with your own hands, you should prepare the necessary materials. Manufacturing begins by creating the basis of the structure. The seat bars are attached to the back bars at the selected angle.
Additional ribs to provide rigidity.
The planks are attached to the seat by drilling holes for fastening in the base bars. The same goes for the back.
Armrests are installed on both sides of the seat. They can be secured with bolts.
The resulting bench is coated with wood preservatives and varnish. It is very important to paint everything as carefully as possible.
The bottom of the bench is reinforced with a metal profile. Chains are attached to the profile on which the swing bench will be suspended. It is imperative to check the reliability of the beams on which the bench will be suspended.
Making a kitchen corner sofa with your own hands
If the area of the room does not allow for a straight sofa, which is often found in old houses where the kitchen barely exceeds 7 m2, then it is better to make a corner model. As mentioned above, such sofas are more complex to manufacture and require experience in such work. The corner design of upholstered furniture for the kitchen consists of three main parts:
- Short sofa.
- Long sofa.
- Corner module.
Making short and long sofas is not fundamentally different from the process described above. The corner module may be different. One of the options, which is the simplest, is to install a connecting table. It is made from laminated chipboard and is attached to the handrails of sofas. True, in this case the corner sector cannot be used for sitting. To make the corner suitable for seating, a separate corner section must be manufactured.
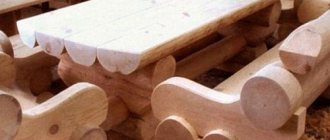
Log bench
To make such a bench with your own hands from wood you will need a chainsaw . The main material is a thick log one meter long.
The log is marked to create two slightly unequal parts. The back will be made from the smaller one, and the seat from the larger one.
Using a chainsaw, the log is sawed lengthwise along the mark. The resulting irregularities are immediately cut off with the same saw.
Next, a triangular piece is cut out to create a dovetail . Recesses are cut out on the back and seat. The photo shows how they should look.
The cut triangular piece is cut into pieces and inserted into the holes in the seat. The back is secured on top. The bench is almost ready. All that remains is to give it a more decorative look.
You can put the seat on legs . To do this, recesses are made in the lower part to install a pair of logs as legs.
Transformable bench
The design features of the transformer can be seen in the drawings of the bench. A transformer bench is made with your own hands from planed boards , which are sawn to the specified dimensions.
Holes for fasteners are drilled in the cut timber parts
At the table top, the boards located on the edge can be made wavy.
Holes with a diameter of twenty-two millimeters and a depth of three centimeters are drilled in the material intended for the countertop Cuttings of the same diameter will be inserted into them.
The edges of parts and edges are processed and rounded.
All elements are assembled using screws and screws. Screws are needed with dimensions 6x70 and 6x90, screws - 8x80.
Wooden parts are painted with stain.
The structural parts that will move are connected by hinges.
Parts of a round handle are placed between the boards of the tabletop .
Install the back support.
A hand-made transformer bench is varnished.
Rocking bench
Making an original bench with a backrest with your own hands is not difficult if you have the tools and materials. First you need to consider the drawings of the bench, which contain a small number of parts.
The side parts are transferred according to the pattern onto europlywood three centimeters thick. They are cut out using a jigsaw and the ends are processed with a grinder.
To attach the connecting strips, markings are made. Then the holes are drilled. After assembling the frame, the slats are attached using self-tapping screws. The fastening points are sprayed, and the entire product is varnished.
Assembly
- The diagram for assembling a massage table with your own hands begins with marking the tabletop. On the prepared plywood I marked two elements measuring 600 x 900 millimeters. After that, I cut out the parts using a jigsaw.
I sanded the ends of the resulting blanks with sandpaper to remove burrs and make them smooth.
In the blank, which will be the front part, a cutout for the face is marked. I cut out an oval hole measuring 180 x 110 millimeters using a jigsaw. The edges were also treated with sandpaper.
- After making the lid I started working on the frame. From timber measuring 20 x 50 millimeters, I made four sections of 900 millimeters in length and four sections of 550 millimeters in length.
Using self-tapping screws 45 millimeters long, the beam must be connected in such a way that you get two frames measuring 900 x 600 millimeters, they are measured at the outer ends.
There is no need to rush with the screws; before connecting the bars, I made holes 3 millimeters deep in them. This prevents the wood from cracking. We attach the tabletop element to the finished frames. For fastening we use self-tapping screws 20 millimeters long.
- Next I started finishing the top cover. I carefully spread the glue over the tabletop and laid a sheet of foam rubber on top. After some time, I repeated the procedure and secured the second sheet of foam rubber. After the glue had dried, I carefully cut out an oval for the face and removed excess material around the edges.
The next step is stretching the leatherette. I carefully secured it to the tabletop without compressing the foam too much. I folded the edges of the material and brought it behind the frame, stitching it with a stapler to secure it. The stitch pitch is 0 millimeters. First I secured the material on the long sides, and only then on the short ones.
The hardest part is the corners. The material must be secured without the formation of folds or unevenness. On the short side I left small cutouts for the loops.
I assembled the legs as shown in the diagram. The most difficult thing when assembling a massage table with your own hands is to achieve stability and an even cut. The table should not wobble. The cut must be made carefully and accurately. In total I needed two of these blanks.
I assembled the next supports using a similar pattern; two of them were also needed.
We connect the first pair of supports with the second using self-tapping screws. I ended up with two identical sets of legs. No distortions are allowed; this must be checked immediately.
I marked the locations for the hinges on the inside frames of the table top. They are placed right at the corners of the structure. Then I secured the hinges and tried on supports for them. To check for foldability, you can fasten the hinges to the legs with only one self-tapping screw along the central hole in the hinges.
All main connections should be easy to fold and not jam. This should be taken care of before all the screws are tightened.
- The final step involves making a spacer that will give the portable table more stability.
To do this, two bars 53 centimeters long are connected with a piano loop. After this, I connected the ends of the element to the short part of the table supports. In a stationary position, this part will unfold together with the supports.
The project is completed. This table is suitable for both professionals and those just starting to get involved in this difficult task.
Bench around a tree
The simplest version of such a bench is hexagonal. The size depends on the size of the tree. Measurements are taken at the height of the seat. A margin of fifteen to twenty centimeters is added to the result obtained. If you divide the result by 1.75, you will get the length of the inner side.
To cut boards ten centimeters wide, they are laid in four rows with intervals of one centimeter.
The cutting location is marked immediately for all rows with an angle of thirty degrees. This is how are cut out .
Legs are used with a height of sixty to seventy centimeters. They are connected by cross members by drilling holes and using bolts and nuts.
The seat is installed so that the joints are located in the center of the ribs of the legs. The outer parts are screwed on first, and then the inner ones. In this way, the entire hexagonal structure around the tree is assembled.
Finally, the back is made and the apron is installed. The result is a DIY circular bench with a backrest.
The finished product is treated with oil impregnation.
Bench made of curved branches
A bench made of curved branches will look original. It will require branches for the front part, two legs, a horizontal top and a pair of transverse branches.
The branches are cut so that they fit together as accurately as possible. Next, they are connected with metal corners.
The back part is made in the same way and connected to the front.
The finished product is placed on a flat surface and the seat is assembled.
Bench options
- A bench made of logs that blends well with the surrounding nature. It consists of half a log, used for a seat, and two short round logs, which are legs.
- A beautiful wooden bench with a back and armrests, reminiscent of a sofa. Curved and cut elements make it more attractive, while leaving knots and irregularities gives the structure a natural look.
- Bench made of wood and metal. The base of the structure is metal. The wooden parts of the seat and back are attached to it. The thin metal parts make it look lightweight.
- The bench has a simple, classic shape. It is made of wooden, rather wide boards. This width allows you to sit comfortably on the bench. Armrests make the design more complete.
- An original bench made of wood with figured details. This option is well suited for a site with a natural, rural design. Carved legs and armrests, a figured back - all this gives the product originality.
- A bench with an interestingly shaped back. The curved parts gradually bend back, creating a unique design. The seat is slightly curved but has a more traditional appearance.
- A set of wood – a table with two benches. The design looks traditional due to the material used. The original solution is to fasten all components into a single structure.
- The bench is made of solid logs. A single piece is cut out of it, combining the back and seat. The legs are attached to the bottom. The log required is quite large.
- Bench with a drawer for storing toys. Outwardly it looks like an ordinary wooden bench-sofa, but under the seat there is a drawer in which you can put various things.
- A comfortable bench made of wood with a simple shape. The base is made in the form of a rectangular box. The back is also simple with a straight shape. The seat has soft cushions for added comfort.
- Wooden bench located around a tree. It is made as if it consists of four benches, each of which has one armrest. The composition looks attractive and comfortable.
- A simple bench made of wide boards. It looks solid, but its size is somewhat hidden due to the gaps between the boards and the light blue color in which it is painted.
Decorating the product
Unusual rope daybed-bed
For decoration, you can only use paints and varnishes, various synthetic ones, microfiber, dermantin or velor - it all depends on your taste and budget. Synthetic upholstery retains its color and shape for a long time, but it tends to electrify and attract dust.
Massage couch with wooden legs and soft upholstery
The couch will have an interesting appearance if you drill holes in the plywood and tighten the filler with nylon thread. The holes will be hidden with the help of beautiful buttons covered with matching fabric.
Using the couch for relaxation, massage and treatments