Pros and cons of using MDF panels for ceiling finishing
To achieve a good result, when choosing any material for finishing, you need to take into account its strengths and weaknesses.
Advantages of the material:
- Environmentally friendly. MDF panels are made from wood chips, which are hot pressed. No phenol or toxic resins are used for bonding, so the material does not emit harmful substances during operation.
- The panels can be used in premises for various purposes: office, industrial, residential.
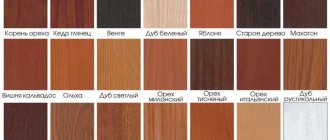
- Large selection of colors and textures. You can choose a material that imitates wood or natural stone.
- Easy care: just wipe the ceiling periodically with a damp cloth.
- Easy to install, repair and replace, all work can be done with your own hands.
- Durability.
The disadvantages include the following features of MDF:
Like all wood-based materials, it is afraid of direct contact with water and steam, and can swell from dampness and become deformed. When washing, do not use household chemicals, this can damage the surface. Combustible material
The panels can easily catch fire if the fire is handled carelessly. For the same reason, it is necessary to carefully insulate all wiring.
Tensioners
There is an opinion that suspended ceilings in the kitchen are always a risky decision. They say that vinyl will quickly deteriorate as a result of daily exposure to moisture and high temperatures. However, reality shamelessly refutes these arguments: stretched fabrics successfully cope with any thermal loads and are pleasing to the eye for many years.
Pros:
- impeccable aesthetic appearance;
- completely seamless design;
- do not require serious preparation of the base;
- they are not afraid of a flood - in which case the water is simply drained and the canvas is re-stretched;
- wide selection of colors and textures;
- basic care;
- reference moisture resistance;
- durability - from 10 to 20 years;
- can be combined with other materials;
- do not reduce the size of the kitchen as much as hanging options made from gypsum plasterboard.
Minuses:
- require professional installation;
- poor resistance to mechanical stress.
It is also worth mentioning that different types of suspended ceilings behave differently in operation. For example, fabric canvases are more difficult to clean from stains, and sometimes even impossible. Accordingly, classic glossy and matte options are more optimal for the kitchen.
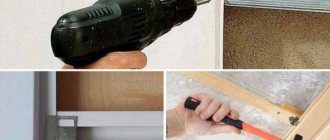
Basics of installation work on finishing MDF ceilings photo
How to make a plastic ceiling with your own hands correctly, step-by-step process for installing plastic panels
The frame is prepared in advance before finishing the walls.
It is installed from a wooden beam 60 by 40 centimeters long and wide.
The timber prepared for the frame must be well dried. Raw material can lead to undesirable consequences, such as deformation or curvature of the ceiling.
Horizontal levels of the frame are marked on the walls using a water or laser level. In addition, it is necessary to use painting thread. When installing LED lighting, the frame level should be lowered 10-12 meters lower.
The timber is fastened along the horizons cut off on the walls with special elements called dowels.
The cord is pulled from two beams located opposite to each other. The interval between the bars should be no more than sixty centimeters.
Next, you need to secure the drywall along the cords and their length. At the next stage, the ceiling beam is secured with self-tapping screws. Thus, the frame is ready and you can safely carry out further work.
Next, the first panel is cut into two equal parts and applied with a tenon to the wall or frame. The panel is secured to the beams using self-tapping screws.
A distance of three millimeters is left in the space between the board and the wall, which will then be covered with the ceiling plinth.
The places reserved for self-tapping screws must be drilled with a drill. But only in such a way that the drill has a smaller diameter. Then the heads for the screws are countersinked.
The last of the panels is attached to the ceiling in the same way as the first, to the frame, and the finishing is completed by installing a plinth or corner.
Install MDF ceiling panels yourself and purchase them for your home! An ideal option that will transform your interior and also turn out to be a durable and practical companion!
In appearance and structure they are similar to conventional chipboard. Only now, there is still a difference between these two materials and it lies in the manufacturing technology.
When choosing a building material for a home that should transform the interior, not only its price and quality are important, but also many other advantages.
The advantages of the panels are more than enough, even if they have to be compared with other, more expensive ones.
So, the advantages of MDF panels for the ceiling are as follows:
- Easy to assemble material. You can assemble and install it on a ceiling or wall surface in just a few hours, without experiencing any particular difficulties.
- Working with panels is not dusty or dirty and will not cause inconvenience or discomfort.
- The coating disassembles quickly.
- An element damaged on the ceilings can be easily replaced.
- Caring for the panels is easy, even if they are laminated.
- It has a wide variety of textures and a wide price range.
- Resistant to any external influences.
Thanks to the panels, the soundproofing of the walls in the apartment will not become its companion.
These and other advantages are a reason to make this material the main finishing material for the house, to use it for cladding both the ceiling surface and walls.
The panels have significantly fewer disadvantages than advantages.
Among the disadvantages of MDF for ceilings are:
- They have a low degree of water resistance, so as a result of flooding by neighbors or other penetration of moisture into the material, it can easily swell.
- Strength is not high enough. Any impact or other damage spoils its entire aesthetics.
- The panels are easily flammable. For this reason, you need to operate them in any room very carefully, making sure that no sparks fall on them.
It is easy to install it yourself without the help of craftsmen and enjoy the aesthetics for a long time!
Ceiling panels of this type are the best option for finishing at the most affordable prices!
Beautiful examples
Ceiling made of PVC plastic panels step by step instructions
MDF panels can be used in different rooms. To prevent such an addition to the interior from spoiling the overall picture, you need to use the ideas of real masters of their craft as an example.
Modern living room
A beautiful living room in a modern style is a triumph of minimalism and subdued tones. The background in this room is contrasting - part of the room is dark, while part, on the contrary, is very light. In the dark area, the ceiling and wall are finished with MDF panels of the same color. The material is stylized as parquet masonry, which looks very interesting. This background adds coziness to the room and sets the whole family and guests up for relaxation.
Textile products were also selected to match the color of the wood. These are not only checkered curtains, but also equally stylish pillows.
Classic interior
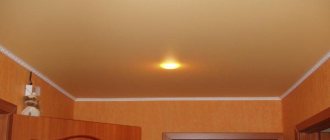
The second example is a beautiful living room in a classic style. It is made in light colors. The floor is dark, the walls are coffee, and the ceiling, made of MDF panels, is very light. The beautiful finishing around the edges reminds us of ancient houses in which the ceilings were decorated with stucco. And the lighting allows you to feel comfortable in any part of the room. In the center of the ceiling there is a luxurious chandelier, which serves as a real decoration of this room.
Against the background of such a light ceiling, furniture made several shades darker also looks good. This includes a sofa, armchairs, shelves, and everything you need for a comfortable stay in the company of loved ones.
Bright corner for relaxation
The last example is a room decorated in bright colors that serves as a place to relax or work. Colors that are too light are known to be relaxing. But the shade of yellow present here, on the contrary, will charge the person entering with energy. Both the wall, the ceiling, and the floor are in the same color, so the room does not seem too colorful. In addition, stylized wood inserts soften the white background of the wall.
The lack of wide windows next to the reading corner is compensated by good lighting. Along the entire perimeter of the ceiling there are neat chandeliers that provide pleasant light.
MDF panels are a good option for finishing a modern room
It doesn’t matter whether it’s a bedroom, a bathroom or a kitchen – with proper care, they will last a long time, regardless of where they are used. Take into account the manufacturer's recommendations for care, designers' advice when finishing, and then your interior will become unique and arouse the admiration of all guests who come to your home.
How to attach panels to the ceiling, see the video below.
Preparatory work and installation of panels itself
Now about how to attach the panels to the ceiling. We will need to assemble a hanging frame onto which we will attach the panels themselves. To do this you will need the following materials:
- metal profile;
- baseboard;
- fastenings for suspended structures;
- pendants.
Tools that will be useful:
- perforator;
- level;
- roulette;
- screwdriver;
- marker;
- small metal scissors to help trim the profile.
The work sequence looks like this:
- First of all, we mark the area. We take a pencil or marker, arm ourselves with a level and mark a distance of 5 cm from the ceiling along the perimeter of the room. The lowest angle is taken as the starting point.
- According to the marks, we attach the starting profile to one level along the entire perimeter of the working area. The easiest way is to use self-tapping screws in increments of 400-450 mm as profile fastenings.
- A ceiling profile is mounted into the starting profile, and the fastening is the same screws.
- We drill holes at intervals of 600 mm from each other. We mount the hangers into dowels. We place the profile so that the resulting area is divided into squares or rectangles.
- The places where the profiles will intersect with each other are fastened with “crabs”. As a result, we get a metal frame with a good margin of safety.
- Now you can attach the MDF panels. To do this, we use clamps that are attached to the profiles. The clamps will create a visual seamless effect, so the ceiling will look very neat.
- The panels should be fastened so that there is a small gap between the edge of the material and the wall. Upon completion of installation, ceiling plinths should be installed to hide the side gaps.
A do-it-yourself ceiling made from MDF panels using a metal frame is ready.
Base ceiling mounting
How to make a ceiling from PVC panels with your own hands
This method is considered simpler and lighter compared to suspended profiles. To attach to a base ceiling, there is no need to install additional structures, which means significant savings in financial resources and time. The advantage of this finish is the fact that when mounted on a base ceiling, the height of the room does not decrease. Decorating with this finishing method is quite varied, thanks to the available finishing materials. But it should be noted that this method does not allow the installation of shaped structures, as well as the installation of ventilation communications and lamps.
Panel installation
To install a ceiling made of MDF panels with your own hands, the homeowner will need the following tools:
- pencil and cord or thick thread rubbed with chalk;
- tape measure and level;
- a diagram of the location of electrical wiring on the ceiling or a device that detects it;
- miter box, metal scissors;
- a hammer drill and a screwdriver with an angle attachment (you can do without it);
- a drill with a crown, a circular saw with guides, a nail gun or a hammer;
- fastening elements: screws, nails, staples, dowel-nails.
The following materials are also purchased for attaching MDF panels to the ceiling:
- the panels themselves;
- ceiling plinths;
- wooden bars and metal holders;
- for metal lathing you will need connectors, hangers and guides for the profile, profile.
Ceiling technology
Before attaching the MDF, the home craftsman must mount the sheathing on the ceiling:
- determine the level at which the ceiling will be located, not forgetting the size of additional elements in it, for example, lamps;
- measure the dimensions of the ceiling, then mark it with a pencil and a chalk cord so that the ceiling is lined with squares with a side of 100 cm;
- using a wiring diagram or a special device to find it, mark the location of the wires on the ceiling;
- Use a puncher to make holes in the places where the marking lines intersect. If there is wiring at the desired point, move the drilling location a few centimeters so as not to catch the wiring with the drill;
- insert the dowels into the resulting holes and secure the hangers with dowel nails;
- slightly bend the edges of the hangers towards the ceiling;
- mount the guides for the profile using a level and making a hole for the dowel-nail;
- fasten the profile to the suspension on both sides with metal screws, controlling the process with a building level;
- bend the protruding edges of the suspension more strongly or cut off completely;
- install the second profile, aligned with the level of the first, the third - with the level of the second, and so on;
- to make a profile shorter, cut it with metal scissors, and to lengthen it, use profile connectors;
- take the last step before installing the MDF panels - fasten the wooden beams to the resulting frame in increments of 40 cm (it is advisable to calculate the exact step according to the size of the purchased panels) using a screwdriver and self-tapping screws, leaving a gap of about 5 cm between the outer beams and the wall so that it was hidden by baseboards.
A metal profile frame is preferable in terms of durability and fire resistance
After installing the sheathing, begin installing the MDF panels on the ceiling:
- attach the panel to the sheathing, insert a metal holder in those places where the panel meets the wooden beams of the sheathing, and nail it to the beams;
- install the staples on the first panel close to the edge so that they can be hidden by the baseboard;
- insert the next panel into the groove of the previous one, the third panel into the groove of the first, and so on until the end of the ceiling;
- if the edge panel does not fit into the remaining space, it needs to be cut: measure the empty space on the ceiling, measure on the panel and cut it;
- When installing MDF panels with your own hands, at the same time monitor the electrical wiring and cut holes for it with a crown drill;
- Installation of MDF plinth is carried out by coating it with glue and installing it in the desired place, followed by fixing it with nails without a head.
Practical techniques for attaching MDF panels to the ceiling are shown in the video:
https://youtube.com/watch?v=CrqfLr_FZj8
Step-by-step technology for installing panels on the ceiling
To install a ceiling made of MDF lamellas, you will need the following materials and tools:
- metal ceiling profiles for the supporting frame;
- guide profiles for fixing to walls;
- MDF panels;
- ceiling plinth;
- perforator;
- screwdriver;
- clamps;
- ruler, tape measure and pencil;
- construction and laser level;
- ladder;
- dowels and screws for fixing the frame;
- short screws for metal;
- anchor bolts;
- U-shaped hangers for profiles.
The sequence of installation of the ceiling surface made of MDF lamellas is as follows:
- First, we mark out the future structure. To do this, from the lowest angle we set aside the distance by which the ceiling structure is lowered. The amount of omission depends on the presence of built-in lamps, communications and starts from 5 cm. We transfer the marks to all corners of the room and connect them with lines on the walls.
- We attach the guide profile to the markings on the walls. We install self-tapping screws with dowels in increments of no more than 400 mm.
- After this, we attach the ceiling profile to the ceiling in increments of 400-600 mm. We insert its edges into guide rails on the walls and attach the central part to the ceiling using hangers.
- We align the entire structure in one plane, adjusting the height of the suspensions.
- We lay utility lines along the base ceiling and prepare installation sites for lighting fixtures.
- Let's start installing the panels. To do this, we attach the first element to the frame with clamps, turning it with a spike towards the wall. We place the fastening element behind the bottom flange of the groove and screw it to the metal frame with a self-tapping screw.
- We install all subsequent panels in the same way. If necessary, we cut holes for built-in lamps in advance, before installing the slab on the ceiling. We cut the last element to width and fasten it with self-tapping screws through the front surface from the wall side. Subsequently, the place where the screws are screwed in will be covered with a ceiling plinth.
- We install ceiling plinths.
Why wall parts?
Many may ask this very question when they see the word “wall” in the title. The use of this kind of wall details is dictated by several points:
- The coating is much more durable.
- The thickness of the parts is greater and due to this, their heat-saving and sound-proofing characteristics are improved.
- The choice among various options for wall materials is often much greater than for ceiling coverings.
- Often stores simply do not have MDF boards for decorating ceilings.
All these nuances force us to choose coatings that would seem unsuitable for use as ceiling cladding. There are no other fundamental points in the use of such materials.
DIY ceiling made of MDF panels
To finish walls and ceilings with MDF panels you will need the following tools:
- building level
- pencil
- screwdriver, screwdriver
- for concrete surfaces – hammer drill
- wood hacksaw, jigsaw
- measuring device (roulette)
- metal scissors
From materials:
- self-tapping screws
- pendants
- profiles
- clamps
- dowels
- ceiling plinth
- connector
- finishing material
To finish the ceiling with MDF panels, you first need to make a frame. First, you need to make markings around the perimeter of the room, using a tapping cord, having first retreated 5 cm from the ceiling. In accordance with the drawn markings, the first profile will be attached. You can check the horizontality of the marked line using a building level.
The first profile is mounted on wooden surfaces with self-tapping screws, and on concrete surfaces with dowels; the distance between them should not exceed 50 cm.
You need to insert the ceiling profile into the guides. The step frequency should be 40-60 cm.
After that, ceiling suspensions are installed, to which the profiles are attached. The optimal distance between profiles along the length is up to 70 cm.
For information! The edges of a hanger that is too long can be directed upward or trimmed with metal scissors.
Each profile needs to be attached to the suspension on both sides; it is especially good to do this with self-tapping screws with a pointed tip. Next, the transverse profile is fixed and leveled.
There is an opinion that wooden blocks can be used instead of metal profiles. This option is quite possible, but not in rooms with high humidity, since there is a high probability of their deformation and damage. Working with wood material in dry rooms is simple and easy.
We begin to sheathe the frame with MDF panels. Panel fastening process:
- Cut strips of the required size using a jigsaw with a sharp blade;
- The first panel must be inserted into the guide profile and secured with self-tapping screws or clamps every 20-25 cm;
- The second panel is inserted and connected to the starting one. The tongue-and-groove technology is used; the tongue of the second panel must be inserted into the groove of the first;
- Each subsequent panel is mounted to the ceiling profiles. To avoid cracking of wood-fiber material, you can use clamps. Nails or screws are screwed into the installed plate;
- It is recommended to prepare places for built-in lighting fixtures immediately. To do this, first insert the panel, mark the specific location of the lamps, remove the finishing material and make a hole to size. For convenience, it is good to use a screwdriver with a special attachment - a crown. After the preparatory work, the lighting fixtures are installed and the panel is mounted on the working surface;
- The last panel often does not fit in width, and it has to be adjusted and trimmed.
The final stage is the installation of the ceiling plinth. It is needed not only to give the structure an attractive appearance, you can hide fasteners under it.
The ceiling covering with MDF panels is finished. All work on installing the finishing material can be done with your own hands, without the involvement of a construction team. This is an affordable and effective way to cover ceiling surfaces. And the use of panels with a three-dimensional texture will allow you to create an original interior in your living space.
MDF panel installation technology
Before starting finishing work, it is necessary to: prepare working tools, purchase the required number of panels and additional elements (see Ceiling plinth Format: information about the manufacturer, types of plinth, related products).
MDF ceiling panels
Necessary tool
We will need a tool that a home craftsman will probably have:
- Pencil.
- Building level.
- Roulette.
- Hammer.
- Metal scissors.
- Screwdriver.
From the materials we will need:
- MDF panels.
- Ceiling plinths.
- Galvanized metal profile.
- Suspensions.
- Connectors.
Veneered MDF panels for ceilings
Frame installation
- Let's move on directly to installation. First of all, we begin assembling the frame from metal profiles. Using a building level, we mark the perimeter of the room. In this case, the distance from the ceiling must be at least 5 cm. After marking, using a special device, we check the location of the hidden wiring.
- We fasten the starting profile around the entire perimeter of the room using dowels or self-tapping screws. It depends on the material of the walls. The fastening pitch is 400 millimeters.
- The next step is installing the ceiling profile. It is inserted into the starting profile parallel to one of the walls. The profile pitch is 400-600 millimeters.
- Next, we attach the ceiling profile to straight ceiling hangers. The profile is attached to the suspension on both sides with self-tapping screws.
For each subsequent profile, we take the horizontal level from the previous one, install all the remaining profiles identically, if necessary, shortening them using metal scissors (see Ceiling tiles made of polystyrene foam - select the appropriate option).
If the length of the profile is not enough, you can use special connectors to lengthen it.
- Installation of wooden blocks. It is with their help that MDF panels will be attached to the ceiling. We fasten using a screwdriver and self-tapping screws. When installing the edge bars, a prerequisite is a gap from the wall of approximately 5 centimeters. We carry out calculations individually for your existing ceiling plinth.
- Calculate the length from one bar to another, relying on the geometry of your specific MDF panels; as a rule, the distance between the bars is about 40 centimeters.
Thus, we prepared the ceiling directly for the installation of MDF panels.
Installation of MDF panels
Attaching MDF panels to the ceiling is very simple. To do this, it is enough to acquire special metal holders.
The installation algorithm looks like this:
- The panels are fastened using tongue-and-groove technology. Therefore, finishing the ceiling with MDF panels begins with securing the very first screws or nails. Then this fastener can be easily hidden using a ceiling plinth. The panel fastening spacing is no more than 200 millimeters (see Installation of ceiling plinth: expert advice).
Panel installation
- The next panel is inserted into the groove of the previous panel. We secure it from the groove side with a clamp.
A kleimer is a special fastening element that allows you to secure moldings and MDF panels to the walls and ceilings of a room.
It is a rectangular metal plate that has special cuts and a tongue with which the panels are actually attached (and screws are screwed into the cuts of the plate or nails are driven into them). Considering that the panels can be used in rooms with high humidity, the stamp is specially made in such a way that its anti-corrosion properties are maximized - it is made of carbon steel and additionally galvanized.
Fastening with a clamp
- If the panel is too long, it must be shortened. We do this using a jigsaw with a cutting blade designed for a clean cut.
Jigsaw
When installing panels, you should make holes for spotlights in advance using a “crown”.
This can be done on an already installed panel, or before its installation. We install sources of spot lighting in the resulting holes. When installing halogen bulbs, remember that they are very sensitive and should not be touched with your hands. All subsequent panels are installed in the same way.
- Lastly, the decorative plinth is installed. It will give our design a complete appearance. It will also help hide the starting fasteners.
Ceiling plinth option
This completes the finishing of the ceiling with MDF panels. We examined in detail all stages of installation work. They talked about all the subtleties and nuances. Now you should have no questions left.
Decorative MDF panels
MDF ceiling tiles are a modern finishing material. Unlike PVC, it has high levels of noise and heat insulation, as well as an excellent level of thermal protection.
Decorative MDF panels are also divided into two types:
- Laminated - the top layer is made of PVC film, which gives the material the ability to withstand moisture and water, as well as additional strength. The surface is easy to clean from dirt and is resistant to mechanical stress.
- Veneered - made from veneer of valuable wood species, which is obtained by peeling. In the manufacture of this material, any harmful phenolic resins are excluded. The surface of such plates is coated with special paints that are chemically resistant. This layer gives MDF panels high aesthetic properties and special strength.
Installation of decorative MDF boards
Ceiling tiles made of MDF must be mounted on a pre-installed wooden frame or metal profile. Also, before starting to decorate the surface, the following work is carried out:
- communications are laid and hidden;
- carry out insulation of the ceiling (if necessary);
- install ceiling lamps and fixtures.
Installing panels on the ceiling requires the presence of a frame. To do this, it is necessary to install the sheathing in increments of about 400 mm. Each individual frame element is mounted on the ceiling using self-tapping screws or dowels, as shown in the photo.
When the sheathing is completely installed, you can proceed to attaching the wooden panels. The first element of decorative finishing is mounted on the sheathing using self-tapping screws. All subsequent ones are fastened with clamps (special fasteners). In this way, MDF panels are installed over the entire area.
When choosing decorative materials, you should pay special attention to their surface. The top layer should not have any flaws
Low-quality PVC panels may have a blurred pattern, which can be easily removed with a regular damp sponge.
Also, numerous defects may be the result of improper storage conditions, which is especially common in markets. To minimize the risk, you should purchase finishing materials from construction stores, where all requirements regarding storage and transportation are met. In addition, if a defect is discovered, the product can be returned and your money back.
Ceiling finishing with MDF panels
Mount MDF panels on a pre-prepared frame. To arrange it, you need to mark the ceiling. Using a construction tape, determine the lowest angle and set it down about 5 cm. This notch will be a guide for marking around the entire perimeter of the room to create a frame. The lines must be strictly horizontal, which can be easily checked if you use a building level.
Along the resulting lines, a metal profile is installed, onto which a frame for the ceiling made of panels is fixed. For the base, it is better to choose metal elements, since wooden blocks may not be well dried. This will subsequently lead to deformation of the frame and the entire structure and will require repeated repairs.
Afterwards, you can attach the hangers in increments of 65 cm, which are fixed with dowels and also form a kind of frame. Next, the MDF panels are installed on the ceiling. If plastic panels are attached only with self-tapping screws, then clamps are additionally needed. These two fasteners are capable of creating the most reliable fixation.
Specifics of installing MDF boards
- To fix the first panel, use self-tapping screws to connect to the corner profile and clamps for the opposite side. In this way, the entire canvas is assembled.
- It should be remembered that holes for lamps are made in advance using a hammer drill with special attachments.
- When installing wooden slabs, it is necessary to focus on the central center line - all lamellas on both sides of it should be located symmetrically and have identical inter-panel gaps of 1 cm. These gaps are left for air circulation and the creation of optimal temperature conditions. After installing the ceiling tiles, they are hidden under decorative strips. The result is a flat surface with an excellent level of thermal insulation, which has a rather attractive appearance.
- Nails must not be used during installation; only glue must be used. The gaps between the plates must be filled with silicone sealant.
- MDF panels can be placed on the ceiling in any direction. It is even possible to create a vault - install the slabs at an angle, aiming for a semicircle.
If you correctly use all the instructions for selection and installation, you can create an ideal ceiling in the room that will last for a long time.
Pros and cons of the material
MDF panels have many advantages. In addition to the ease of installation, both on the wall and on the ceiling, which can be carried out both horizontally and vertically, these include the external beauty of the material, which is presented in a wide variety of colors and textures (see photo), the ease of maintenance for which is sufficient just a slightly damp cloth, and also a fairly affordable price.
But along with the advantages, like any other finishing material, MDF panels also have their disadvantages
These include the presence of free space between the sheathing and the wall, as a result of which, if handled carelessly, there is a risk of dents or cracks. Also, it will be difficult to hang shelves and pictures on an MDF surface.
To install them, you will need to use very long dowels, which must go directly into the concrete or brick surface.
MDF panels are materials with low fire resistance, so it is very undesirable to use them in the kitchen, bathroom and toilet, as well as in other rooms where open fire will be used or there will be excessive humidity. It is recommended to make a distance of approximately 45 centimeters between the individual elements of the sheathing during installation. If it is even a little larger, MDF structures on the walls and ceiling may “play,” which will sooner or later lead to their damage.
Preparatory work
In order to install MDF panels on the ceiling or walls with your own hands, you will need the following materials and tools:
- pencil;
- roulette;
- building level;
- metal corner;
- electric jigsaw;
- construction stapler and staples;
- screwdriver or screwdriver;
- self-tapping screws;
- drill.
It is not necessary to level the surface before installing the material.
In this case, it does not matter at all what material it is made of: concrete, bricks, wood or foam blocks, whether there is any finishing on it or not. It is enough just to apply several layers of primer mixture to the wall or ceiling, after which you can proceed to creating your own lathing
If wood will be used during the work, it must be covered with special mixtures that will protect it from moisture and insects. If necessary, insulation material, for example, mineral wool, can be laid between the profiles, which can be seen in the presented photo.
Installation technology
The process of installing MDF panels on the wall and on the ceiling is almost the same, with the only difference being that during installation on the ceiling you will need an assistant to hold the paneling. So, in order to cover a room with MDF panels you need to:
- choose the direction of installation of MDF structures;
- fix the lower profiles at a distance of 5 centimeters from the floor, and the upper ones - about 3 centimeters from the ceiling;
- make the distance between the profiles equal to 45 centimeters;
- use a building level to check how level the profiles are;
- attach additional profiles around window and door openings;
- if the MDF panels are positioned vertically, installation should begin from the left corner, gradually moving to the right, and if horizontally, from top to bottom;
- attach the sheathing to the sheathing using clamps, which are specially designed for working with such materials;
- attach the clamps to the profiles using self-tapping screws;
- installation of MDF panels is carried out using the tongue-and-groove technology;
- Cut the last sheathing element to the required dimensions and attach it to the sheathing using self-tapping screws.
After installing the material on the walls or ceiling, the corners of the room, both internal and external, must be covered with special corners made from the same fiberboards. The corners can be secured very simply with glue (see photo). They will serve more of an aesthetic function, hiding underneath the self-tapping screws that hold the trim along the edges. More detailed information on how to properly install the panels can be viewed in the video presented.
Advantages and disadvantages
Cladding the ceiling with panels is considered a fairly popular type of decorative finishing, which is due to a number of undeniable advantages of this design.
- Simplicity and high speed of installation allow you to update the kitchen ceiling yourself and in a short time.
- Compared to other decorative coatings, the panels are sold at a very affordable price and are widely available to consumers.
- A huge range of lamellas with a wide variety of textures and designs greatly simplifies the choice and allows you to purchase material to suit any style and color.
- The surface of the panels contains a minimum number of pores , which is why it has high moisture-repellent properties and is not afraid of steam and drops of fat. It is very easy to wash such a ceiling, and any liquid product is suitable for treatment.
- Thanks to the smooth and hard surface, panel ceilings are not afraid of the appearance of mold and mildew, since harmful bacteria simply have nowhere to settle.
- One of the options for decorating ceilings is to decorate them with ordinary wall panels. They are equipped with a convenient tongue-and-groove lock, which allows you to assemble the surface like a puzzle.
- To install a panel structure, a frame is required, thanks to which a space is created between the floor slab and the hanging slats. This allows you to hide all communications in it and makes it possible to hide defects and unevenness of concrete or wooden ceilings. Moreover, the presence of an air gap has a good soundproofing effect, which is especially important in apartment buildings.
- Unlike suspended ceilings, structures made from PVC panels are not afraid of floods from above and do not need to be dismantled in case of moderate flooding. The only exceptions are serious accidents when several tens of liters of water fall on the ceiling. In such cases, the structure is dismantled and the ceiling is repaired.
- PVC panels are not afraid of elevated temperatures and thermal changes. The material does not deform, does not crack and does not lose its attractiveness for a long time.
- Due to their high resistance to negative temperatures, PVC panels are quite suitable for cladding ceilings in unheated rooms: in a summer kitchen or in a country house.
- The panel ceiling does not absorb food odors, which is especially important for kitchen spaces. In addition, high-quality panels from renowned manufacturers do not emit harmful impurities and toxic substances into the environment. The exception is cheap Chinese analogues of little-known companies. You need to choose plastic models especially carefully, since when they are manufactured, unscrupulous companies often violate production technology and produce low-quality goods.
Along with a large number of undeniable advantages, panel finishing still has its disadvantages. These include reducing the height of the room, as well as fading in the sun and the appearance of yellowness on plastic models. This ultimately leads to the loss of attractiveness of the ceiling and the need to replace it. Among the shortcomings, one can note the difficulty of caring for interpanel joints, which tend to accumulate grease and dirt.
In order to avoid such troubles, it is recommended to form seamless structures with the lamellas very tightly adjacent to each other.
However, the main disadvantage is the fact that decorating the ceiling with panels brings a certain office-like and official feel to the kitchen space. This drawback can be mitigated only by carefully selecting the color scheme and texture of the panels, as well as their maximum compatibility with the interior of the kitchen.
Is it worth using MDF panels for the ceiling, or are there more reliable options for finishing an apartment? MDF is one of the cheapest finishing materials, which at the same time has a good set of performance characteristics. In addition, MDF is quite easy to install even without outside help, so many owners of city apartments still decide to use it.
MDF panels for ceilings
It comes as a simple paper plan, or with a surface laminated with film.
A simple MDF ceiling covering is used for cladding corridors, kitchens or living spaces in general.
You can decorate not only the ceiling, but also the walls with this material. The decoration will not only look aesthetically pleasing, but will also prove to be a practical companion to your interior. Finishing the ceiling with these panels is a simple process that does not require much time.
They can also be used to sheathe interior partitions.
The materials for the ceiling and walls have different structures, differing from each other in many ways.
The panels have the following advantages:
- High-quality and inexpensive (white or colored).
- Durable.
- A practical solution to interior problems.
- Aesthetic.
- The ceilings will provide sound insulation to the walls in the apartment.
If the room has tiles, then laminated MDF is suitable for finishing the ceilings and walls, which will look perfect on their surface.
MDF panels for the ceiling
Working with MDF panels is not much more difficult than installing a cheap suspended plastic ceiling, but the interior looks more presentable. Most often, this material imitates wood; it is sometimes very difficult to distinguish such a surface visually from natural wood. In addition, there are excellent MDF ceiling panels that look like marble, metal, granite and other finishes, which can be successfully purchased for the kitchen, hallway, bathroom, loggia or for finishing another room in the apartment.
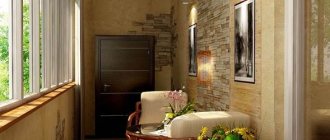
Ceiling cladding with MDF panels
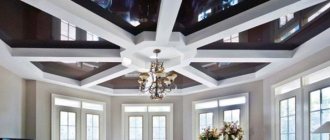
- The ceiling in the bedroom is made of MDF panels . A major advantage of this material is its safety for humans, PVC is much inferior in this, so MDF can easily be installed in the bedroom, replacing expensive wood with it. This choice is suitable when there is a desire to decorate the interior in a country or rustic style, but an acute lack of finances to purchase expensive natural boards is preventing you from doing so. By the way, in our examples you will also see a modern ceiling design using MDF sheets, which do not cover the entire ceiling, but only a small accent area. Although it looks unexpected, it is quite original and stylish.
- Suspended ceiling made of MDF panels in the kitchen . Where suspended panel systems are traditionally used is in kitchens. The MDF ceiling is easy to clean from dirt, even with a simple rag or sponge; it will be clean, warm and cozy. MDF panels on the ceiling in the kitchen look more prestigious than plastic, and a large range of such products will make it possible to choose the material to suit any interior. The disadvantage of this material is its flammability, so you need to be careful when installing the panels in the area of the hob to avoid overheating. The second danger is high humidity, which occurs in a poorly ventilated kitchen. Try to avoid clouds of steam, strong splashes and condensation in the room.
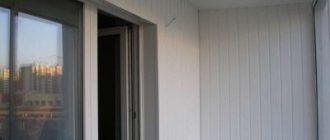
- Ceiling decoration with MDF panels on the balcony . It is advisable to use moisture-resistant sheets on the loggia, which are durable. But even in this case, MDF panels on the ceiling and walls should be used only if all the cracks are perfectly sealed, the external enclosing structures on the balcony are well insulated, and high-quality double-glazed windows are installed. By the way, the under-panel space will allow you to hide the wiring and provide thermal insulation, so everything will look very neat and beautiful.
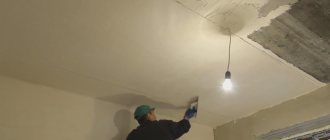
The main stages of installing a false ceiling
Installation of suspended ceiling
Only with proper installation of a false ceiling can its main functions be performed.
Let's look at everything in detail:
- Stage 1 – marking the ceiling
Then hammer nails into the corners of the ceiling structure and stretch the twines between them. Thus, find the central part of the ceiling.
Ceiling markings
- Stage 2 – installation of a frame made of profiles. Based on the marks obtained on the wall, you need to install guide profiles. To do this, we apply marks through the mounting holes. In these places we make indentations with a hammer drill and insert plastic dowels.
Now we proceed to install the profiles and secure them into the prepared dowels with special self-tapping screws.
Installation of a frame for a false ceiling
Next, using self-tapping screws, we securely attach the ceiling profiles to the guide profiles (see Modern do-it-yourself ceilings: mirror and hemmed structures). In this case, you need to connect the profile guides to each other - to do this, install one profile into another, and securely fasten all connection points with self-tapping screws. We completed the installation of the frame. Now you need to think about how to conduct all communications: telephone and television cables, electrical wires, ventilation.
- Installation of plasterboard sheets.
With the help of a partner, the first sheet of drywall is lifted to the ceiling and attached to the metal frame using self-tapping screws. What’s interesting: you can start laying the sheet from any angle. Initially, we make the fastening along the perimeter of the plasterboard sheet, and after that - along those ceiling profiles that remain under it. Drywall is easy to cut, so if necessary, we cut it according to the required dimensions (see Lining the ceiling with plasterboard: instructions). Gradually close the entire ceiling. Don't forget that you need to leave holes for attaching lamps.
Installation of drywall sheets
- Primer and putty of all joints and seams. After completing the installation of all sheets of drywall into a single ceiling surface, we begin to putty the seams and joints.
After these procedures, we once again putty the seams and joints, prime them and sand them, prepare the ceiling for painting with water-based paints - this will give it a snow-white appearance. If desired, the finished ceiling can be finished with a ceiling plinth, giving the entire ceiling structure a complete look.
As you can see, it is quite possible to install suspended ceiling structures yourself
It is important to have a reliable friend and listen to the advice of experts. And then the false ceiling will delight you for a long time
How to decorate a ceiling with MDF panels
MDF panels are an excellent material for finishing ceilings, however, when using them, it is necessary to take into account that with high humidity in the room they tend to sag under their own weight.
There are various options for finishing the ceiling with MDF panels. The fastest of them is to mount it on a clean, perfectly flat ceiling using liquid nails. Setting time ranges from 15 to 30 minutes. Therefore, after gluing each strip you will have to pause.
The second option is more suitable for wooden ceilings - it is fastened with self-tapping screws and clamps to the rail. To begin with, a thread is stretched along the level along the perimeter of the entire room. This must be done taking into account the thickness of the lath used and the most protruding surfaces of the ceiling. Then, every half a meter, at the level of the existing ones, threads are pulled across the future rows of MDF panels.
When attaching slats along stretched strings, self-tapping screws of different lengths and a pre-prepared set of pads made of plywood, fiberboard or board scraps are used. Of course, the outer side of the slats should coincide in level with the tensioned threads.
After installing the entire frame and leveling the ceiling in this way, you can attach the panels. First of all, on the rail we need based on the lengths of the panels, we fasten the plastic H-profile with self-tapping screws. Next, the rows of panels are fastened using self-tapping screws, screwed into clamps driven into the grooves of the panels. You also need to remember about the wiring for future fixtures.
The third option is suitable for attaching panels to concrete slabs. In this case, metal profiles and hangers for them are used. Instead of stretched threads, you can use guide profiles fixed around the perimeter of the room. Suspensions must be secured with dowel nails.
That is, you need to bend them at the required distance from the slab, mark points on it with a pencil and drill holes with a concrete drill for the dowels. After installing the hangers, the profiles themselves are attached to them with short self-tapping screws.
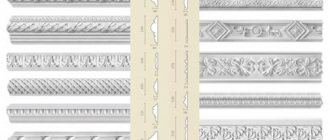
After fixing all the MDF panels, you need to decorate the cracks in the walls with something. The easiest way is to glue a polystyrene foam baseboard. However, the ceiling will look more elegant and beautiful with the use of polyurethane stucco elements, such as cornices, ceiling rosettes and moldings.
Modern technology for decorating ceilings with stucco differs from that previously used for elements made of alabaster, soft stone or gypsum. Manufacturers of modern ceiling elements also sell ready-made adhesive compositions for them.
Even if you didn’t take care of them in time, you can still use the same liquid nails. They are capable of holding decorative elements weighing up to 50 kg. Gluing stucco molding is not a difficult operation, you just have to hold it while the glue sets.
Elements made of polyurethane can be painted or purchased in a suitable color to match the color of the ceiling. They will perfectly complement the composition of any interior and decorate any room. Cornices will visually add height to the ceiling, hidden lighting can be arranged in the moldings, and framing the chandelier with a ceiling rosette will complete the decoration.
Find a repairman
—
—
—
Mounting methods
For fixation to the sheathing, you can use construction staples (in case of installation on a wooden beam and using a construction stapler), nails or self-tapping screws
Please note that in the latter case, you need to countersink each “breakdown” (make a recess for the head). Methods of fixing to the ceiling depend on the density of the sheet
We remember that the denser the fiberboard sheet, the heavier it is, and, accordingly, the stronger the materials for fastening. Protruding iron from staples or nails must be carefully puttied, because over time these iron parts will rust and show through the paint or wallpaper.