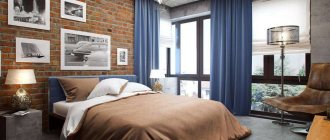
The lining ceiling looks good in the interior
The appearance of the ceiling is an important component of the interior of any room. It not only has a decorative function, but also has practical significance. First of all, the ceiling retains heat, isolates extraneous sounds and makes communications and lighting details invisible. The modern market for construction products offers a variety of finishing materials that can make the ceiling modern, beautiful and well-groomed. One of the representatives of such finishing materials is lining. Let's consider its types and how to cover the ceiling with clapboard.
Types of construction lining
Wooden lining is a popular finishing material. It is made from deciduous and coniferous trees. Main advantages: resistant to the formation of fungus and mold, easy to process, there is a small number of knots. To cover the ceiling with clapboard with your own hands, many consumers choose it due to its strength, durability and environmental friendliness. In rooms where the air temperature is much higher than usual, and the ceiling is intended to be finished with clapboard, linden cladding boards are used, since it does not contain resin. The lining can be painted with enamel of various colors, varnished, or simply have its own natural appearance and color.
Plastic lining is distinguished by ease of installation and practicality, the absence of rotting and corrosion processes. It can be either with a seam or seamless, imitating the structure of natural stone, various types of trees, and also have a uniform color. After assembling the ceilings, no priming or painting is required.
Fibreboard or MDF panels are made from wood fiber using the pressing method; they are also used for finishing the ceiling with lining with your own hands, but are not recommended for use in rooms with high humidity. Features: due to the rich color range, they have a beautiful appearance and are durable.
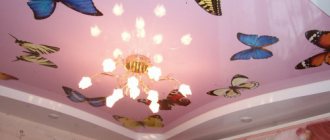
The lining can be painted or left natural color
Peculiarities
The lining is a board that has a special groove on one side and a protrusion on the other. Thanks to this design, when assembled, the parts form a solid coating, which is reliable in operation and does not deform under the influence of temperature. Typically, lining is made from various types of wood, but panels made of plastic and metal can also be found.
The ceiling in an apartment is usually sheathed with boards made of coniferous wood - they are characterized by a beautiful texture and patterns, withstand mechanical loads and give the room a pleasant aroma.
A lining ceiling can be installed either as a single-tier ceiling or as a complex structure consisting of several levels. The difference between the models of suspension systems lies only in the assembly of the frame. Finishing the ceiling with clapboard has many advantages, which include:
- Beautiful decor . This type of design is always in fashion and can be used for any style.
- Ease of installation work. Suspended structures do not require additional processing - it is enough to cover them with stain or varnish.
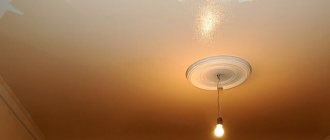
- Masking of surface defects. Facing panels can not only brighten up unevenness, but also allow you to hide communication systems and wiring that are necessary when installing lamps.
- Excellent thermal conductivity and sound insulation.
- Possibility of combination with other decorative materials . Thanks to the original combination of wood with metal and glass, you can achieve a stunning design effect.
- Environmental friendliness . Wood is a natural raw material and therefore completely safe for human health. In addition, board structures are able to maintain a certain microclimate in the rooms.
Despite the presence of positive properties, lining ceilings also have their disadvantages, namely:
- Reducing the height of the room. Regardless of whether it is a simple or multi-tiered system, when installing it, it will not be possible to maintain the height of the room. Therefore, such ceilings are recommended to be placed in spacious rooms.
- Lack of fire safety . Unlike finishing the ceiling with plasterboard, wooden structures can quickly catch fire, so it is advisable to cover them with special mixtures that will not only extend the life of the coating, but also protect it from a possible fire.
- Low level of moisture resistance. In rooms with high humidity, it is best not to install lining ceilings, since under the influence of condensation and evaporation, the panels may change in size and undergo deformation. For such premises, it is advisable to choose plastic lining. If the design includes a wooden board, then it will have to be coated with a protective varnish.
- Instability to mold and mildew. This only applies to wooden lining.
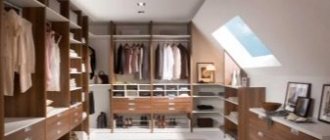
Design of ceilings made of lining
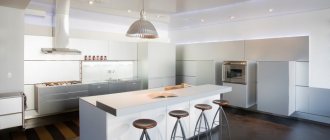
Almost all materials used in interior decoration can be perfectly combined with clapboard boards used to construct the ceiling with your own hands. For baths and saunas, country houses, loggias and balconies, this material has no equal. The kitchen requires no less attention.
The design of the lining ceiling should be combined with the overall interior of the room and look stylish and harmonious. To prevent the surface from being monotonous, the slats are installed in different directions, thereby forming a certain pattern. For this purpose, decorative beams or slats of different colors are used. The kitchen will look elegant if natural wood is present in the ceiling decoration.
Adviсe
A lining ceiling looks beautiful and original in a modern interior, but in order for it not only to please with its aesthetics, but also to reliably serve for a long time, you need to know how to attach it correctly. If installation work is carried out independently, then the following recommendations from specialists can help novice craftsmen with this:
- Since wood is considered a “capricious” material, before use it should be kept for several days in the room where the ceiling is planned to be installed. Thanks to this, the lining will “get used” to the new conditions of temperature and humidity, take on the desired shape and be easy to install. The boards must be stacked.
- If, when purchasing the material in the package, you find several crooked planks, then there is no need to be upset - they can be used in covering those places where pieces of material are needed.
- The lining should be secured with nails with a small head. At the same time, to cover the ceilings in bathrooms and verandas, the nails need to be covered with a protective mixture, otherwise under the influence of humidity they will rust, and stains will appear on the white lining that will be difficult to wipe off.
Burrs and chips around the screws can be prevented if you pre-drill holes for the screws before attaching them to the board.
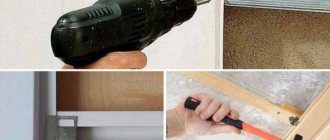
What tools will you need?
To ensure that lining the ceiling with a clapboard with a wooden frame does not cause any inconvenience, it is necessary to have your own specific set of tools on hand:
- Screwdriver, hammer drill or impact drill.
- Hammer.
- Level (water or laser).
- Construction corner.
- Roulette.
- Hacksaw. For metal profiles - metal scissors.
When constructing a wooden frame, it is recommended to use timber measuring 20X40 mm, 40X40 mm, 50X50 mm. To attach it to the ceiling and walls, use nails, screws or anchors along with plastic dowels and wood screws. If you need to make a ceiling from a lining with your own hands, but using a metal frame, you will additionally need:
- CD profile – serves as the basis of the frame;
- UD profile for creating a perimeter;
- crab-type cross fastenings and U-shaped fastenings;
- flea screws and metal screws.
In order to sheathe the ceiling in a wooden house, certain calculations of the amount of materials needed are required. The lining is fastened to the frame using staplers, special nails, clips and self-tapping screws with a press washer.
Sheathing can be done in one direction or in different directions to create a pattern.
Preparatory work
Cladding with clapboard requires mandatory preparatory work. When purchasing this material, you need to understand that the lining must have the same temperature and humidity as the room, in order to subsequently avoid perspiration and distortions. For this purpose, it must be freed from packaging and laid out on the floor for at least a day.
If there is old cladding or other finishing materials on the ceiling, they are dismantled without regret and the peeling plaster is removed. The surface is cleaned of dust and various contaminants. Small cracks are sealed with putty, and deep ones are expanded using a grinder and concreted with cement mortar.
To avoid fungal infection, the base is treated with a special solution. If necessary, insulation is done with heat-insulating material.
Surface marking
This stage of work is the most critical, on the quality of which the entire finishing process of the ceiling depends. The problem of how to sheathe a ceiling with clapboard will be correctly solved if the markings are made correctly. Its goal is to determine the horizontal, which indicates the plane of the future location of the wooden finish, as well as to draw lines parallel to each other on all walls of the room.
Using any level, find the lowest point of the base, from which the remaining marks are made on other walls around the perimeter. The ceiling is lowered within 7-10 cm. A closed contour is applied using a dyeing molar cord or marker. It must be remembered that the laid line must converge at one point, and displacements indicate an error in the marking.
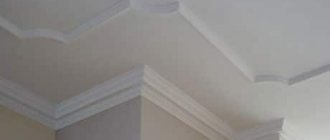
Frame installation
The frame for the lining should be correctly assembled
Finishing the ceiling with your own hands is a simple process, but it requires some attention. Ceiling cladding is carried out in two stages: the installation of a load-bearing base and its covering.
Option 1: frame made of wooden beams
At the very beginning of work, two beams are attached to opposite sides of the room at a distance of 10-15 cm from the wall. The timber is fixed to the ceiling using nails, screws, dowels or anchors in increments of 60 cm, and perpendicular to the selected direction of the panels. The distance between the beams should be 60-100 cm for wood and 40-60 cm for plastic panels. The bottom edge of the beam must be exactly parallel to the floor and be at the same level as the other beams. A fishing line or rope is stretched along the lower edge of the installed wooden crossbars, following which the remaining beams are attached.
We are strengthening the structure. Between the laid beams, jumpers made of the same timber are installed. They are especially necessary where lighting fixtures are planned to be installed.
Option 2: metal profile frame
Installation begins with fastening the UD profile along the entire perimeter of the walls along the marked contour. Attach it with dowels. Then CD profiles are attached to opposite sides of the ceiling 10-15 cm from the walls. Their location should be strictly perpendicular to the future cladding. The connection of the profiles to the ceiling is made using U-shaped fasteners in increments of 40-60 cm. The remaining profiles are installed along a stretched cord, and then the remaining profiles are secured along the surface of the ceiling. The distance between CD profiles should be no more than 60 cm.
The metal structure is reinforced with jumpers using a crab-type cross fastening.
After complete installation of all types of frames, electrical wiring is installed; the ends of the wire are left at the necessary points where lighting fixtures will be installed.
Types of ceiling lining: interior decoration
Lining is a special product used for high-quality interior finishing. It is imperative to select the appropriate material in order to place the right accents in the room. Knowing what types of lining for ceilings are offered, there is a very good opportunity to create a cozy home.
Why lining is gaining popularity
In most cases, natural finishing materials cannot be called cheap. This applies to wood, stone and all other materials. At the same time, the lining turns out to be an ideal compromise between naturalness and an affordable finishing price.
The advantage of any type of material is simplicity of design, maximum ease of maintenance and installation. The work on decorating the premises can be carried out by one person, as a result of which, even if the help of professionals is used, a good opportunity for savings is provided.
In any case, finishing the ceiling with clapboard has important advantages that will certainly be taken into account:
- Beautiful design;
- finishing material will always meet fashionable criteria;
- ease of installation of the finishing structure, thanks to which it will certainly exhibit numerous positive characteristics.
Taking into account the design features of the panels, the possibility of successfully transforming the interior without additional use of ceiling decoration is guaranteed. As a result, no special wallpaper or painting work is required. If you choose the right panels, you can enjoy the use of an original design element. For example, a wooden variety can be additionally treated only with varnish or stain, but most often this is not required.
A ceiling made of high-quality wooden lining will successfully hide all kinds of flaws. As a result, you don’t have to worry about potential construction flaws. Behind the ceiling covering, presented in the form of panels, it is possible to efficiently hide all modern wiring. After this, there is a good opportunity to install lamps, mask pipes and air ducts.
Installation of lining on the ceiling
An additional advantage is the ability to use a layer of high-quality material for sound and thermal insulation, as a result of which coziness and comfort will always reign in the house. Of course, these aspects, successfully combined with an additional finishing layer, allow you to enjoy ideal living conditions.
What disadvantages can lining have?
Could modern lining have serious shortcomings? What aspects would you like to pay more attention to?
First of all, it is noted that the material reduces the useful height of the room. Unfortunately, there is no escape from this. Regardless of the specifics of the installation activities, the lining will not allow you to maintain the optimal height.
Another nuance is that classic wooden models will not provide as much fire safety as plasterboard coatings do. However, protection against potential fire will still be at a high level compared to plastic coatings. In order for any type of lining to provide a high level of protection from a possible fire, manufacturers try to use special impregnations for treating wooden structures or elements.
High humidity levels can cause the original size of the product to change. For this reason, panels can be used in wet rooms only taking into account certain nuances. First of all, experts recommend trying to choose a suitable type of lining (for example, a plastic model). If you still use a wooden product, it is advisable to take care of treating it with special protective varnishes.
Another unpleasant moment is the risk of fungi and mold. Such dangers, first of all. belong to the wooden varieties. For this reason, it is impossible to do without the use of specialized chemicals.
The surface of the lining must be treated
The most popular materials for lining
Modern ceiling lining is in most cases made from the following materials:
- natural wood;
- Fiberboard;
- high quality plastic.
At the same time, natural wood is the most popular, and the possibility of using different types of wood is provided. Experts note that products made from linden and pine have gained the most popularity. What is the reason for this?
- Pine lining is an ideal finishing material for the interior of cottages and private houses. An additional purpose is to line the ceiling.
- Linden lining is primarily suitable for covering rooms where the ambient temperature is high: saunas, baths and steam rooms. This situation can be explained simply: linden wood does not contain resin, so there is no risk associated with the release of hazardous substances at elevated air temperatures.
Wooden clapboards
Classes of wooden lining
Initially, the panels have a close connection with natural wood, and the products can be covered with grooves and ridges for reliable installation. Experts advise using conifers and linden, taking into account the type of room being finished.
Another important task is to take into account the class, which depends on the quality of the wooden lining:
- extra class assumes the absence of the slightest defects;
- class A proves the high quality of the cladding, but at the same time allows for knots;
- class B is created on the basis of materials with defects, which are carefully corrected by the manufacturer;
- Class C includes only inexpensive panels, so the presence of various defects is not surprising.
Only if the wooden lining is made of high-quality material, it can not only serve successfully, but is also ready to become the basis of an elegant home interior.
Lining made of pressed hardboard (MDF)
Pressed hardboard (MDF) is one of the best options for finishing the ceiling. It is used to create lining, onto which a smooth or embossed decorative coating is applied. Panels are usually afraid of moisture, so it is advisable to use MDF models only for dry rooms.
Another nuance is the heavy weight of the panels. Ceiling filing is only possible if a good understanding of the nuances of using products is assumed. In 99% of cases, it is advisable to abandon MDF models if the lining is to be used in a damp room.
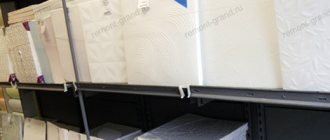
PVC linings
PVC panels are pleased with their high quality workmanship and optimal resistance to humidity. The presence of a cellular structure helps reduce weight while maintaining reliability.
An important advantage is the ability to wash PVC linings, but practically no dust settles on the surface. For washing, it is advisable to use modern non-abrasive cleaning products.
What to choose: treated or untreated lining
In the modern market, both treated and untreated linings are often offered. In most cases, it is advisable to purchase an unfinished model, because it can be decorated taking into account personal wishes and properly joined.
Only an untreated product can be painted in a suitable color. Of course, it will be possible to leave the natural color scheme.
It is important to understand that modern manufacturers often violate the production process, so many models of processed lining do not live up to their expectations. In addition, if the finished material is not stored correctly, its quality gradually deteriorates. Features of the unprocessed product are noticeable from the very first minutes.
What should be the design of the lining
Under any circumstances, it is important to understand what the lining should be like. What are the requirements for this finishing material?
- The design should be visually pleasing. A variety of models are offered on the modern market, so even the wildest design fantasies are successfully manifested in practice. If desired, the ceiling can be not only dark or light, but also striped, divided into several color sections. At the same time, white remains the most popular color, as it gives space and volume to the room.
- Glossy linings are particularly practical, because they are almost impossible to get dirty. At the same time, matte panels suffer from numerous stains.
- Panels with a dedicated seam usually cost less, but the beauty of the seamless product is attractive. Another important nuance is the optimal choice of a model with the maximum width, despite the fact that the number of trims will increase. If preference is given to wide lining, the question of how to join the lining along the length will not be a concern.
The modern lining market is developing rapidly, but at the same time, representatives of the target audience should choose only high-quality and visually attractive products. An appropriate approach allows you to transform any room, taking into account design requirements and available financial capabilities.
sotdelkoi.ru
Installation of lining
Installation of lining to the ceiling
So, let's figure out how to line a ceiling with clapboard so that the result of the work evokes a feeling of deep satisfaction.
From the selected material, blanks are first made with a length equal to the distance between parallel walls minus 5 cm. Assembly begins by installing the first plank, which is attached to the frame beams on both sides using a stapler. The second and subsequent slats are inserted at a slight angle into the groove holes of the previous one. For reliability, each lining is tapped from the end side along its length with a rubber hammer. The second side is attached to the guides at the bottom of the lock rim. To do this, take nails or self-tapping screws with a press washer. Install strips to the opposite wall.
When using plastic cladding or PVC panels, the installation order and the size of the gaps for possible thermal expansion remain unchanged. Just before proceeding with the installation of the first strip, it is necessary to secure a U-shaped groove along the entire perimeter of the ceiling under construction, into which the extreme ends of all panels will be inserted.