Not everyone knows that the profiles that form the frame structure when covering walls and ceilings with plasterboard are a lightweight and durable material, and its use is not at all limited to the area of repair. These elements can help create a structure called a “greenhouse from a plasterboard profile”, and if you are careful enough, you will probably notice that many people already have these installed on their sites.
Using a plasterboard profile, you can build a greenhouse in the shortest possible time and at minimal cost.
And this is not at all surprising, because the cost of materials is very low. And their reliability has already proven itself in the practical application of such structures. And as soon as the inquisitive minds of our fellow citizens do not dodge, inventing new forms: profiles are bent, cut, flattened - in a word, they do with them whatever their heart desires. Surprisingly, the profiles can withstand everything, and even the most unusual designs continue to serve properly. Let's talk about the classic form of a greenhouse - with gentle slopes. After all, it is the easiest to build.
Pros and cons of profile pipe
The profile used for installing drywall has its own pros and cons. Let's try to sort them out through the prism of its use for the construction of a greenhouse frame. As a basis, we will take the most popular Knauf profiles today.
Advantages of steel profile:
- The profile used for gypsum plasterboard and gypsum board sheets is made of galvanized steel. This means that it is not afraid of rust and corrosion. In order not to create vulnerable spots, the profile is cut with special scissors, a hacksaw or a jigsaw with a special file. When cutting with a grinder, the steel heats up and destroys the protective properties of zinc. In addition, the cut line should be painted with whatever paint is available to protect it.
- Ease of installation. You can create structures of any size and shape from the profile.
- A light weight. Due to its light weight, the structure will not require a massive base (foundation).
- Light weight is a double-edged sword. To prevent the structure from being damaged by the wind, it needs to be further strengthened.
- Weak fracture strength. This means that in winter the owner will have to regularly clear snow from the roof.
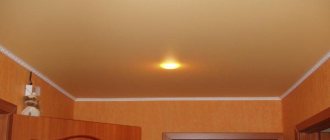
"Floating" ceiling LumFer with reflective lighting from profiles Ba01 and M01
A niche with lighting along the wall is assembled from two profiles, creating a “floating” effect. The design is attached to the ceiling and provides the possibility of using lighting around the perimeter of the ceiling. A gap 3 cm wide is formed along the wall with backlighting. An LED strip is installed in the groove on the Lumfer Ba01 profile and covered with a decorative insert. The light from it, directed upward, is reflected from the Lumfer M01 profile, which has a rounded shape, and is softly diffused around the perimeter of the room. The design prevents insects from entering the ceiling space.
The profile can be located along the entire perimeter of the room or along its individual walls. Internal corners in the room must be more than 80 degrees. Along the walls where there are heating pipes, a frameless ceiling is not installed.
How to make a greenhouse from a plasterboard profile
To make a greenhouse from a plasterboard profile with your own hands, you need to think through everything down to the smallest detail and draw up a drawing of the future structure. To date, the most effective projects are considered to be those of Mittleider (a scientist-enthusiast who conducted experiments with different types of greenhouses). Their essence is to create a two-level roof, when one slope is higher than the other, and the distance between them is used to arrange ventilation flaps. Thus, when using the Mitlider technology, air exchange will occur throughout the entire greenhouse space.
Let us point out some of the nuances of calculating the construction of such a greenhouse:
- Ventilation flaps should be located on the south side to ensure the flow of warm air.
- The structure itself should have a large number of transverse crossbars, giving rigidity and stability to the frame.
- When assembling a greenhouse in regions with harsh winters, the roof must be made collapsible so that it can be removed at the end of the season.
- You should not make the greenhouse very high. Firstly, this will make it more difficult for the structure to withstand wind loads, and secondly, it will complicate the task of removing snow from the roof in winter.
Below we provide step-by-step instructions, following which you can build a practical and high-quality greenhouse.
"Floating" ceiling LumFer from profile PP01
The Lumfer floating ceiling is mounted using the PP01 profile with a translucent polycarbonate screen without plugs or inserts. A light line 2.5 cm wide is formed along the walls. An LED strip is installed in a special groove. Illumination around the perimeter emphasizes the unevenness of the walls - they need to be leveled. The distance of the suspended ceiling from the base one will be from 6 cm. The profile of the floating ceiling can be located both along the entire perimeter of the room and along its individual walls. It is impossible to install the structure along the wall if there is a pipe nearby at a distance of less than 5 cm. It cannot be installed on walls less than 10 cm or on walls with curves.
How to choose a form for a greenhouse
The choice of shape, size and location of the greenhouse depends on the following factors:
- the place where the greenhouse will be installed (at a summer cottage or in a place of permanent residence);
- region and its climatic conditions;
- the needs of a particular person;
- available material.
We provide general recommendations for choosing a shape, size and location:
- Let's start with the form. Greenhouse structures can be domed, gable or lean-to. A domed greenhouse reduces the wind load on the frame, which is very good when using a metal profile, but the snow will not move off of it on its own and it needs to be cleaned regularly. In addition, to create a dome, the profile will have to be bent, which will significantly damage its strength. The construction of a lean-to wall greenhouse guarantees its stability due to the wall on which it is built. But this same wall will contribute to shading, which most greenhouse crops do not like. A homemade gable greenhouse is the best option. It can be placed anywhere and the snow moves off of it on its own.
- The size of the structure largely depends on the needs of the owner. But it is not recommended to make a large greenhouse from a plasterboard profile, as it will be difficult for it to withstand wind and snow loads.
- The last point is location. On the site, the greenhouse should be located on the south side and in such a way that it is illuminated throughout the day.
How to prepare the site
In a garden plot, a greenhouse made from a plasterboard profile should be positioned in such a way that sunlight falls on it for as long as possible during the day, covering as much area as possible.
This rule applies to all greenhouses located on the site.
If you plan to make a greenhouse with a foundation, you need to prepare it in advance, because... It will be possible to install the frame only a month after it has completely dried.
Prepare the area for installing the greenhouse: level the ground, clear it of debris, grass and roots. If there is a foundation, fill it. To do this, mark the border of the future greenhouse and dig a channel along it measuring twenty-five centimeters wide and half a meter deep. Lay a base of sand and gravel at its bottom, place a wooden formwork, it should protrude about twenty centimeters above the ground, lay reinforcement inside and fill everything with concrete mortar.
Keep in mind: the solution takes a week to set, after which the formwork can be removed. Complete hardening occurs within a month. After this, you can begin to mount the greenhouse frame.
Of course, before buying the material, you need to choose a ready-made drawing on the Internet or calculate your own so that the greenhouse with your own hands from a profile for plasterboard is the right size, and its frame is designed for the weight of the covering. After everything is calculated, purchase the material and tools. To work with the profile you need the following tools:
- Metal scissors – for cutting the profile into the required sections.
- A screwdriver and self-tapping screws for the profile.
- Connectors and mounting tape made of steel.
- Sealing tape and anti-corrosion coating for metal.
How to hang a TV on a plasterboard wall without it falling
A greenhouse made from a gypsum plasterboard profile requires constant snow removal in winter; it cannot withstand the heavy weight of the snow cap and can break inside. To prevent this from happening, it is recommended to remove the roof for the winter, that is, make it so that it can be removed. The second option would be to constantly clear the roof of snow. Recently, it has become popular to combine two types of coating - polycarbonate on the sides and polyethylene on the roof - so it can be rolled up for the winter. Then nothing will threaten the structure.
Foundation
When designing a greenhouse, it is necessary to provide a foundation. Since the drywall profile is lightweight, there is no need for a concrete base. Thick wooden beams are suitable as a foundation. How to install them:
- First of all, the ground must be leveled. At this stage, leveling can be done without a level, just by eye.
- Next, the beams are laid. Fastening is done using self-tapping screws or nails. The beams must be laid evenly (checked by level) and at an angle of 90 degrees to each other, so that other elements of the greenhouse are installed on a level base without distortions.
- If part of the beam hangs in the air, you need to pour earth under it and, if possible, compact it.
"Floating" line LumFer from profile PL01
“Soaring lines” from the Lumfer BP01 profile with a translucent plug is a lighting system that is built into a suspended ceiling and located on the same level. The width of the visible part of the light line is 2.5 cm. The profile is mounted without gaps or inserts.
The distance from the base ceiling when installing Lumfer BP01 is from 5 cm. The profile can be mounted in a closed structure, L- and U-shaped or in a straight line, coming into the wall. The distance from the wall to the parallel light line is at least 30 cm. The “floating” lines are joined to each other at an angle of 90 degrees.
The minimum distance when combining several “floating” lines is at least 30 cm from each other. The minimum square of “floating” lines should be 40x40 cm.
We build the frame
The construction of a greenhouse frame from a plasterboard profile is the most critical stage of work. Here are step-by-step instructions:
- The installation of the frame begins with the guides - the main racks. They must be placed at a distance of no more than 50-60 centimeters from each other.
- If the base was laid level, which needs to be checked again, all posts along the entire perimeter of the greenhouse are cut to the same length.
- If the greenhouse is being built by several people, then it is better to assemble the individual parts (2 ends and 2 side walls) on the ground, and then connect them together. If the work is carried out by one person, then we build the frame gradually, from rack to rack.
- You need to start installation from the corner; after installing the second rack, they are connected to each other by crossbars. Moreover, you can install several crossbars: three across (top, bottom and middle) and two diagonally. The connection of individual frame elements is carried out using metal screws. If it is necessary to trim the edges to connect the profiles, they (the edges) are not bent outward, but inward.
- After assembling the individual elements of this design, they are connected to each other: side wall to end, etc. In this case, at the corners it is necessary to use hangers that bend in one and the other direction. This type of fastening increases the overall rigidity of the structure.
- The next stage is bandaging the side walls. From each rack of the metal frame along the top you need to put another profile to connect the side walls together. To make the profile easy to attach, it is necessary to place the racks of the two walls strictly opposite each other.
- The roof is erected in the same way: individual elements are assembled on the ground, and then mounted on an installed frame.
- After this, you can begin making the door and windows. Since the profile will not fit tightly to the frame when opening and closing the moving elements, it is necessary to glue it with sealing tape.
- It is better to cover such greenhouses with polycarbonate; it is durable in itself and will help the frame to withstand external loads. If we use polycarbonate, then for its installation you need to use self-tapping screws with washers, which will prevent warm air from escaping from the greenhouse.
If any nuances are not clear to you, watch the video on the topic.
Construction of the structure
Now that everything is ready, the materials have been purchased, the foundation, if you decide to do it, has been installed and all preparations have been completed, you can begin work on constructing the structure. Here are the main stages of such work:
After installing the frame for the greenhouse, the profile must be treated with an anti-corrosion compound.
- Mark the profiles that in the future will form the basis of the end wall of your structure.
- Using tin snips, cut all the pieces you will need. Don't forget to wear construction gloves on your hands - they will protect you from calluses and injuries. It is better to take scissors with a ratchet; they are easier to work with.
- According to the calculated diagram, using self-tapping screws and connectors, assemble the end walls of the greenhouse.
- Fasten them to each other with several longitudinal sections of the profile. If the greenhouse is long, make a new segment, that is, a stiffener, every three meters.
- Now attach the resulting structure to the foundation and begin hemming longitudinal and transverse reinforcing beams to it. If necessary, strengthen weak points with diagonal jumpers.
Having completed the construction of the frame, proceed to lining the outer walls of the greenhouse with insulating material.
It is recommended to treat the frame with an anti-corrosion compound and lay a sealing tape between the frame and the cladding material. All that remains is to install the door and hang the transoms so that you can say that the greenhouse made from the plasterboard profile is ready.
Drawings of homemade structures: types
The most popular greenhouse size is 3x6 meters. But at the same time, the structure can be made of an arched type, with one or two slopes, according to Mittleider’s design, in the shape of a ball, etc. Therefore, before starting construction, look at the photos of the frame drawings, decide what you like and what suits your specific conditions. For example, in snowy winter conditions, the roof of the greenhouse must be made in the form of two slopes with a large angle so that the snow does not linger and immediately slides off. In regions with high wind loads, you should pay attention to the drawings of the arched frame. The wind will smoothly blow across the structure without causing harm to it.
Contour floating ceiling Lumfer
The Lumfer floating ceiling is installed without a translucent screen, without plugs or inserts. A light line 2.2 cm wide is formed along the walls. An LED strip is installed in a special groove and closed with a KS4 insert. The second possible position of the LED strip is on the bottom of the profile. This gives even illumination along the edge of the stretch ceiling while maintaining a 2.2 cm gap around the perimeter. In this case, the LED strip is covered by a suspended ceiling and shines through it.
Illumination around the perimeter emphasizes the unevenness of the walls - they need to be leveled. The profile of a floating ceiling can be located both along the entire perimeter of the room and along its individual walls.
It is impossible to install the structure along the wall if there is a pipe nearby at a distance of less than 5 cm. It cannot be installed on walls less than 10 cm or on walls with curves.
How to make a kitchen bar counter from plasterboard with your own hands: step-by-step instructions
Plasterboard sheet is a universal material used for interior decoration. Using the profile, a variety of, including complex, geometric shapes and compositions are created. Before you understand how to make a plasterboard bar counter with your own hands, you should prepare for the process.
Advice . Be sure to make a drawing or diagram of the product to scale. If this is difficult for you, contact the services of designers.
Making any piece of furniture requires time, patience and care. The kitchen bar counter is no exception. When the project has been studied in detail, we begin to prepare the workspace and necessary materials:
- plasterboard sheets;
- metallic profile;
- dowels and screws for fastening;
- putty;
- seam tape;
- sealant;
- building level;
- stationery knife;
- drill or screwdriver;
- tool for grouting putty.
Additionally, finishing materials are prepared. When painting, you additionally need a tray and a roller. If you plan to lay tiles, you will need special glue. Protective equipment (mask, gloves, goggles) must be used.
Next, we move on to step-by-step instructions for making a bar counter:
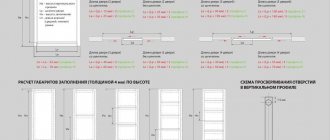
- We determine the length, width, height and depth of the product.
- Transfer the drawing from a piece of paper to the floor (in the place where the rack is mounted).
- We make a frame from an aluminum profile according to the specified parameters and dimensions (the more solid parts, the stronger the structure).
- We fix the product on the floor and install crossbars to increase rigidity (crab fastenings are used).
- We cover the created frame from the profile with plasterboard of the appropriate size (the material is cut effortlessly, with a simple stationery knife or jigsaw).
- We fasten the drywall parts using dowels or self-tapping screws (it is better to use a screwdriver to make the work faster).
- The cap should be screwed in using the recessing method in order to subsequently hide its presence with putty. The pitch width of the screws is 20-30 cm.
- At this stage, we install the wires for the lighting, carefully insulate them, and check the functionality and reliability of the electrics.
- We glue sickle tape onto all the resulting joints, and cover the heads of the screws with putty.
- After drying, we treat the areas with a grouting tool (dry method) until a perfectly smooth surface is obtained.
- Finally, we apply a primer, after which we install the baseboard, if the design requires it.
The main frame of the bar counter in the kitchen is ready. Then we proceed to its final finishing. As a top, you can use laminated chipboard sheets, a countertop, ceramic tiles or glass, mosaic tiles (it all depends on the design). The base is usually coated with paint. It is convenient to do this with a roller, and in hard-to-reach places a brush is used.
What is required for installation of plasterboard structures
- Metallic profile. The most popular products of this plan are PP 60/27 (ceiling profile with rib sizes of 6 cm and 2.7 cm), PPN 28/27 (guide profile with rib sizes of 2.7 and 2.8 cm), PS (rack profile) with dimensions ribs 50/50 and 50/75. The standard length of products is 3 m, but there are also 4-meter ones.
- The suspension is straight or shortened. It is a thin but durable metal plate that has several rows of holes. This product is designed to fix a metal profile in a certain “suspended” position, that is, at a certain distance from the wall or ceiling. Installation of the suspension is simple: first of all, you need to bend it along the existing grooves and give it a U-shape. Then the suspension is placed on a concrete or wooden base and self-tapping screws are screwed into the holes located in the upper part of the metal profile. The perforation, which is located at both ends of the suspension, serves to attach a metal profile to it.
- Spring suspension. If the height of the “legs” of a direct suspension is not enough and the structure needs to be lowered much lower, use products that have a wire with a hook at its end. Its standard length is 12.5 -15 cm.
- Connecting elements. This is a fairly large group of products that are used when it is necessary to increase the length of profiles (docking connector), strengthen the places of their cross-shaped intersection (single-level crab connector), fasten the profile in the corners (corner connector), connect profiles (two-level connector). There are other fastener options, but the ones listed are used most often.
- Self-tapping screws. To fasten the metal profiles to each other and to the connecting elements, use a 3.5/11 self-tapping screw, which is designated in the retail chain as a self-tapping screw with a sharp end or with a drill on it. Builders call them “sharp seeds” or “drill seeds.” You can also use a self-tapping screw with a press washer. To attach drywall to the frame, use self-tapping screws or gypsum plasterboard screws.
- Dowels and anchors. These fasteners are needed to fix the guide profile and hangers to the concrete base.
Related article: Curtains for brown wallpaper: basic combinations and original solutions
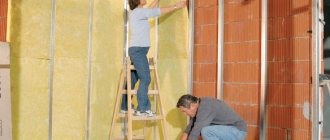
Leveling the walls with drywall
Scheme for leveling a wall with plasterboard.
To make smooth and strong walls in an apartment with your own hands, you will need PPN 28/27, PP 60/27, a straight hanger (if you plan to install the leveling wall very close to the main one, you can take a shortened hanger), drywall and self-tapping screws. If necessary, you can use dowels or anchors. You will need a screwdriver, a tape measure, a pencil, a building level and, possibly, a hammer drill. To cut profiles you will need metal scissors.
Before starting construction of the frame, you need to decide whether the wall will be insulated or simply leveled. This determines at what distance from the main wall the drywall will be sewn. Due to the fact that there are suspensions, the width of the opening can be varied as far as the length of their sides allows. Further, it should be taken into account that for each vertically installed profile you will need at least 3 hangers (with a standard room height of 2.5 meters). That is, the metal stand must be fixed at the bottom (no more than 30 cm from the floor or ceiling), at the top and in the middle. The distance between the vertical profile should be 40-50 cm.
In accordance with these recommendations, points on the wall are marked with a pencil in the right places, to which pendants curved in the shape of the letter U are attached with screws or dowels. Next, you should install the guide profile. To do this, select the distance at which the drywall should be separated from the wall, and strictly opposite each other, on the floor and ceiling, PPN 28/27 is securely fixed. It is into this that the racks from the 60/27 ceiling profile will be inserted. Please note that they should not be installed flush against the guides. A gap of at least 1 cm is required, which will prevent deformation of the frame if the room “moves” in any way.
Scheme for leveling plasterboard walls on krakas.
Another important nuance is the installation of plastic pads under the vertical metal posts. The fact is that when walking, the floorboards may sway and, thus, the profile will “creak”, shifting relative to each other. Plastic or rubber backing elements help to avoid this unpleasant moment. It is enough to place them only under the end of the rack that rests on the floor. So, the hangers are fixed, the guides are fixed, the PP 60/27 stands are cut to height. Now all that remains is to insert each of them one by one at the top and bottom into the guide and fasten it using self-tapping screws with hangers. The verticality of the racks is monitored using a level.
Next, if the wall is insulated, insulation is placed in the recesses between the frame posts. Most often, mineral wool is used in the form of mats or in rolls. You can take sheet foam or polystyrene foam, that is, the same foam, only with a higher density. The owner chooses the thickness of the insulating layer at his own discretion. After completing this stage of work, you should proceed directly to covering the frame with plasterboard.
Related article: DIY wooden hanger (35 photos)