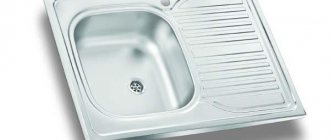
- Sink parameters - its depth, dimensions.
- Dimensions of the mounting hole for the tap and its location on the sink itself.
- The presence of free space between the sink and the wall, its area.
In modern kitchens, various types of mixers are used, for example, axle-type faucets, which belong to the classic models. More advanced ones - single-lever and electronic - belong to the new generation of plumbing equipment. The advantage of faucet-axle mixers for washing is that they combine traditional technologies, simple design and ease of operation. More advanced is the single-lever mixer, in which one cartridge controls two flows of water. Electronic versions are equipped with sensors and always provide water at the same temperature.
Each type of crane has many designs. It may be worth exploring different options or seeking advice from sellers. They will help you choose the best mixer for your sink configuration. Today, the crane-axle and single-lever modifications continue to be the most popular.
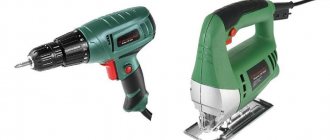
Preparing the tool
Before installing the faucet on the kitchen sink, you need special equipment. To complete this job you will need:
- FUM tape for sealing. It must be non-swelling from exposure to water.
- Set of different keys. You definitely need a pipe one. It is used if you have to tighten the nuts on the sink in places that are difficult to reach. Open-end wrenches are also used - 10 or 11 (in some sink models, 12 is used). A small key will probably be useful in your work, so you should have that ready too.
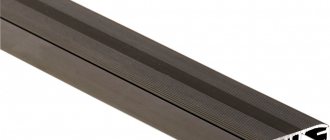
- Special installation kit. It should include rubber O-rings, a nut, one or two studs, and a metal half-washer, which is made in the shape of a horseshoe.
- Pliers.
- Screwdriver.
- Plumbing connections (or hoses) - 2 pieces.
You will also need auxiliary items for your work: a basin, several rags of different sizes, a flashlight that will illuminate hard-to-see areas.
One of the most important functions in replacing a faucet is performed by plumbing connections. Definitely, if you are replacing an old faucet, you also need to change the hoses. Sometimes they are replaced separately, so any repair service should have a supply of them. Before using eyeliners, it is important to choose the sizes. They should be neither too long nor too short, so they are often purchased separately. Practice has shown that the most optimal length for plumbing hoses is 86 cm. At the same time, it is the dimensions that are a common problem with factory hoses - they are often produced too short.
Another important factor is the material of the eyeliners. For example, you should not use silumin hoses, as there are complaints from experts regarding their reliability. Usually, eyeliners are sold complete with rubber gaskets to ensure greater tightness. It is believed that if the hoses bend well, then their installation will not take much time. At the same time, with intensive use, they will quickly become unusable, as they are subject to wear.
Removing a non-working mixer. First stage of replacement
Before installing a purchased faucet in the kitchen, you should divide the workflow into five points. The first stage is the dismantling of the crane that has become unusable. First, the water supply to the apartment is cut off. Place a rag on the bottom of the sink. This is necessary in order to collect small parts that may accidentally fall apart during disassembly of the mixer. Using a rag will also prevent nuts and bolts from getting into the drain hole, and the cloth will also save the surface of the sink from unwanted damage.
The tap is disconnected from the cold and hot water supply pipes using open-end wrenches. However, if convenient, you can do this work with your hands. Rags are placed under the pipes, and a basin is installed into which the residual water is drained. After it has all flowed out, wipe the pipe threads dry. Then take a tubular wrench and unscrew the clamping nut. It can be placed on one or two studs, located on the sink or under it, but it is with its help that the faucet is secured to the sink.
Following the clamping nut, the half washer is also removed, after which the mixer itself is carefully pulled out of the hole in the sink.
Installation instructions
As a rule, the reason why a decision is made to install a mixer is either the old one has failed, or the desire to change the entire furnishings, down to the smallest detail. Before you begin the installation, it should be noted that the work process is divided into three main stages.
The structure of the mixer, taking into account small parts and gaskets.
- First of all, you have to decide on the choice of device, plan the entire work process, prepare the necessary tools and (if necessary) materials.
- The next step is to install the mixer, securely fasten all the elements attached to it, screw in the hoses supplying hot and cold water.
- The last thing left to do is to check how correctly you performed the installation. Having assessed the work visually, if none of the individual elements of equipment raise any doubts, turn on the water and make sure that the mixer is working. Such caution is necessary due to the fact that during installation you may not have noticed possible defects in the components. This way you will eliminate the possibility of water leakage. Particular attention should be paid to the hoses.
You may be interested in: How does a kitchen sink move?
Second phase. Assembly
The main point of assembling the mixer is its connection to the inlets connecting the device to the central water supply. The spout (tap) is inserted into the body. The guideline for this is the restrictive ring. After you have inserted the spout, manually tighten it with the tap nuts. Next, take FUM tape and wrap it around one end of the eyeliner. It acts as an additional spacer, so if you don’t have tape at hand, it’s not critical.
After this, the tip of the first line is inserted into a hole specially provided on the mixer body. The hose is screwed on first by hand, then using an open-end wrench. The second liner is fixed in a similar way, and it doesn’t matter which one you start with - for cold or hot water. When twisting the hoses, try to maintain balance. If you don't tighten enough, you risk unreliable operation and water leakage, and if you overtighten, you risk damaging the gasket, which will also negatively affect the functions of the mixer.
A pin is placed in a special hole (its location is noted in the instruction manual). There may be several or one, depending on the model. Next, the connections are threaded through the o-ring and firmly fixed to the base of the housing.
Types of Kitchen Faucets
Before starting to replace the faucet in the kitchen, the owner must decide on the choice of the device to be installed, because models can differ significantly in:
- design;
- operating principle;
- installation method;
- manufacturing material.
When choosing the “appearance” of the device, the owner must be guided by his own preferences. It will be very nice if the appearance of the mixer is in harmony with the interior of the entire kitchen space.
The first thing you should pay attention to when choosing a device is the installation method. According to this parameter, all kitchen faucets are divided into two types: wall-mounted and table-top. The former are most often used to implement bold design ideas for luxury interiors. The installation of a tabletop kitchen faucet is carried out directly on the sink panel, which is very convenient when operating and maintaining the device.
On this topic:
What material should I use to decorate the ceiling in the kitchen?
Dec 26, 2018
Wall decoration in the kitchen: overview of current options
Dec 25, 2018
BACK FORWARD 1 of 8
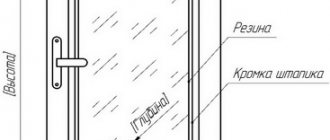
There are two types of faucet attachments to the sink:
- Clamping nut. The inlet part of the mixer body is equipped with a thread, which is installed in the hole provided in the sink. The mixer is secured with a nut. The tightness of the connection is ensured by a rubber gasket.
- Fastening the mixer to the sink with 1 stud using a pressure plate, stud with nut and gasket. This type of fastening is less reliable and is often used in budget plumbing fixtures.
Types of faucets
Today, modern industry offers three types of mixers:
- Valve. The design of this type of faucet involves the presence of two faucet boxes with valves that control the temperature and pressure of the flow. Advantages: availability, wide range of models. The disadvantage is the very short service life of the basic structural elements.
- Single lever. The temperature and water pressure are controlled by changing the position of one lever. Advantages: modern design, ease of operation, variability of choice.
- Contactless. These are the most modern, functional and expensive devices. To turn on the faucet, you just need to bring your hand to the spout. The main disadvantage of contactless models is their very high cost.
A few words about the material from which modern faucets are made. Stainless steel, silumin, brass, bronze and ceramics can be used in their manufacture.
Silumin models show the shortest service life.
When choosing a kitchen faucet, you should pay attention to the design of the spout, which can be high, low or retractable. Low, convenient in the bathroom, but not in the kitchen. It is difficult to place a large saucepan or kettle under such a “spout” of the faucet. Tall, convenient for everyday use, but in case of strong pressure, be prepared for splashes scattered throughout the kitchen space.
Today, the most popular models are faucets with a pull-out spout.
When choosing a faucet for the kitchen, you should pay attention to models whose water jet will precisely hit as close to the center of the sink as possible.
Final installation of the faucet on the sink. Third and important stage
It is much more convenient to work if you install the mixer on the sink before you build it onto the countertop. There are special holes in the sink where hoses are threaded and the faucet is installed. The operation will be easier if it is performed in conjunction with an assistant. A second person is needed to hold the sink while threading the hoses and installing the faucet. This will significantly increase labor productivity.
At the bottom of the sink, we also attach a rubber pressure washer to the liners. This way the case will be provided with maximum protection. Following the rubber pressure washer, a horseshoe-shaped metal washer is also secured. The last step is to install the stud-nut at the bottom of the sink. It is convenient to use an open-end wrench to tighten it, but it is suitable if the sink is not yet secured. If for some reason it is already installed on the countertop (for example, you did not dismantle it because you are only changing the mixer), then use a tubular wrench to secure it.
What to consider before starting installation?
First you need to decide on the installation method: the mixer can be mounted on a countertop, sink body or on a wall. It is necessary to outline in advance the routes for the location of hot and cold water pipes. In this case, the connection points must be accessible in case of subsequent repairs or maintenance. If you plan to install a filter, then the place for its installation must be provided in advance.
Several recommendations for choosing a mixer
The mixer is invariably operated in tandem with the sink, so when choosing a product you need to take into account its size and depth, as well as:
- distance between the wall and the hole for the mixer;
- diameter of the hole for the mixer insert;
- drain location points.
In this case, the faucet must be of sufficient length so that the end of the spout, after installation, falls on the center of the sink or sink.
The length of the spout should be equal to half the width of the sink bowl. The most ideal case is when a stream of water hits the drain directly
The height of the spout should be enough so that you can place a tall pan under the tap. But don’t go to extremes and buy a faucet that is too tall. Otherwise, splashes are created that fly outside the sink.
Another important parameter regarding the geometry of the mixer is the rotation angle. If the sink is close to the wall, then it is enough to install a faucet with a rotation angle of up to 90 degrees. If you use a sink with two bowls, then you need to pay attention to models with a rotation angle of 180-360 degrees.
Variety of styles of plumbing fixtures
Having finished with the technical part, you need to decide on the appearance. Today, the choice of faucet styles is so huge that even the most spoiled owner will be able to find a model to suit his taste. Classic, hi-tech, loft, minimalism, chopped and streamlined shapes, chrome, copper or black - you can choose an option for any kitchen.
At the same time, unfortunately, the rule applies: the more expensive, the better - especially true for plumbing fixtures and faucets in particular. There is a limit to everything, but high-quality plumbing fixtures made in Europe are an order of magnitude more expensive than domestically made products.
Determining the optimal design
When choosing, you need to take into account the design features of the mixers. The most practical models are single-lever ones, in which the flow intensity and temperature can be adjusted using one handle. Models with two valves are less practical, but go well with the classic kitchen interior.
A single lever mixer is the most practical option in the kitchen. With one movement of your hand you can adjust both the jet strength and the water temperature
Manufacturers also produce contactless products that are equipped with a motion sensor. When you raise your hands, the sensor is triggered and the mixer starts dispensing water. For the kitchen, this is also not the most practical option, since you often have to change the temperature and collect water in containers.
Prices for faucets depend on the type of alloy used and the brand of the manufacturer. The cheapest models are made of silumin, have a beautiful appearance, but quickly wear out and become unusable. Silumin and other cheap alloys crumble and crack quite quickly.
The highest quality products are made from brass. A layer of nickel, aluminum or chrome is applied to the surface to give the faucet a beautiful appearance. Chrome plated products are the most wear-resistant.
Image gallery
Photo from
Kitchen valve mixer
Vintage style faucet model
Single lever kitchen faucet
Operating the articulated device
Connection to pipes and preliminary check of operation. Fourth and fifth stages
If the sink has not yet been installed on the countertop, then after completing the above operations it is necessary to do so. Then the last task remains - to correctly connect the mixer connections to the central water supply pipes. According to standard schemes, cold water is supplied from the left pipe, and hot water from the right. However, there are also alternative modifications of water supply systems. In these, cold water is supplied from above, and hot water from below.
The very last stage is testing the assembled and installed mixer. To do this, water is drained. Correct connection and a strong connection is indicated, firstly, by the absence of leaks, and secondly, by the condition of the supply hoses. If they bend in a U shape, then you did everything right. If leaks are detected, this is an indication that there is a weak seal installed somewhere in the system. Troubleshooting is easy: you need to carry out an inspection, find the damaged gasket and replace it.
Selecting mixer hoses
Before removing the faucet in the kitchen, it is necessary to dismantle the hoses supplying hot and cold water to the device. The problem is that during operation, limescale forms on their inner surface, which significantly reduces their flow area, which affects the reduction in water pressure in the mixer.
The supply hose fitting is made of soft non-ferrous metal. Dismantling these elements from the tap is often accompanied by a change in the thread geometry, which subsequently leads to a decrease in the tightness of the connection. That is why, when installing a new device, experts recommend completely replacing the mixer hoses, given that they are supplied as standard on most models. However, their length most often does not exceed 30 cm, which may not be enough to connect the mixer to the water supply system, and the quality of these components, as a rule, leaves much to be desired.
When purchasing new hoses, you should pay attention to the following parameters:
- hose length;
- diameter and type of threaded connection to the water supply system;
- fitting length.
The dimensions of the hose must correspond to the distance between the mixer and the connection point with the water supply system.
You should purchase hoses with different fitting lengths for more convenient assembly of the device.
There are options with two types of threaded parts: “male” and “female”.
The standard nut diameter is ½ inch. To connect to the water supply system, “female” type hoses are most often used.
On this topic:
Glass tables for the kitchen - a modern take on luxury...
Assembling a kitchen set - secrets of craftsmanship
Create home comfort by choosing kitchen curtains
Kitchen faucet: difficult to choose - nice...
BACK FORWARD 1 of 5
Experts recommend purchasing corrugated flexible hoses made of stainless steel. They are more reliable, durable and high cost compared to rubber hoses with metal braid.
In some cases, hoses are not used at all to connect the mixer to the water supply system. Instead, stationary metal-plastic pipes are installed.
To connect them to the mixer, specialized fittings are used.